
Welcome, fellow baking enthusiasts! Are you ready to embark on a delightful journey back in time with a classic? Today, we’re dusting off a cherished family treasure: our 100 Year-Old Fruit Cake Recipe. Don’t let the name intimidate you; while fruit cake often gets a bad rap, this particular rendition is incredibly moist, rich, and surprisingly easy to master, even if you’re new to the kitchen. We’ve broken down every step to make this one of the most easy baking recipes you’ll ever try. Get ready to impress your friends and family with a cake that tastes like pure tradition, packed with all the essential baking tips for beginners you’ll need for success. Let’s create something truly special together!
A Little History About Fruit Cake
Fruit cake has a long and storied history, dating back to ancient Roman times. Over centuries, it evolved from a simple bread with pomegranate seeds to the rich, spiced confection we know today. Often associated with holidays and special occasions, a well-made fruit cake is a symbol of warmth, celebration, and enduring tradition. This particular recipe captures that spirit, offering a taste of history in every bite.
Ingredients You’ll Need
Gathering your ingredients beforehand, often called “mise en place,” is a top baking tip for beginners. It ensures a smooth and stress-free baking process!
| Ingredient | Quantity | Unit |
|---|---|---|
| Mixed Dried Fruit (Raisins, Currants, Glace Cherries, Candied Peel) | 3 | cups |
| Chopped Pecans or Walnuts | 1 | cup |
| All-Purpose Flour | 2 ½ | cups |
| Unsalted Butter (softened) | 1 | cup (2 sticks) |
| Dark Brown Sugar (packed) | 1 | cup |
| Large Eggs | 4 | |
| Molasses (Dark Treacle) | ¼ | cup |
| Orange Zest (from 1 large orange) | 1 | tablespoon |
| Lemon Zest (from 1 large lemon) | 1 | tablespoon |
| Ground Cinnamon | 1 | teaspoon |
| Ground Nutmeg | ½ | teaspoon |
| Ground Cloves | ¼ | teaspoon |
| Baking Powder | 1 | teaspoon |
| Salt | ½ | teaspoon |
| Orange Juice or Brandy/Rum (for feeding, optional) | ¼ – ½ | cup |
Step-by-Step Instructions for Your Fruit Cake Masterpiece
Patience and precision are your best friends when baking. Take your time, read each step carefully, and enjoy the process!
Step 1: Prepare Your Fruits & Nuts (The Flavor Base!)
- In a large bowl, combine your 3 cups of mixed dried fruit and 1 cup of chopped nuts.
- Beginner Tip: To prevent your fruits and nuts from sinking to the bottom of the cake during baking, lightly toss them with 2 tablespoons of the all-purpose flour from your measured quantity. This creates a thin coating that helps them suspend evenly in the batter.
- Set aside.
Step 2: Preheat Oven & Prepare Baking Pan (Crucial for Even Baking!)
- Preheat your oven to 300°F (150°C). Fruit cakes bake at a lower temperature for a longer time to ensure they cook through without drying out or burning.
- Prepare your 9-inch round or square baking pan: Grease the pan thoroughly with butter or baking spray. Then, line the bottom and sides with parchment paper, allowing the paper to extend a couple of inches above the rim of the pan. For fruit cakes, it’s often recommended to double-line the sides with parchment to protect the edges from over-browning during the long bake.
Step 3: Combine Dry Ingredients (Except for that reserved flour!)
- In a medium bowl, whisk together the remaining all-purpose flour (after using 2 tablespoons for the fruit), ground cinnamon, ground nutmeg, ground cloves, baking powder, and salt.
- Beginner Tip: Sifting your dry ingredients (or at least whisking them well) helps to break up any lumps and ensures they are evenly distributed, leading to a smoother, more consistent batter.
- Set aside.
Step 4: Cream Butter and Sugar (The Foundation of a Moist Cake!)
- In a large mixing bowl, using an electric mixer (handheld or stand mixer with paddle attachment), beat the softened 1 cup of unsalted butter and 1 cup of dark brown sugar together on medium speed.
- Beginner Tip: Make sure your butter is truly softened to room temperature. It should be pliable but not melted. Creaming means beating until the mixture is light, fluffy, and pale in color. This incorporates air, which contributes to the cake’s texture. This usually takes 3-5 minutes.
Step 5: Incorporate Eggs & Wet Flavorings
- Add the 4 large eggs one at a time to the creamed butter and sugar mixture.
- Beginner Tip: Beat well after each egg addition, scraping down the sides of the bowl as needed. This ensures each egg is fully incorporated and prevents the mixture from curdling. If it looks a little curdled, don’t worry, the flour will help bring it back together.
- Stir in the ¼ cup of molasses, 1 tablespoon of orange zest, and 1 tablespoon of lemon zest. Mix until just combined.
Step 6: Combine Wet and Dry Ingredients (Don’t Overmix!)
- Gradually add the dry ingredient mixture to the wet mixture, alternating with a small amount of liquid (if you’re adding any extra liquid like a tablespoon of orange juice here, otherwise just alternate with dry).
- Beginner Tip: Mix on low speed until just combined. Overmixing the batter once the flour is added can develop the gluten too much, resulting in a tough, dry cake. Mix until no streaks of flour remain, but stop immediately once combined.
Step 7: Fold in the Fruits and Nuts (The Grand Finale!)
- Add the flour-coated dried fruits and nuts to the batter.
- Beginner Tip: Using a spatula, gently fold them into the batter until they are evenly distributed. “Folding” means using a gentle motion to incorporate ingredients without deflating the air you’ve already beaten into the batter.
Step 8: Bake Your Fruit Cake
- Pour the batter into your prepared baking pan, spreading it evenly.
- Bake for 2 to 2 ½ hours, or until a wooden skewer or toothpick inserted into the center of the cake comes out clean.
- Beginner Tip: Fruit cakes bake for a long time. Resist the urge to open the oven door frequently, especially in the first hour, as this can cause the cake to sink. If the top starts browning too quickly, you can loosely tent it with aluminum foil.
Step 9: Cool & “Feed” Your Cake (The Secret to Longevity & Flavor!)
- Once baked, remove the cake from the oven and let it cool in the pan for 30 minutes.
- Beginner Tip: While still warm, you can begin the optional “feeding” process. Using a skewer or toothpick, poke small holes all over the top of the cake.
- Brush or spoon about 2-3 tablespoons of orange juice (for an alcohol-free version) or brandy/rum over the top of the cake. The warm cake will absorb the liquid beautifully, adding moisture and flavor.
- After 30 minutes, carefully invert the cake onto a wire rack, remove the parchment paper, and then flip it right-side up to cool completely.
- Once completely cool, wrap the cake tightly in plastic wrap, then again in aluminum foil. Store in an airtight container.
- For best results and traditional flavor: “Feed” the cake with another tablespoon or two of your chosen liquid every few days or once a week for 2-4 weeks before serving. This process is what gives fruit cake its incredible moisture and deep, complex flavors over time. Store it in a cool, dark place (not the fridge, unless your home is very warm).
Tips & Tricks for Fruit Cake Success
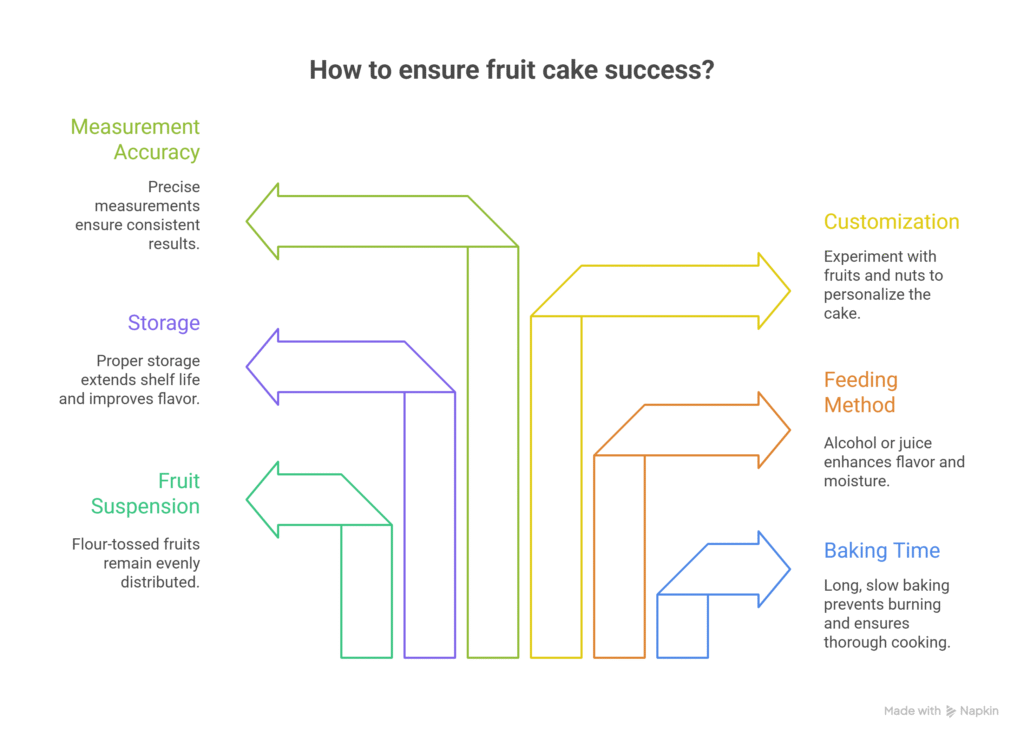
Here are some extra nuggets of wisdom to ensure your fruit cake is nothing short of spectacular:
- Room Temperature Ingredients are Key: This is a golden rule for many baking recipes, especially cakes. Room temperature butter creams better, and room temperature eggs emulsify more easily into the batter, resulting in a smoother, more uniform texture.
- Don’t Rush the Baking: Fruit cakes require a long, slow bake. The low temperature prevents the exterior from burning while allowing the dense interior to cook thoroughly. Patience is truly a virtue here!
- Preventing Sunken Fruit: As mentioned in the steps, lightly tossing your dried fruits and nuts with a tablespoon or two of flour before adding them to the batter is a classic trick to help them suspend evenly rather than sinking to the bottom.
- The Art of “Feeding”: If you’re using alcohol, feeding your fruit cake over several weeks transforms it. The alcohol acts as a preservative and infuses the cake with incredible depth of flavor and moisture. For an alcohol-free version, orange juice or apple juice works wonderfully.
- Storage Secrets: Fruit cakes improve with age! Properly wrapped and stored, this cake can last for weeks, even months, especially if “fed.” Store it in an airtight container in a cool, dark place.
- Customizing Your Fruits & Nuts: Feel free to experiment! While this recipe uses a traditional mix, you can swap out fruits (dried cranberries, figs, apricots) and nuts (almonds, cashews) to suit your taste. Just keep the total quantity the same.
- Accuracy in Measuring: For consistent results, especially with flour, measure by weight if you have a kitchen scale. If using cups, spoon the flour into the measuring cup and level it off with a straight edge rather than scooping directly, which can compact the flour.
Essential Baking Tools for This Recipe
Having the right tools makes all the difference in baking. Here are a few essentials you’ll want on hand:
- Mixing Bowl
- Whisk
- Baking Pan (9-inch round or square recommended)
- Measuring Cups
- Spatula
- Electric Mixer (handheld or stand mixer)
- Parchment Paper
- Wire Cooling Rack
Nutrition Information (Estimated per serving, based on 16 servings)
Please note, these are approximate values and can vary based on specific ingredients and portion sizes.
| Nutrient | Amount |
|---|---|
| Calories | 420 kcal |
| Carbohydrates | 65 g |
| Protein | 5 g |
| Fat | 18 g |
| Fiber | 4 g |
| Sugar | 48 g |
Frequently Asked Questions (FAQs)
Q1: Can I make this fruit cake completely alcohol-free?
Absolutely! For an alcohol-free version, substitute the brandy or rum with orange juice, apple juice, or even strong brewed tea for “feeding” the cake. The flavor will still be wonderfully rich and moist.
Q2: How long does this 100-year-old fruit cake recipe last?
When properly wrapped and stored in an airtight container in a cool, dark place (not the refrigerator unless your home is very warm), this fruit cake can last for several weeks, even up to 2-3 months, especially if regularly “fed” with alcohol. An alcohol-free cake will last 2-3 weeks.
Q3: Why is my fruit cake dry? What did I do wrong?
A dry fruit cake is usually a result of overbaking or not having enough moisture in the initial batter. Ensure your oven temperature is accurate (an oven thermometer can help!), and always check for doneness with a skewer. 100 Year-Old Fruit Cake Recipe the cake regularly is also key to maintaining its moisture over time.
Q4: Can I use different types of dried fruits and nuts?
Yes, absolutely! Feel free to customize your fruit and nut mix. Good alternatives include dried cranberries, apricots, figs, dates, almonds, or even pistachios. Just ensure the total quantity of fruits and nuts remains the same (3 cups fruit, 1 cup nuts) to maintain the cake’s balance.
Q5: How do I prevent the fruits from sinking to the bottom of the cake?
This is a common issue! The best trick is to lightly toss your dried fruits and nuts with a tablespoon or two of the all-purpose flour (from your measured amount) before folding them into the batter. This light coating helps them stay suspended evenly throughout the cake as it bakes.
Q6: Can I freeze this fruit cake?
Yes, fruit cake freezes beautifully! Once completely cooled, wrap the cake tightly in plastic wrap, then in aluminum foil, and place it in a freezer-safe bag or container. It can be frozen for up to 6-12 months. Thaw overnight in the refrigerator before unwrapping and serving.
Conclusion: A Taste of History, Made by You!
And there you have it! You’ve successfully baked a piece of history with our 100 Year-Old Fruit Cake Recipe. This isn’t just a cake; it’s a labor of love, a connection to the past, and a delightful treat that will surely become a cherished part of your own baking traditions. Don’t be afraid to experiment with your favorite dried fruits and nuts, and remember that the “feeding” process truly brings out its best. We hope these baking tips for beginners have made your experience enjoyable and confidence-building. Share your creation with loved ones, savor each rich bite, and be proud of the delicious legacy you’ve brought to life. Happy baking!