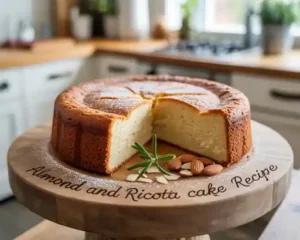
Welcome, fellow baking enthusiasts (and future enthusiasts)! Are you ready to dive into the delightful world of baking with an utterly irresistible dessert that’s surprisingly simple to master? This Almond And Ricotta Cake Recipe is a true gem – light, moist, and bursting with a delicate almond flavor complemented by the creamy richness of ricotta. Forget complex techniques; this is one of those easy baking recipes that makes you look like a pro with minimal effort. We’ll walk you through every single step, offering invaluable baking tips for beginners to ensure your first (or hundredth!) cake turns out perfect. Get ready to impress your family and friends with a slice of pure heaven!
Gathering your ingredients beforehand is a fantastic habit for any baker, especially beginners. It ensures you have everything on hand and makes the baking process smoother. Here’s what you’ll need for this delicious cake:
For the Cake
| Ingredient | Quantity | Unit |
|---|---|---|
| All-Purpose Flour | 1 ½ | cups |
| Almond Flour (or finely ground almonds) | ½ | cup |
| Baking Powder | 2 | teaspoons |
| Salt | ¼ | teaspoon |
| Unsalted Butter (softened) | ½ | cup (1 stick) |
| Granulated Sugar | 1 | cup |
| Large Eggs | 3 | |
| Ricotta Cheese (whole milk, drained if very wet) | 15 | ounces |
| Vanilla Extract | 1 | teaspoon |
| Almond Extract | ½ | teaspoon |
| Lemon Zest (from 1 lemon) | 1 | tablespoon |
For Garnish (Optional)
| Ingredient | Quantity | Unit |
|---|---|---|
| Powdered Sugar | As needed | |
| Fresh Berries (e.g., raspberries, blueberries) | As needed | |
| Toasted Sliced Almonds | As needed |
Baking Instructions: A Step-by-Step Guide for Beginners
Don’t be intimidated! Baking is a science, but it’s also a lot of fun, especially when you follow clear instructions. We’ll break down each step so you can confidently bake your delicious Almond and Ricotta Cake.
Step 1: Get Prepped and Preheat!
- Preheat Oven: Turn your oven to 350°F (175°C). This is crucial for even baking. If you put your cake into a cold oven, it won’t rise properly.
- Prepare Baking Pan: Grease and flour a 9-inch springform pan or a standard 9-inch round cake pan.
- Beginner Tip: To grease, rub butter or spray cooking spray generously all over the inside of the pan. Then, add a spoonful of flour, tilt the pan, and tap it all around until the flour coats the butter. Tap out any excess flour. This prevents your cake from sticking! For a springform pan, you can also line the bottom with parchment paper after greasing for extra insurance.
Step 2: Combine the Dry Ingredients
- Whisk Dry Ingredients: In a medium-sized mixing bowl, combine the all-purpose flour, almond flour, baking powder, and salt. Use a whisk to gently mix them together for about 30 seconds.
- Why this step is important: Whisking ensures that the baking powder and salt are evenly distributed throughout the flour. This means your cake will rise uniformly and have consistent flavor, rather than having pockets of concentrated salt or leavening.
- Common Mistake: Not mixing enough, which can lead to uneven rising.
- Set Aside: Once mixed, set this bowl aside for later.
Step 3: Cream the Butter and Sugar (The Foundation of Flavor and Texture)
- Cream Butter and Sugar: In a large mixing bowl (or the bowl of a stand mixer fitted with the paddle attachment), add the softened unsalted butter and granulated sugar. Beat them together on medium speed until the mixture is light and fluffy, and pale yellow. This usually takes about 3-5 minutes.
- Beginner Tip: Softened butter should be pliable enough to leave an indentation when gently pressed, but not melted. If it’s too cold, it won’t cream properly. If it’s melted, your cake will be dense. This “creaming” process incorporates air into the mixture, which is vital for a light and tender cake texture.
- Common Mistake: Not creaming long enough. This step is key for the cake’s texture!
- Scrape Down the Bowl: Stop the mixer and use a spatula to scrape down the sides and bottom of the bowl. This ensures everything is evenly mixed.
Step 4: Incorporate Wet Ingredients
- Add Eggs One at a Time: Add the eggs one at a time to the butter-sugar mixture. Beat well after each addition, scraping down the bowl as needed.
- Why one at a time? Adding eggs gradually allows them to emulsify (combine smoothly) with the fat, preventing the mixture from curdling. It creates a stronger, more stable batter.
- Add Ricotta and Extracts: Once the eggs are fully incorporated, add the ricotta cheese, vanilla extract, almond extract, and lemon zest. Beat on low speed until just combined.
- Ricotta Tip: If your ricotta looks very watery, drain it in a fine-mesh sieve lined with cheesecloth for 30 minutes to an hour beforehand. Excess moisture can make your cake gummy.
- Lemon Zest Power: Don’t skip the lemon zest! It adds a bright, fresh note that perfectly balances the richness of the ricotta and the sweetness of the cake.
Step 5: Combine Wet and Dry Mixtures
- Gradually Add Dry Ingredients: With the mixer on low speed, gradually add the reserved dry ingredients to the wet mixture, a third at a time. Mix only until just combined and no streaks of flour remain.
- Crucial Beginner Tip: Do NOT overmix! Overmixing develops the gluten in the flour too much, leading to a tough, dry cake. The moment you see no more dry flour, stop the mixer. A few small lumps are perfectly fine.
- Final Scrape: Give the batter one final gentle scrape with your spatula to ensure everything is incorporated from the bottom and sides.
Step 6: Bake Your Masterpiece!
- Pour Batter: Pour the cake batter into your prepared 9-inch pan and spread it evenly with a spatula.
- Bake: Bake in the preheated oven for 45-55 minutes.
- How to Check for Doneness: The cake is done when the top is golden brown, the edges begin to pull away slightly from the pan, and a wooden skewer or toothpick inserted into the center comes out clean or with a few moist crumbs attached (not wet batter).
- Oven Variations: Ovens vary, so start checking at 45 minutes. If the top is browning too quickly, you can loosely tent it with aluminum foil for the last 10-15 minutes of baking.
- Cool in Pan: Once baked, remove the cake from the oven and let it cool in the pan on a wire rack for 15-20 minutes.
- Why cool in the pan first? Hot cakes are delicate and can break easily. Cooling in the pan allows the cake to firm up and prevents it from collapsing.
- Remove from Pan: After cooling slightly, run a thin knife around the edge of the pan (if not a springform) to loosen, then invert the cake onto the wire rack to cool completely. If using a springform, simply release the sides.
Step 7: Garnish and Serve!
- Cool Completely: Ensure the cake is completely cool before dusting with powdered sugar or adding any other garnishes. This usually takes at least 1-2 hours.
- Why cool completely? If you dust with powdered sugar while warm, it will melt and disappear.
- Garnish and Serve: Once cool, dust generously with powdered sugar. You can also add fresh berries or toasted sliced almonds for an extra touch of elegance and flavor.
Pro Tips & Tricks for a Perfect Almond Ricotta Cake
Even with an “easy” recipe, a few extra pointers can elevate your baking from good to absolutely amazing. Here are some actionable **baking tips for beginners** to ensure your Almond Ricotta Cake is a showstopper every time:
- Room Temperature Ingredients are Key: This is arguably the most important tip! Ensure your butter and eggs are at room temperature. Softened butter creams beautifully with sugar, incorporating air for a light texture. Room temperature eggs emulsify better into the batter, preventing curdling and creating a smoother, more uniform cake.
- Measure Accurately: Baking is a science. Use proper measuring cups for dry ingredients (levelled off with a straight edge) and liquid measuring cups for wet ingredients. A kitchen scale is even more precise for flour and sugar if you want to get serious!
- Don’t Overmix the Batter: Once you add the flour, mix only until just combined. Overmixing develops gluten, which can lead to a tough, dry cake. A few small lumps are perfectly fine and often preferred.
- Drain Your Ricotta: If your ricotta cheese seems very wet, place it in a fine-mesh sieve lined with cheesecloth or paper towels for 30 minutes to an hour before using. Excess moisture can make your cake dense or gummy.
- Test for Doneness Properly: Don’t just rely on the timer. Insert a wooden skewer or toothpick into the center of the cake. If it comes out clean or with a few moist crumbs, it’s done. If it’s wet, continue baking for a few more minutes.
- Cooling is Crucial: Allow the cake to cool in the pan for the recommended time before transferring it to a wire rack. This allows the cake to set and prevents it from breaking or crumbling. Always cool completely before frosting or dusting with powdered sugar.
- Storage: Store leftover cake tightly covered at room temperature for up to 2 days, or in the refrigerator for up to 4-5 days. It’s also suitable for freezing!
Essential Baking Tools for Your Kitchen
Having the right tools makes baking much easier and more enjoyable. Here are some basics that will serve you well for this recipe and many others:
- Mixing Bowls (various sizes)
- Whisk
- 9-inch Springform Pan or Round Cake Pan
- Measuring Cups and Spoons
- Rubber Spatula
- Electric Mixer (handheld or stand mixer)
- Wire Cooling Rack
- Parchment Paper (optional, but helpful)
Nutrition Information (Per Serving, Estimated)
Please note: These are estimated values and can vary based on specific ingredient brands and preparation. This recipe yields approximately 12 servings.
| Nutrient | Value |
|---|---|
| Calories | 350-380 kcal |
| Carbohydrates | 40-45 g |
| Protein | 9-11 g |
| Fat | 18-22 g |
| Fiber | 1-2 g |
| Sugar | 25-30 g |
Frequently Asked Questions (FAQs)
We know you might have some questions, especially if you’re new to baking. Here are answers to common queries:
Can I substitute almond flour with all-purpose flour?
While you can substitute, we don’t recommend replacing all the almond flour with all-purpose flour as it will change the cake’s texture and flavor significantly. Almond flour contributes to the cake’s moisture, delicate crumb, and distinct nutty taste. If you must, you can use an equal amount of all-purpose flour, but be aware the cake will be denser and less “almondy.”
My ricotta cheese is very wet. Should I drain it?
Yes, absolutely! If your ricotta cheese is watery, it’s a good idea to drain it. Place it in a fine-mesh sieve lined with cheesecloth or a few layers of paper towels over a bowl. Let it sit for at least 30 minutes, or even an hour, in the refrigerator. This removes excess moisture that could make your cake gummy or heavy.
How can I tell if my butter is at “room temperature”?
Room temperature butter should be cool to the touch but pliable. When you gently press it with your finger, it should leave a slight indentation without your finger sinking all the way through or the butter feeling greasy. If it’s too hard, cut it into smaller pieces and let it sit for another 15-30 minutes. If it’s too soft or melted, pop it in the fridge for 10-15 minutes to firm up slightly.
My cake top is browning too quickly, but the inside isn’t cooked. What should I do?
This is a common oven issue! Loosely tent a piece of aluminum foil over the top of the cake. This will shield the top from direct heat, allowing the inside to cook through without the crust burning. Continue baking as directed, checking for doneness with a toothpick.
How should I store leftover Almond and Ricotta Cake?
Once completely cooled, store the cake tightly covered with plastic wrap or in an airtight container at room temperature for up to 2 days. For longer storage, you can keep it in the refrigerator for up to 4-5 days. This cake also freezes beautifully! Wrap individual slices or the whole cake (if unfrosted) tightly in plastic wrap, then aluminum foil, and freeze for up to 2-3 months. Thaw overnight in the refrigerator.
Can I make this recipe gluten-free?
To make this cake gluten-free, you would need to substitute the all-purpose flour with a gluten-free all-purpose baking blend (one that contains xanthan gum) in equal measure. The almond flour is naturally gluten-free. Always double-check your specific blend, as some may require slight adjustments to liquid or baking time.
Time to Enjoy Your Homemade Masterpiece!
And there you have it! You’ve successfully baked a beautiful, moist, and incredibly flavorful Almond And Ricotta Cake Recipe. Whether you’re a seasoned baker or just starting your journey, this recipe proves that delicious homemade treats are well within your reach. The delicate almond notes, combined with the creamy ricotta and a hint of lemon, create a truly special dessert perfect for any occasion – from a casual coffee break to a festive gathering.
Don’t be afraid to experiment with garnishes or even a light glaze if you’re feeling adventurous. Most importantly, savor every single bite of your hard work. We hope this detailed guide has given you the confidence and inspiration to keep baking. Happy baking, and enjoy your delightful cake!
“`