
Welcome, fellow baking enthusiasts and curious beginners! Are you ready to fill your home with the most comforting, spiced aroma imaginable? Today, we’re diving into the wonderful world of the Amish Apple Cake Recipe. This isn’t just any cake; it’s a moist, tender, apple-packed delight that tastes like a warm hug on a chilly day. Perfect for dessert, breakfast, or an afternoon treat, this recipe is one of those truly easy baking recipes that delivers incredible flavor without fuss.
If you’re new to the kitchen, don’t fret! We’ve crafted this guide specifically with baking tips for beginners in mind. We’ll walk you through every step, demystify common baking terms, and help you avoid typical pitfalls. Get ready to impress yourself and everyone you share this delicious cake with. Let’s get baking!
Ingredients List
Gather your fresh ingredients! Using quality produce and pantry staples will make all the difference in the final taste of your Amish Apple Cake.
| Ingredient | Quantity |
|---|---|
| All-Purpose Flour | 2 ½ cups |
| Granulated Sugar | 1 ½ cups |
| Baking Soda | 1 teaspoon |
| Ground Cinnamon | 1 teaspoon |
| Ground Nutmeg | ½ teaspoon |
| Salt | ½ teaspoon |
| Large Eggs | 2 |
| Vegetable Oil (or other neutral oil) | ½ cup |
| Vanilla Extract | 1 teaspoon |
| Apples (firm, tart like Granny Smith or Honeycrisp), peeled, cored, and finely diced | 4 cups (about 4-5 medium apples) |
| Optional: Chopped Walnuts or Pecans | ½ cup |
Step-by-Step Instructions: Your Path to Perfect Apple Cake
Follow these detailed steps carefully for a truly delightful Amish Apple Cake. Remember, baking is a science, so precision helps!
Step 1: Prepare Your Oven and Pan
- Preheat your oven: Set your oven to 350°F (175°C). This ensures the oven is at the correct temperature when your cake goes in, which is crucial for even baking.
- Prepare your baking pan: Lightly grease and flour a 9×13 inch baking pan. You can also line it with parchment paper for easier removal. Beginner Tip: To grease and flour, first wipe the inside of the pan with a thin layer of butter or non-stick spray, then sprinkle a tablespoon or two of flour and tilt the pan to coat all surfaces. Tap out any excess flour.
Step 2: Prepare the Apples
- Peel, core, and dice: Take your apples, peel them using a vegetable peeler, then core them. Dice them into small, uniform pieces (about ¼ to ½ inch). Aim for consistency so they cook evenly.
- Why dice finely? Smaller pieces distribute better throughout the batter and soften more consistently during baking.
Step 3: Combine Dry Ingredients
- In a large mixing bowl: Whisk together the all-purpose flour, granulated sugar, baking soda, ground cinnamon, ground nutmeg, and salt.
- Beginner Tip: Whisking dry ingredients together ensures they are evenly distributed, so you don’t end up with pockets of salt or baking soda in your cake. This is especially important for baking soda, which needs to be spread throughout to react properly.
Step 4: Combine Wet Ingredients
- In a separate medium bowl: Lightly beat the 2 large eggs. Then, add the ½ cup vegetable oil and 1 teaspoon vanilla extract. Whisk until just combined.
- Why separate bowls? Mixing wet and dry ingredients separately helps prevent overmixing the batter once combined, which can lead to a tough cake.
Step 5: Combine Wet and Dry Mixtures
- Pour the wet ingredients into the dry ingredients.
- Mix gently: Using a spatula or wooden spoon, mix until just combined. Do not overmix! A few lumps are perfectly fine and even desirable.
- Common Mistake & Tip: Overmixing develops the gluten in the flour too much, resulting in a dense, tough, or chewy cake instead of a light and tender one. Stop mixing as soon as you no longer see streaks of dry flour.
Step 6: Fold in the Apples (and Optional Nuts)
- Add the diced apples: Gently fold the 4 cups of diced apples into the batter. Make sure they are evenly distributed.
- Optional additions: If you’re using ½ cup chopped walnuts or pecans, fold them in now as well.
- Beginner Tip: Some bakers like to toss the apples lightly in a tablespoon of flour before adding them to the batter. This can help prevent the apples from sinking to the bottom of the cake, especially if they are very juicy.
Step 7: Bake Your Cake
- Pour batter into the prepared pan: Spread the batter evenly in your greased and floured 9×13 inch baking pan.
- Bake: Place the pan in your preheated 350°F (175°C) oven. Bake for 40-50 minutes.
- How to check for doneness: The cake is done when a wooden skewer or toothpick inserted into the center comes out clean or with a few moist crumbs attached (no wet batter). The top should be golden brown and spring back when lightly touched.
- Common Mistake & Tip: Underbaking vs. Overbaking. Amish Apple Cake Recipe An underbaked cake will be gooey in the middle. An overbaked cake will be dry and crumbly. Start checking at 40 minutes and add more time in 5-minute increments if needed. Every oven is different!
Step 8: Cool and Serve
- Cool in the pan: Once baked, remove the cake from the oven and let it cool in the pan on a wire rack for at least 15-20 minutes. This allows the cake to set and firm up.
- Slice and enjoy: Slice into squares and serve warm or at room temperature. This cake is delicious on its own, or you can serve it with a dollop of whipped cream, a scoop of vanilla ice cream, or a simple dusting of powdered sugar.
- Alternative: Simple Glaze. For an extra touch, whisk together 1 cup powdered sugar with 2-3 tablespoons milk (or apple cider for more apple flavor) and ½ teaspoon vanilla extract until smooth. Drizzle over the cooled cake.
Tips & Tricks for Amish Apple Cake Success
Elevate your baking game with these simple yet effective tips:
- Room Temperature Eggs: Eggs at room temperature emulsify better with other ingredients, creating a smoother, more uniform batter and a lighter cake texture. If you forget, place them in a bowl of warm (not hot!) water for 5-10 minutes.
- Measure Flour Correctly: Don’t scoop flour directly from the bag with your measuring cup! This compacts it and you’ll end up with too much. Instead, fluff the flour with a spoon, then spoon it into your measuring cup and level off the top with a straight edge (like a knife or the back of a spoon). This is called the “spoon and level” method.
- Choose the Right Apples: Firm, slightly tart apples like Granny Smith, Honeycrisp, or Fuji work best. They hold their shape during baking and provide a lovely contrast to the cake’s sweetness. Softer apples can turn to mush.
- Don’t Overmix: We can’t stress this enough! Mix just until the ingredients are combined. Overmixing develops gluten, leading to a tough, dry cake.
- Know Your Oven: Oven temperatures can vary. If your cakes often bake too fast or too slow, consider using an oven thermometer to check its accuracy.
- Storage: Store leftover cake at room temperature, covered tightly, for up to 3 days, or in the refrigerator for up to 5 days. It also freezes well for up to 3 months; wrap individual slices tightly in plastic wrap and then foil.
Essential Baking Tools
Having the right tools makes baking a joy. Here are some essentials for this Amish Apple Cake Recipe:
- Mixing Bowls (at least two, one large, one medium)
- Whisk (for dry ingredients and wet ingredients)
- 9×13 Inch Baking Pan
- Measuring Cups and Measuring Spoons
- Rubber Spatula (for folding and scraping)
- Vegetable Peeler and Knife (for apples)
- Wire Rack (for cooling)
Nutrition Information (Estimated per serving)
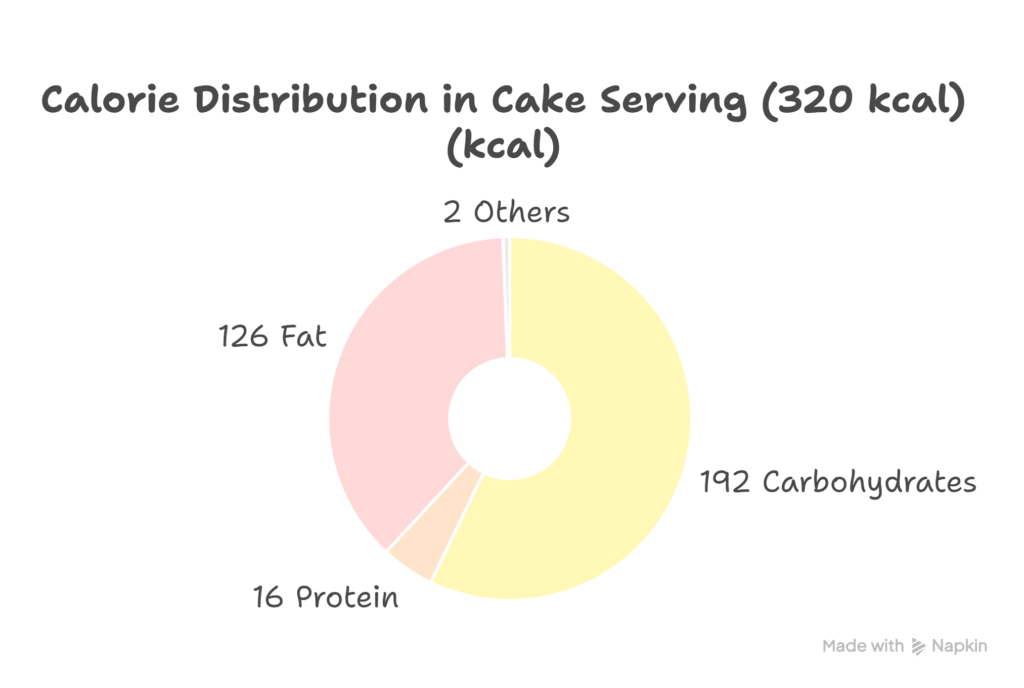
This information is an estimate based on 16 servings from a 9×13 inch cake. Actual values may vary depending on ingredients and portion size.
| Nutrient | Amount |
|---|---|
| Calories | 320 kcal |
| Carbohydrates | 48g |
| Protein | 4g |
| Fat | 14g |
| Fiber | 2g |
| Sugar | 32g |
Frequently Asked Questions for Beginner Bakers
Here are some common questions beginners might have about this recipe:
- What kind of apples are best for this cake?For best results, use firm, slightly tart apples that hold their shape well when baked. Granny Smith, Honeycrisp, Fuji, or Braeburn are excellent choices. Avoid very soft or mealy apples, as they can turn mushy in the cake.
- Can I use butter instead of oil?While some apple cakes use butter, this traditional Amish recipe often calls for oil, which contributes to its incredibly moist and tender crumb. If you substitute butter, use melted butter, but be aware that the texture might be slightly different – perhaps a bit denser and less uniformly moist. For your first attempt, stick with oil!
- How do I prevent the apples from sinking to the bottom of the cake?To help prevent sinking, you can lightly toss the diced apples with a tablespoon or two of the flour from the recipe before folding them into the batter. This creates a thin coating that helps them suspend in the batter during baking.
- My cake turned out dry/dense. What went wrong?A dry cake is often a sign of overbaking, while a dense cake can be due to overmixing the batter. Ensure you’re measuring your flour correctly (spoon and level method) and mix only until just combined. Use an oven thermometer to verify your oven’s temperature.
- Can I add other spices or ingredients?Absolutely! Feel free to experiment. A pinch of ground cloves or allspice can complement the cinnamon and nutmeg beautifully. Raisins or dried cranberries can also be folded in with the apples for extra texture and flavor. Just don’t go overboard, especially on your first try!
Conclusion: Enjoy Your Homemade Amish Apple Cake!
And there you have it! You’ve just created a truly delicious and comforting Amish Apple Cake. We hope this detailed, beginner-friendly guide made your baking experience enjoyable and successful. There’s nothing quite like the pride of pulling a homemade cake out of the oven, especially one that smells this good!
Don’t be afraid to experiment a little on your next batch, or simply enjoy this classic just as it is. Share your creation with loved ones, or savor a slice all to yourself with a cup of coffee. Happy baking, and we look forward to seeing you back for more easy baking recipes soon!