Are you ready to embark on a delightful baking adventure? If the idea of baking bread from scratch feels a little intimidating, you’ve come to the perfect place! This Baby Bread Recipe is specifically designed with aspiring bakers in mind. It’s one of those wonderfully easy baking recipes that builds confidence, step by step, resulting in perfectly soft, fluffy, and utterly delicious small loaves or rolls. Forget complicated techniques; we’re breaking down every single process with clear baking tips for beginners to ensure your success. Imagine the aroma filling your kitchen that’s the magic we’re about to create together!
Whether you’re looking for a simple side for dinner, a sweet treat for breakfast, or just want to experience the pure joy of homemade bread, this recipe is your starting point. We’ll cover everything from activating your yeast to achieving that perfect golden crust, explaining common pitfalls and how to avoid them. Get ready to impress yourself and your loved ones with your newfound baking skills!
Ingredients: What You’ll Need for Your Baby Bread
Gathering your ingredients is the first step to success. Make sure everything is measured accurately before you start!
| Ingredient | Quantity | Unit |
|---|---|---|
| All-Purpose Flour | 3 | cups |
| Active Dry Yeast | 2.25 | teaspoons |
| Granulated Sugar | 2 | tablespoons |
| Salt | 1 | teaspoon |
| Warm Water (105-115°F / 40-46°C) | 1 | cup |
| Whole Milk (or 2%), warmed | 1/4 | cup |
| Unsalted Butter, melted | 2 | tablespoons |
| Vegetable Oil (for greasing bowl) | 1 | teaspoon |
Step-by-Step Instructions: Baking Your Baby Bread
Follow these detailed steps carefully, and don’t be afraid to get your hands a little floury!
-
Activate Your Yeast (The Magic Begins!)
In a large mixing bowl, combine the warm water (make sure it’s between 105-115°F / 40-46°C – too hot will kill the yeast, too cold won’t activate it!), granulated sugar, and active dry yeast. Give it a gentle stir. Let it sit for 5-10 minutes. You’ll know your yeast is alive and well when it becomes foamy and bubbly on top – this is called “proofing.” Beginner Tip: If your yeast doesn’t foam, your water might have been the wrong temperature, or your yeast might be old. It’s best to start over with fresh yeast and carefully check your water temperature.
-
Add the Liquids
Once your yeast is active, add the warmed milk and melted butter to the yeast mixture. Stir until everything is well combined. The warmth of the milk and butter will help keep the yeast happy.
-
Combine Dry Ingredients
In a separate medium bowl, whisk together the all-purpose flour and salt. Whisking ensures the salt is evenly distributed throughout the flour, which is important for flavor and yeast activity.
-
Mix Wet and Dry
Gradually add the dry flour mixture to the wet yeast mixture, about a cup at a time. Stir with a sturdy spoon or spatula until a shaggy, somewhat sticky dough forms. Don’t worry if it looks messy at this stage; it will come together!
-
Knead the Dough (The Arm Workout!)
Turn the dough out onto a lightly floured surface. Now comes the kneading! Knead for 8-10 minutes by hand (or 5-7 minutes with a stand mixer fitted with a dough hook). To knead, push the dough away from you with the heels of your hands, fold it back over itself, give it a quarter turn, and repeat. Beginner Tip: The dough will be sticky at first, but resist the urge to add too much extra flour, as this can make your bread dry. Instead, lightly flour your hands and the work surface as needed. You’re looking for a dough that becomes smooth, elastic, and less sticky. When you can stretch a small piece of dough thinly enough to see light through it without tearing (the “windowpane test”), it’s ready!
-
First Rise (Proofing for Flavor)
Lightly grease a large clean bowl with about a teaspoon of vegetable oil. Place the kneaded dough in the bowl, turning it once to coat the top with oil. Cover the bowl tightly with plastic wrap or a clean kitchen towel. Place it in a warm, draft-free spot. An oven with just the light on (not preheated!) can be a perfect warm spot. Let the dough rise for 1 to 1.5 hours, or until it has doubled in size. Beginner Tip: Patience is key here! Don’t rush this step; proper rising develops flavor and texture.
-
Punch Down and Shape
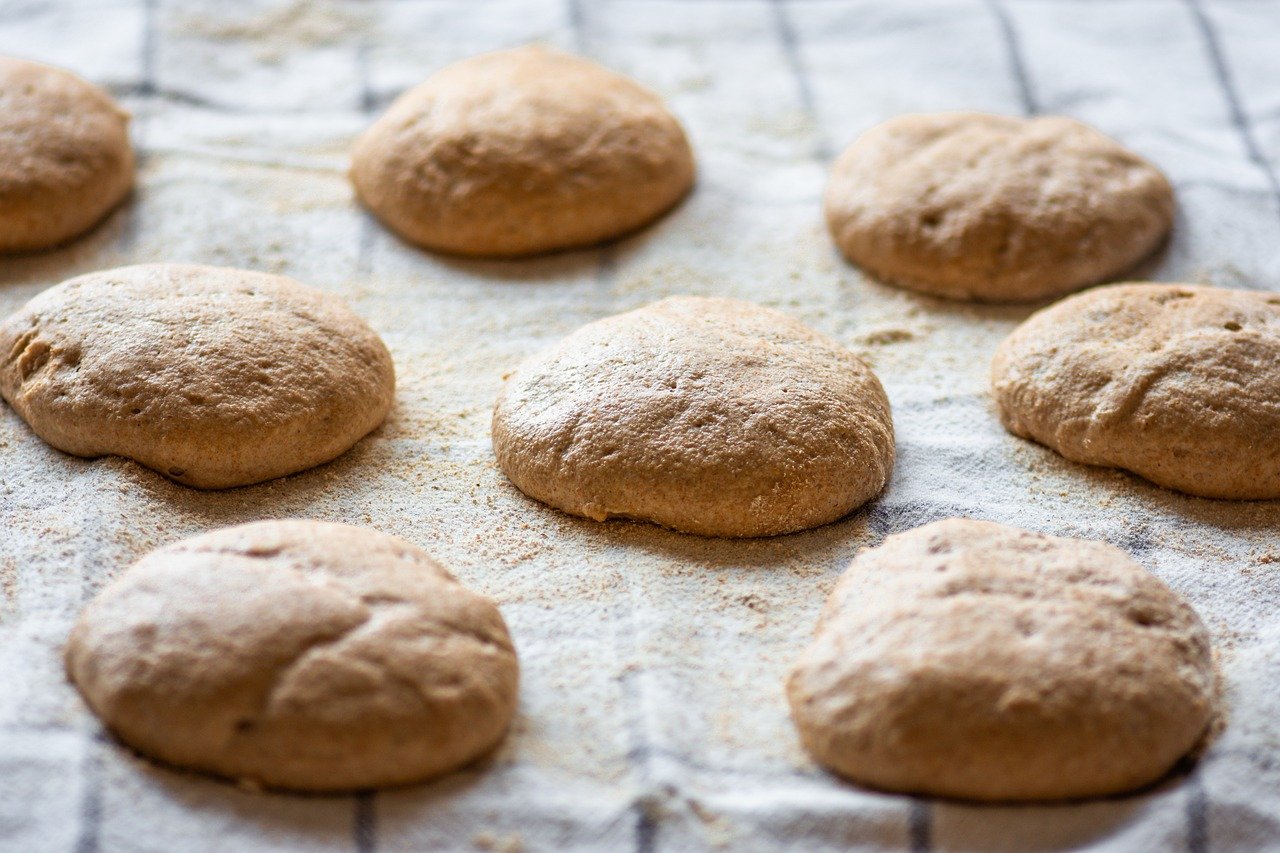
Gently “punch down” the risen dough to release the air. This isn’t aggressive; just a gentle push with your fist in the center. Turn the dough out onto a lightly floured surface. Divide the dough into 6-8 equal pieces for small rolls or two pieces for two small loaves. Shape each piece into a smooth ball or an oblong loaf. Place the shaped dough pieces onto a lightly greased baking sheet or into small loaf pans.
-
Second Rise (Final Proof)
Cover the shaped dough loosely with plastic wrap or a kitchen towel. Let it rise again in a warm, draft-free spot for another 30-45 minutes, or until it has almost doubled in size and looks puffy. This is crucial for a light, airy texture.
-
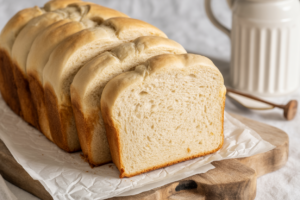
Bake Your Baby Bread
While the dough is on its second rise, preheat your oven to 375°F (190°C). Once preheated, place the baking sheet or loaf pans into the oven. Bake for 15-20 minutes for rolls, or 20-25 minutes for small loaves, or until the tops are golden brown and they sound hollow when tapped on the bottom. For ultimate certainty, an internal temperature of 200-210°F (93-99°C) indicates doneness.
-
Cool and Enjoy!
Once baked, immediately transfer the bread from the baking sheet/pans to a wire rack to cool completely. Beginner Tip: It’s tempting to cut into warm bread, but cooling allows the internal structure to set, preventing a gummy texture. Enjoy your homemade Baby Bread warm with butter, jam, or as a side to your favorite meal!
Tips & Tricks for Baking Success
Here are some additional insights to make your bread baking journey even smoother:
- Accurate Measuring: Especially with flour, don’t scoop directly from the bag. Instead, spoon flour into your measuring cup and then level it off with a straight edge. Better yet, invest in a kitchen scale for ultimate precision – it’s a game-changer!
- Yeast Temperature is Crucial: Remember the “too hot, too cold” rule for water. Aim for bathwater temperature, comfortable to the touch. This is the single biggest factor for successful yeast activation.
- Patience is a Virtue: Bread baking isn’t a race. Both rises are essential for flavor and texture. If your kitchen is cooler, your dough might take longer to rise.
- Don’t Overbake: While a golden crust is desirable, overbaking can lead to dry, tough bread. Keep an eye on it and use the internal temperature check if you’re unsure.
- Room Temperature Ingredients: For best results, ensure your milk and butter are at room temperature (aside from the initial warming of milk for yeast) as this helps them incorporate better into the dough.
- Kneading is Non-Negotiable: Kneading develops the gluten structure, which gives bread its chewiness and ability to rise. Don’t cut this step short!
- Store Properly: Once completely cooled, store your Baby Bread in an airtight container at room temperature for 2-3 days, or freeze for longer storage.
Essential Baking Tools for Your Baby Bread Recipe
Having the right tools makes all the difference! Here are some basics you’ll want on hand:
- Mixing Bowl
- Whisk
- Baking Pan (or Baking Sheet)
- Measuring Cups
- Spatula
- Kitchen thermometer (for water temperature, highly recommended for beginners!)
- Wire cooling rack
Nutrition Information (Estimated per 1 Roll/Serving)
Here’s an approximate nutritional breakdown for one serving of our Baby Bread. Please note these are estimates and can vary based on exact ingredients and portion sizes.
| Nutrient | Per Serving (1 roll) |
|---|---|
| Calories | ~195 kcal |
| Carbohydrates | ~36g |
| Protein | ~5g |
| Fat | ~4g |
| Fiber | ~1.5g |
| Sugar | ~3g |
Frequently Asked Questions (FAQs)
Q: What if my yeast doesn’t foam?
A: If your yeast doesn’t foam after 5-10 minutes, it’s likely that your water was either too hot (killing the yeast) or too cold (not activating it), or your yeast is old/inactive. It’s best to discard that mixture and start again with fresh yeast and carefully measured water temperature (105-115°F is key!).
Q: How do I know if I’ve kneaded the dough enough?
A: Your dough should feel smooth, elastic, and much less sticky than when you started. A great test is the “windowpane test”: pinch off a small piece of dough and gently stretch it. If you can stretch it thin enough to see light through it without it tearing, your gluten is well developed, and it’s kneaded enough.
Q: My dough isn’t rising. What went wrong?
A: The most common reasons for dough not rising are inactive yeast (see above FAQ) or a too-cold environment. Ensure your proofing spot is warm and draft-free. Sometimes it just needs more time, especially if your kitchen is cool.
Q: Can I use whole wheat flour for this recipe?
A: Yes, you can substitute some or all of the all-purpose flour with whole wheat flour, but be aware that whole wheat flour absorbs more liquid and produces a denser loaf. You might need to add a tablespoon or two more liquid (water or milk) to achieve the right dough consistency, and the rise times might be slightly longer.
Q: How should I store my homemade Baby Bread?
A: Once completely cooled, store your Baby Bread in an airtight container or a large zip-top bag at room temperature for up to 2-3 days. For longer storage, you can freeze the cooled bread for up to 2-3 months. Thaw at room temperature or reheat gently in the oven.
Q: Can I make this recipe without a stand mixer?
A: Absolutely! This recipe is perfectly suited for hand-kneading, as detailed in the instructions. It takes a little more arm work, but many bakers find it a very therapeutic and rewarding experience.
Your First Loaf Awaits!
Congratulations, budding baker! You’ve just walked through the steps of creating your very own Baby Bread Recipe. There’s truly nothing quite like the smell and taste of fresh, homemade bread, and now you have the skills to make it happen. Don’t be discouraged if your first attempt isn’t absolutely perfect; every loaf is a learning experience, and the joy is in the process.
We hope these baking tips for beginners have empowered you to confidently tackle this easy baking recipe. Share your creations with friends and family, and most importantly, savor every bite of your delicious accomplishment. Happy baking!