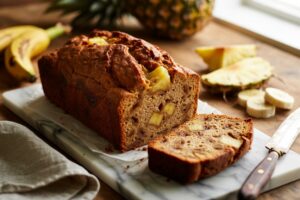
This isn’t just any quick bread; it’s a tropical escape in every bite, combining the classic comfort of banana bread with the tangy sweetness of pineapple. Perfect for breakfast, a snack, or even dessert, this recipe is designed with you in mind, making it one of the best easy baking recipes out there. We’ve packed this guide with essential baking tips for beginners to ensure your first (or hundredth!) loaf is nothing short of perfection. Get ready to impress yourself and everyone around you with this moist, tender, and unbelievably delicious creation!
Ingredients List: What You’ll Need
Gather your ingredients! Precision is key in baking, so make sure to measure everything accurately. This list is for one standard loaf.
| Quantity | Unit | Ingredient |
|---|---|---|
| 1 ½ | cups | All-purpose flour |
| 1 | teaspoon | Baking soda |
| ½ | teaspoon | Salt |
| ¾ | cup | Granulated sugar |
| 1 | large | Egg, lightly beaten |
| ⅓ | cup | Vegetable oil (or melted unsalted butter) |
| 1 | teaspoon | Vanilla extract |
| 3 | medium | Ripe bananas, mashed (about 1 cup) |
| ½ | cup | Crushed pineapple, well-drained |
| ½ | cup | Chopped pecans or walnuts (optional) |
Step-by-Step Instructions: Bake Your Way to Bliss!
Follow these steps carefully for a perfect loaf every time. Don’t rush, and remember, baking is a joyful process!
Step 1: Prepare Your Workspace and Oven
- Preheat Oven: Set your oven to 350°F (175°C). It’s crucial for the oven to be at the correct temperature before your bread goes in, ensuring even baking and proper leavening.
- Prepare Loaf Pan: Lightly grease a 9×5-inch loaf pan with butter or cooking spray. For extra insurance against sticking, you can also flour the pan, or line it with parchment paper, leaving an overhang on the long sides to easily lift the bread out later.
Step 2: Combine Dry Ingredients
- In a large mixing bowl, whisk together the all-purpose flour, baking soda, and salt.
- Beginner Tip: Whisking dry ingredients ensures they are evenly distributed, especially the baking soda, which is essential for the bread to rise properly. Don’t skip this step!
- Common Mistake: Not sifting or whisking flour can lead to lumps in your batter and uneven texture in your final bread.
- Add the granulated sugar to the dry ingredients and whisk again briefly to combine.
Step 3: Mix Wet Ingredients
- In a separate medium bowl, lightly beat the large egg.
- Add the vegetable oil (or melted butter) and vanilla extract to the beaten egg. Whisk until well combined.
- Mash your ripe bananas. The riper they are (brown spots are great!), the sweeter and more flavorful your bread will be. Add the mashed bananas to the wet ingredients.
- Open your can of crushed pineapple and make sure to drain it very, very well. Excess moisture can make your bread gummy. You can press it against the side of a sieve or even squeeze it gently in a clean kitchen towel. Add the well-drained pineapple to the wet ingredients.
Step 4: Combine Wet and Dry Mixtures
- Pour the wet ingredient mixture into the dry ingredient mixture.
- Using a spatula or a wooden spoon, gently fold the ingredients together until they are just combined.
- Beginner Tip: This is where many beginners make a common mistake! Do not overmix! Overmixing develops the gluten in the flour too much, resulting in a tough, dense bread instead of a tender, moist one. A few streaks of flour are perfectly fine.
- Alternative: If you’re adding optional mix-ins like chopped pecans, walnuts, or even chocolate chips, fold them in gently at this stage.
Step 5: Bake Your Bread
- Pour the batter evenly into your prepared 9×5-inch loaf pan.
- Place the loaf pan in the center of your preheated oven.
- Bake for 55-65 minutes.
- How to Check for Doneness: The top should be golden brown. To truly check, insert a wooden skewer, toothpick, or thin knife into the center of the loaf. If it comes out clean or with just a few moist crumbs attached (no wet batter!), your bread is done. If it comes out wet, continue baking for another 5-10 minutes and test again.
- Common Mistake: Opening the oven door too often can cause temperature fluctuations and prevent proper rising. Try to resist the urge until at least 45 minutes into baking.
Step 6: Cool and Enjoy!
- Once baked, remove the loaf pan from the oven.
- Let the bread cool in the pan for about 10-15 minutes. This allows the bread to set and prevents it from crumbling when you remove it.
- After 10-15 minutes, carefully run a knife around the edges of the pan (if you didn’t use parchment paper) and then invert the bread onto a wire cooling rack.
- Allow the bread to cool completely on the wire rack before slicing.
- Beginner Tip: Cooling completely is important for the texture and flavor to fully develop. Slicing hot bread can make it gummy and difficult to cut neatly.
- Slice, serve, and savor your homemade Banana And Pineapple Bread!
Tips & Tricks for Baking Success
Mastering quick breads is all about a few key techniques. Here are some extra pointers to make your Banana And Pineapple Bread truly shine:
- Embrace Overripe Bananas: The browner and spottier your bananas, the better! They are sweeter and easier to mash, imparting a much richer banana flavor to your bread. If your bananas aren’t ripe enough, you can speed up the process by baking them unpeeled on a baking sheet at 300°F (150°C) for 15-30 minutes until they turn black.
- Don’t Overmix the Batter: This is perhaps the most crucial tip for any quick bread. Mix just until the wet and dry ingredients are combined. Overmixing develops the gluten, leading to a tough, chewy loaf instead of a tender, moist one. Lumps are okay!
- Properly Drain Pineapple: Crushed pineapple can carry a lot of moisture. Squeeze out as much liquid as possible to prevent a soggy bread. A cheesecloth or a fine-mesh sieve works wonders.
- Achieving a Perfect Dome: For that classic domed top, you can try starting the bake at a slightly higher temperature (e.g., 375°F/190°C) for the first 10-15 minutes, then reducing it to 350°F (175°C) for the remainder of the baking time. This initial burst of heat helps the bread rise quickly.
- Storing Your Loaf: Once completely cooled, store your banana and pineapple bread at room temperature in an airtight container for up to 3-4 days. For longer storage, wrap it tightly in plastic wrap and then foil, and freeze for up to 3 months. Thaw at room temperature.
- Experiment with Mix-ins: While delicious on its own, feel free to get creative! Add ½ cup of shredded coconut, white chocolate chips, or a sprinkle of cinnamon or nutmeg to the dry ingredients for an extra layer of flavor.
Essential Baking Tools
Having the right tools makes baking a breeze. Here are some essentials for this recipe:
- Mixing Bowl
- Whisk
- Baking Pan (9×5 inch loaf pan)
- Measuring Cups
- Spatula (rubber or silicone)
- Measuring Spoons
- Wire Cooling Rack
Nutrition Info (Per Slice – approximately 1/12 of a loaf)
Please note: These values are approximate and can vary based on specific ingredients and portion sizes.
| Nutrient | Amount |
|---|---|
| Calories | 220 kcal |
| Carbohydrates | 35g |
| Protein | 3g |
| Fat | 8g |
| Fiber | 1g |
| Sugar | 20g |
FAQs: Your Beginner Baking Questions Answered!
-
Q1: What kind of bananas are best for this bread?
- A: The riper, the better! Look for bananas with lots of brown spots or even entirely brown peels. They will be softer, sweeter, and easier to mash, yielding a much more flavorful and moist bread.
-
Q2: Can I use fresh pineapple instead of canned crushed pineapple?
- A: While you can, it’s generally not recommended for this specific recipe as fresh pineapple contains enzymes that can sometimes interfere with the setting of baked goods, and it’s harder to get the same level of well-drained consistency. If you do use fresh, make sure it’s very finely diced and squeezed dry.
-
Q3: How do I know when my Banana And Pineapple Bread is perfectly baked?
- A: The best way is to insert a wooden skewer or toothpick into the very center of the loaf. If it comes out clean or with only a few moist crumbs attached (no wet batter!), it’s done. The top should also be golden brown and spring back slightly when gently pressed.
-
Q4: My bread turned out tough and dense. What went wrong?
- A: The most common culprit for tough quick bread is overmixing. Once you add the wet ingredients to the dry, mix just until combined. A few streaks of flour are fine! Overmixing develops the gluten in the flour, leading to a chewy, dense texture.
-
Q5: How should I store leftover banana and pineapple bread?
- A: Once completely cool, store the bread in an airtight container at room temperature for up to 3-4 days. For longer storage, wrap it tightly in plastic wrap and then aluminum foil, and freeze for up to 2-3 months. Thaw at room temperature before serving.
-
Q6: Can I reduce the sugar in this recipe?
- A: Yes, you can generally reduce the sugar by about ¼ cup without significantly impacting the texture, especially since ripe bananas and pineapple add natural sweetness. However, reducing it too much might affect the moisture and browning of the bread.
Conclusion: Your Delicious Adventure Awaits!
You’ve made it! By following this detailed guide, you’re now equipped to bake a truly delightful Banana And Pineapple Bread that will surely become a staple in your kitchen. This recipe is a testament to how accessible and rewarding baking can be, even for those just starting out. Don’t be afraid to get your hands a little messy, trust the process, and most importantly, have fun! The aroma filling your kitchen will be your first reward, and that first bite will be pure bliss. So go ahead, preheat that oven, gather your ingredients, and embark on your delicious baking adventure. We can’t wait to hear about your successful loaves!
“`