Welcome, aspiring bakers! Get ready to make the most delicious, moist, and utterly irresistible banana bread you’ve ever tasted. If you’re looking for an easy baking recipe that delivers big on flavor with minimal fuss, you’ve come to the right place.
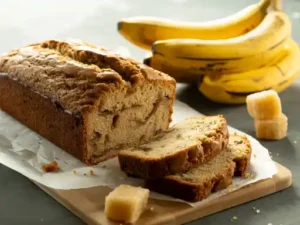
This Banana Bread Recipe Brown Sugar edition is perfect for using up those overripe bananas sitting on your counter, transforming them into a golden, sweet treat that will fill your home with an amazing aroma. We’re going to walk through every step, providing all the baking tips for beginners you need to achieve bakery-quality results on your very first try. Let’s bake some magic!
Ingredients List
Gathering your ingredients beforehand, also known as “mise en place,” is a fantastic habit for beginners. It ensures you have everything you need and makes the baking process smoother!
| Ingredient | Quantity | Unit |
|---|---|---|
| Ripe Bananas (mashed) | 3-4 | medium |
| All-Purpose Flour | 1 ½ | cups |
| Light Brown Sugar (packed) | ¾ | cup |
| Unsalted Butter (melted) | ½ | cup |
| Large Eggs | 2 | |
| Baking Soda | 1 | teaspoon |
| Salt | ½ | teaspoon |
| Vanilla Extract | 1 | teaspoon |
| (Optional) Ground Cinnamon | ½ | teaspoon |
| (Optional) Chopped Walnuts or Chocolate Chips | ½ – 1 | cup |
Step-by-Step Instructions
Follow these detailed steps carefully, and you’ll be enjoying warm, delicious banana bread in no time!
Step 1: Preheat & Prep Your Pan
- Preheat your oven to 350°F (175°C). This ensures the oven is at the correct temperature when your batter is ready, helping the bread rise evenly.
- Grease a 9×5-inch loaf pan with butter or non-stick cooking spray. You can also line it with parchment paper, leaving an overhang on the long sides to easily lift the bread out later. This prevents sticking and makes cleanup a breeze!
Step 2: Mash the Bananas
- In a medium bowl, peel your ripe bananas. You want bananas that are very ripe – speckled with brown spots, or even mostly brown. This means they’re sweeter and easier to mash, imparting that classic banana bread flavor.
- Use a fork or a potato masher to mash the bananas until mostly smooth, with a few small lumps remaining for texture. Don’t worry about getting every single lump out!
Step 3: Combine Wet Ingredients
- In a large mixing bowl, combine the melted butter and brown sugar. Whisk them together until smooth and well combined. The brown sugar adds a deep, molasses-rich flavor and helps keep the bread incredibly moist.
- Add the mashed bananas, eggs, and vanilla extract to the butter-sugar mixture. Whisk until everything is fully incorporated. It’s okay if the mixture looks a little lumpy from the bananas.
- Beginner Tip: Ensure your eggs are at room temperature. This helps them incorporate better into the batter, leading to a more consistent texture. If you forget, place them in a bowl of warm water for 5-10 minutes.
Step 4: Whisk Dry Ingredients
- In a separate medium bowl, whisk together the all-purpose flour, baking soda, and salt. If using, add the ground cinnamon now too.
- Why whisk? This step isn’t just about combining; it aerates the flour and evenly distributes the leavening agents (baking soda and salt) throughout, ensuring a light texture and even rise.
- Beginner Tip: When measuring flour, spoon it into your measuring cup and then level it off with the back of a knife. Don’t scoop directly from the bag, as this can pack the flour and lead to a dense, dry bread.
Step 5: Combine Wet and Dry Mixtures
- Pour the dry ingredients into the wet ingredients.
- Using a spatula or a wooden spoon, gently fold the ingredients together until just combined.
- Crucial Beginner Tip: Do NOT overmix! Overmixing develops the gluten in the flour too much, resulting in a tough, dense banana bread. A few streaks of flour are perfectly fine – they will disappear during baking. This is one of the most common mistakes for beginners!
- If you’re adding optional walnuts or chocolate chips, gently fold them in now.
Step 6: Bake Your Banana Bread
- Pour the batter into your prepared loaf pan, spreading it evenly.
- Bake for 55-65 minutes, or until a wooden skewer or toothpick inserted into the center comes out clean or with a few moist crumbs attached (no wet batter).
- Beginner Tip: Avoid opening the oven door frequently during baking, especially in the first 30-40 minutes. This can cause the bread to sink in the middle.
- If the top of your banana bread starts to brown too quickly before the inside is cooked, you can loosely tent it with aluminum foil for the remaining baking time.
Step 7: Cool and Enjoy!
- Once baked, remove the loaf pan from the oven and let the banana bread cool in the pan for about 10-15 minutes. This allows it to set up and prevents it from falling apart when removed.
- After 10-15 minutes, carefully invert the loaf onto a wire rack to cool completely. Cooling on a wire rack allows air to circulate around the entire loaf, preventing the bottom from becoming soggy.
- Slice and enjoy your homemade banana bread! It’s fantastic warm, perhaps with a pat of butter, or at room temperature.
Tips & Tricks for Perfect Banana Bread Every Time
Mastering banana bread is easy with these extra pointers:
- The Riper, The Better: Don’t underestimate the power of truly ripe bananas. Their natural sugars intensify, providing sweetness and moisture. If your bananas aren’t quite ready, you can bake them on a baking sheet at 300°F (150°C) for 15-30 minutes until their skins are black and shiny – instant ripeness!
- Room Temperature Ingredients: Especially for eggs, bringing them to room temperature helps them emulsify better with the other ingredients, creating a smoother, more uniform batter and a finer crumb in your finished bread.
- Don’t Overmix the Batter: We can’t stress this enough! Mixing until just combined is key. Overmixing develops gluten, leading to a tough, rubbery texture instead of a tender, moist one. Embrace a few flour streaks!
- Measuring Flour Accurately: Use the “spoon and level” method: spoon flour into your measuring cup, then level off the top with a straight edge. Scooping directly from the bag compacts the flour, adding too much and resulting in a dry loaf.
- Customize Your Loaf: Feel free to add ½ to 1 cup of mix-ins like chocolate chips, chopped nuts (walnuts or pecans are classic!), shredded coconut, or even a sprinkle of cinnamon sugar on top before baking for extra crunch.
- Storage: Store leftover banana bread tightly wrapped in plastic wrap or in an airtight container at room temperature for up to 3-4 days. For longer storage, slice and freeze individual pieces for up to 3 months. Thaw at room temperature or gently warm in the microwave.
Essential Baking Tools
Having the right tools makes all the difference, especially when you’re starting out. Here are a few essentials:
- Mixing Bowl
- Whisk
- Baking Pan (9×5 inch loaf pan is ideal)
- Measuring Cups
- Spatula (rubber or silicone)
- Measuring Spoons
- Wire Rack (for cooling)
Nutrition Information
Here’s an approximate nutritional breakdown per slice (assuming 12 slices per loaf). Please note that these are estimates and can vary based on specific ingredients and portion sizes.
| Nutrient | Amount (per slice) |
|---|---|
| Calories | 280 kcal |
| Carbohydrates | 45g |
| Protein | 4g |
| Fat | 12g |
| Fiber | 2g |
| Sugar | 25g |
Frequently Asked Questions (FAQs) for Beginners
Don’t worry, everyone has questions when they start baking! Here are some common ones:
- Q1: My bananas aren’t ripe enough. What should I do?
- A: If you’re short on time, you can bake unpeeled bananas on a baking sheet at 300°F (150°C) for 15-30 minutes until their skins turn black and shiny. Let them cool, then peel and mash. This dramatically speeds up the ripening process!
- Q2: Can I use frozen bananas for banana bread?
- A: Absolutely! Frozen ripe bananas are perfect. Just thaw them completely at room temperature (they’ll release a lot of liquid, which you can either drain or add to the batter for extra moisture), then mash as usual.
- Q3: Why is my banana bread dry or dense?
- A: The most common culprits are overmixing the batter (which develops gluten, making it tough) or adding too much flour (often from scooping directly from the bag instead of spooning and leveling). Underbaking can also make it seem dense, while overbaking makes it dry.
- Q4: How do I know when my banana bread is perfectly baked?
- A: The best way is the toothpick test! Insert a wooden skewer or toothpick into the very center of the loaf. If it comes out clean or with only a few moist crumbs attached, it’s done. If it comes out with wet batter, it needs more time.
- Q5: Can I add nuts or chocolate chips to this recipe?
- A: Yes, please do! This recipe is very versatile. Gently fold in ½ to 1 cup of chopped walnuts, pecans, chocolate chips, or even shredded coconut along with the dry ingredients just before pouring into the pan. This is best done in Step 5.
- Q6: How long does homemade banana bread last?
- A: At room temperature, tightly wrapped or in an airtight container, it will stay fresh for about 3-4 days. You can also refrigerate it for up to a week, or freeze slices for up to 3 months for a longer shelf life.