Are you living at a higher elevation and finding that your baked goods just aren’t turning out quite right? Baking at high altitude can be a challenge, but it doesn’t have to be a mystery! We’ve all been there, pulling a seemingly perfect loaf out of the oven only to watch it collapse into a dense, gummy mess. Fear not, aspiring bakers! This Banana Bread Recipe For High Altitude is specifically designed to tackle those high-elevation hurdles, ensuring you get a perfectly moist, tender, and delicious loaf every single time.
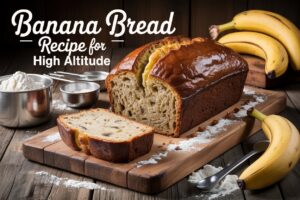
This recipe is one of the best easy baking recipes you can start with, even if you’re a complete novice. We’ll walk you through every step, providing essential baking tips for beginners to make your first foray into high-altitude baking a resounding success. Get ready to fill your home with the irresistible aroma of freshly baked banana bread – a true comfort food that’s perfect for breakfast, a snack, or even dessert!
Ingredients List
Gathering your ingredients correctly is the first step to baking success. For high-altitude baking, precise measurements are even more crucial!
| Ingredient | Quantity | Unit |
|---|---|---|
| All-Purpose Flour | 2 | cups |
| Granulated Sugar | ½ | cup |
| Packed Light Brown Sugar | ¼ | cup |
| Baking Soda | ¾ | teaspoon |
| Salt | ½ | teaspoon |
| Ground Cinnamon (optional) | ½ | teaspoon |
| Very Ripe Large Bananas, mashed | 3 | (approx. 1 ½ cups) |
| Large Eggs | 2 | |
| Vegetable Oil (or melted unsalted butter) | ½ | cup |
| Vanilla Extract | 1 | teaspoon |
| Milk (any kind, or buttermilk) | 2 | tablespoons |
| Optional: Chopped Walnuts or Chocolate Chips | ½ – 1 | cup |
Step-by-Step Instructions: Your High-Altitude Baking Journey
Follow these detailed steps carefully for the best results. Don’t rush, and enjoy the process!
Step 1: Prepare Your Oven and Pan (The Foundation of Success!)
- Preheat Your Oven: Adjust your oven rack to the middle position. Preheat your oven to 350°F (175°C). For high-altitude baking, sometimes a slightly higher temperature can help set the structure faster, but 350°F is a great starting point for banana bread.
- Prepare Your Loaf Pan: Grease a 9×5-inch loaf pan generously with butter, shortening, or non-stick cooking spray. For extra easy removal, you can also line the bottom with a strip of parchment paper, leaving an overhang on the sides like handles. This is especially helpful for beginners to avoid sticking!
Step 2: Combine the Dry Ingredients (Precision is Key!)
- Whisk Dry Ingredients: In a large mixing bowl, combine the 2 cups of all-purpose flour, ½ cup granulated sugar, ¼ cup packed light brown sugar, ¾ teaspoon baking soda, ½ teaspoon salt, and ½ teaspoon ground cinnamon (if using). Whisk these ingredients together thoroughly for about 30 seconds. This ensures that the leavening agent (baking soda) and other dry ingredients are evenly distributed, preventing pockets of unmixed flour or too much leavening in one spot.
- Beginner Tip for Measuring Flour: Do NOT scoop flour directly from the bag with your measuring cup. This compacts the flour, leading to too much in your recipe. Instead, fluff the flour with a spoon, then spoon it into your measuring cup until it overflows. Level it off with the back of a straight knife or flat edge. This is called the “spoon and level” method and is crucial for accurate baking.
Step 3: Mix the Wet Ingredients (Embrace the Mash!)
- Mash the Bananas: In a separate medium-sized bowl, use a fork or a potato masher to mash your 3 very ripe bananas. You want them to be mostly smooth with a few small lumps for texture. The riper the bananas, the sweeter and more flavorful your bread will be! Look for bananas with lots of brown spots or even mostly black peels.
- Combine Wet Ingredients: To the mashed bananas, add the 2 large eggs, ½ cup vegetable oil (or melted unsalted butter), 1 teaspoon vanilla extract, and 2 tablespoons milk. Whisk these wet ingredients together until they are well combined. The mixture might look a little lumpy from the bananas, and that’s perfectly fine!
- Beginner Tip for Eggs: Always crack eggs into a separate small bowl first, especially if you’re a beginner. This way, if you get a shell fragment, it’s easy to remove, and you can ensure the egg is good before adding it to your main mixture.
Step 4: Combine Wet and Dry (The Art of Gentle Mixing)
- Add Wet to Dry: Pour the wet banana mixture into the bowl with your dry ingredients.
- Gently Mix: Using a spatula or a wooden spoon, mix until JUST combined. This is perhaps the most important tip for tender banana bread! Overmixing develops the gluten in the flour, leading to a tough, chewy bread. You should still see a few streaks of flour – that’s okay! They will disappear during baking.
- Add Optional Mix-ins: If you’re adding walnuts or chocolate chips, fold them in now, again, just until they are evenly distributed.
Step 5: Bake Your Loaf (Patience is a Virtue!)
- Pour into Pan: Pour the batter evenly into your prepared 9×5-inch loaf pan. You can gently tap the pan on the counter a couple of times to release any large air bubbles.
- Bake: Place the loaf pan in the preheated oven. Bake for approximately 55-70 minutes. High-altitude baking often requires a slightly longer baking time to ensure the interior is fully cooked.
- Check for Doneness: Around the 55-minute mark, insert a wooden skewer or toothpick into the center of the loaf. It should come out clean or with a few moist crumbs attached, but no wet batter. If it’s still wet, continue baking in 5-10 minute increments, checking frequently.
- Common Mistake & Alternative: If the top of your banana bread starts to brown too quickly before the inside is cooked, you can loosely tent it with aluminum foil for the last 15-20 minutes of baking. This protects the top while allowing the inside to finish cooking.
Step 6: Cool and Enjoy (The Reward!)
- Cool in Pan: Once baked, remove the loaf pan from the oven and place it on a wire rack. Let the banana bread cool in the pan for 10-15 minutes. This allows the bread to set and firm up, making it easier to remove without breaking.
- Remove from Pan: After 10-15 minutes, carefully run a knife around the edges of the pan (if not using parchment paper handles). Invert the loaf onto the wire rack, then flip it right-side up to continue cooling completely.
- Slice and Serve: While it’s tempting to cut into it immediately, banana bread is best when it has cooled down for at least 30 minutes, or even completely. The flavors meld, and the texture becomes perfect. Slice, serve, and savor your homemade high-altitude banana bread!
Tips & Tricks for High-Altitude Banana Bread Success
- Use Very Ripe Bananas: This cannot be stressed enough! They provide natural sweetness, moisture, and intense banana flavor. Green or yellow bananas won’t give you the same results.
- Do Not Overmix: This is a golden rule for many quick breads. Overmixing develops gluten, leading to a tough, dry loaf. Mix until just combined – a few lumps of flour are fine!
- Measure Flour Correctly: Always use the “spoon and level” method (spoon flour into the measuring cup, then level off with a straight edge). Scooping directly from the bag compacts flour, adding too much to your recipe.
- Adjust for Your Specific Altitude: This recipe provides a great starting point for typical high-altitude (around 5,000-7,000 feet). If you’re significantly higher or lower, you might need minor tweaks. For very high altitudes (above 7,000 feet), you might slightly reduce baking soda even further (e.g., to ½ tsp) and consider adding another tablespoon of liquid.
- Patience During Cooling: Letting the banana bread cool completely on a wire rack allows the internal structure to set and prevents a gummy texture. It also makes for cleaner slices!
- Storage: Store cooled banana bread wrapped tightly in plastic wrap or in an airtight container at room temperature for up to 3-4 days. For longer storage, slice and freeze individual pieces for up to 3 months.
- Customize It: Feel free to add ½ to 1 cup of chopped nuts (walnuts, pecans), chocolate chips, or even dried fruit like raisins or cranberries to the batter when you add the wet ingredients to the dry.
Essential Baking Tools
Having the right tools makes baking easier and more enjoyable. Here are a few essentials:
- Mixing Bowl: You’ll need at least two – one for wet, one for dry.
- Whisk: Perfect for thoroughly combining dry ingredients.
- Loaf Baking Pan (9×5 inch): The star of the show for your banana bread.
- Measuring Cups & Spoons: Accuracy is vital in baking, especially at altitude!
- Rubber Spatula: Essential for gentle mixing and scraping down bowls.
- Wire Cooling Rack: Allows air to circulate around your bread for even cooling.
Nutrition Information (Estimated per slice)
This information is an estimate based on 12 slices per loaf and standard ingredient values. Actual values may vary.
| Nutrient | Amount |
|---|---|
| Calories | 260 kcal |
| Carbohydrates | 40 g |
| Protein | 4 g |
| Fat | 11 g |
| Fiber | 2 g |
| Sugar | 25 g |
Frequently Asked Questions (FAQs)
Q1: What if my bananas aren’t ripe enough?
A: If your bananas are still mostly yellow or green, they won’t provide the same sweetness or moisture. You can try to ripen them faster by baking them in their skins on a baking sheet at 300°F (150°C) for 15-30 minutes until they are black and soft. Let them cool before mashing. Alternatively, you can use them as is, but your bread might be less sweet and moist, and you might want to add an extra tablespoon of sugar.
Q2: Can I use butter instead of oil?
A: Yes, absolutely! Melted unsalted butter can be substituted for vegetable oil in a 1:1 ratio. Butter will give your banana bread a richer, more buttery flavor, while oil tends to result in a slightly moister crumb that stays soft longer.
Q3: Why did my banana bread sink in the middle?
A: This is a common issue, especially at high altitudes! It usually means one of two things: 1) The bread wasn’t fully baked through, so the structure hadn’t set before it cooled. Always use the toothpick test! 2) Too much leavening agent (baking soda/powder) caused the bread to rise too quickly and then collapse. This recipe has adjusted the baking soda for high altitude, but if you’re at a very high elevation, you might need to slightly reduce it further.
Q4: How do I store leftover banana bread?
A: Once completely cooled, wrap the banana bread tightly in plastic wrap or aluminum foil, or store it in an airtight container at room temperature for up to 3-4 days. For longer storage, you can freeze individual slices or the whole loaf, wrapped well, for up to 3 months. Thaw at room temperature or gently warm in the microwave.
Q5: Can I add nuts or chocolate chips?
A: Absolutely! This recipe is wonderful with additions. Fold in ½ to 1 cup of chopped walnuts, pecans, or chocolate chips (milk, semi-sweet, or dark) when you combine the wet and dry ingredients, just before pouring the batter into the pan. Don’t overmix!
Q6: What’s the best way to tell if my bananas are “very ripe”?
A: Very ripe bananas will have peels that are heavily speckled with brown or even mostly black. They will feel soft to the touch and emit a strong, sweet aroma. The browner they are, the sweeter and more flavorful they’ll be in your bread!
Conclusion
Congratulations, you’re now equipped with a fantastic Banana Bread Recipe For High Altitude that’s truly beginner-friendly! No more flat, gummy loaves for you. With these detailed instructions and helpful tips, you’re well on your way to becoming a confident high-altitude baker. There’s nothing quite like the comforting smell and taste of homemade banana bread, and now you can enjoy it perfectly, no matter your elevation. Don’t be afraid to experiment, and most importantly, have fun in the kitchen. We encourage you to try this recipe, share your creations, and let us know how it turned out in the comments below! Happy baking!