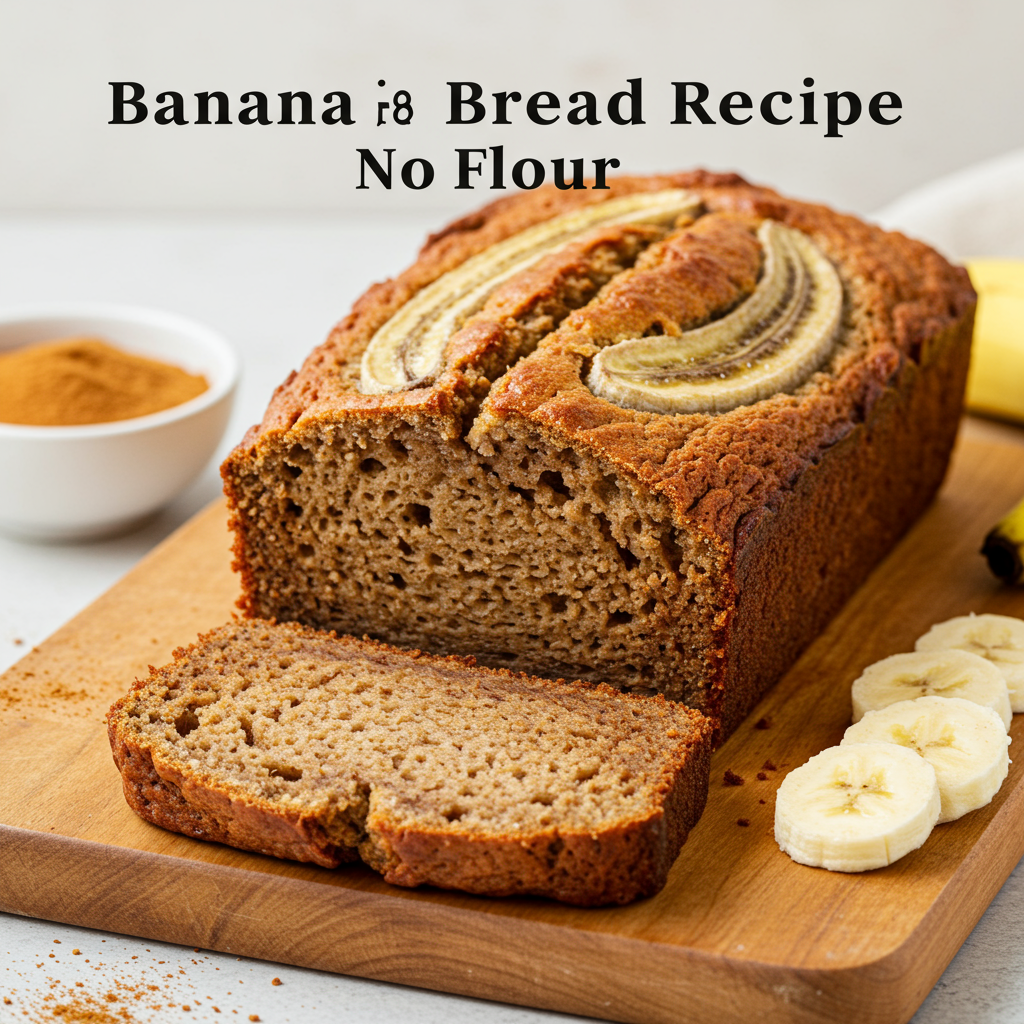
Ingredients
Gathering your ingredients is the first step to baking success. Make sure you have everything ready before you start mixing!
| Ingredient | Quantity | Unit |
|---|---|---|
| Overripe Bananas (mashed) | 3 | large |
| Eggs | 2 | large |
| Creamy Peanut Butter (or almond/cashew butter) | ½ | cup |
| Maple Syrup (or honey/agave nectar) | ¼ | cup |
| Vanilla Extract | 1 | teaspoon |
| Baking Soda | 1 | teaspoon |
| Ground Cinnamon | ½ | teaspoon |
| Salt | ¼ | teaspoon |
| Chocolate Chips (optional, for extra indulgence) | ½ | cup |
| Chopped Walnuts or Pecans (optional) | ½ | cup |
Step-by-Step Instructions: Your Beginner-Friendly Baking Journey
Follow these detailed steps carefully, and you’ll have a delicious, no-flour banana bread in no time. Don’t rush, and enjoy the process!
-
Preheat Your Oven & Prep Your Pan:
Start by preheating your oven to 350°F (175°C). This ensures your oven is at the perfect temperature when your batter is ready, promoting even baking. Next, take a standard 9×5 inch loaf pan. Lightly grease it with butter or cooking spray, then dust it with a little cocoa powder or a gluten-free flour alternative (like almond flour) to prevent sticking. This little trick helps the bread slide out easily after baking. If you don’t have cocoa powder, parchment paper is your best friend! Line the bottom and two long sides of the pan with parchment paper, leaving an overhang to act as “handles” for easy removal.
-
Mash Your Bananas:
The star of the show! Peel your overripe bananas. The riper they are (brown spots everywhere!), the sweeter and more flavorful your bread will be. Place them in a large mixing bowl. Using a fork or a potato masher, thoroughly mash the bananas until they are mostly smooth with a few small lumps remaining. This texture adds a nice rustic feel to your bread. Beginner Tip: Don’t use underripe bananas; they won’t provide enough sweetness or moisture, and your bread might turn out bland and dry.
-
Wet Ingredients First:
To the mashed bananas, add your two large eggs, the creamy peanut butter (or your chosen nut butter), maple syrup, and vanilla extract. These are your ‘wet’ ingredients. Whisk everything together really well until the mixture is smooth and fully combined. Ensure there are no streaks of peanut butter; everything should be uniformly mixed. This ensures that all flavors are evenly distributed throughout your bread.
-
Dry Ingredients Second:
Now it’s time for the ‘dry’ components. Add the baking soda, ground cinnamon, and salt directly into your wet mixture. There’s no need to mix them in a separate bowl first, as we’re not using flour here, which often requires sifting dry ingredients together. Stir gently until these ingredients are just incorporated. Crucial Beginner Tip: Do not overmix! Overmixing develops gluten in traditional flour recipes, making them tough. While we don’t have gluten here, overmixing can still lead to a dense, rubbery texture in no-flour recipes. Mix just until everything comes together.
-
Add Your Mix-Ins (Optional but Recommended!):
This is where you can customize your bread! If you’re using chocolate chips, chopped walnuts, or pecans, gently fold them into the batter now. Use a spatula for this step to avoid overmixing. Don’t add too many, as it can weigh down the bread, but a generous half-cup of each adds fantastic texture and flavor. Alternative: You could also add a handful of dried cranberries, shredded coconut, or a tablespoon of orange zest for a different flavor profile.
-
Transfer to Pan & Bake:
Pour your prepared batter into the greased and floured (or parchment-lined) loaf pan. Smooth the top with your spatula to ensure even baking. Place the loaf pan into your preheated oven. Bake for approximately 45-60 minutes. Baking times can vary depending on your oven, so keep an eye on it.
-
Check for Doneness:
How do you know it’s ready? The top of the bread should be golden brown, and a wooden skewer or toothpick inserted into the center should come out clean or with just a few moist crumbs attached. If it comes out with wet batter, it needs more time. If the top is browning too quickly, you can loosely tent it with aluminum foil for the last 10-15 minutes of baking. Common Mistake: Pulling it out too early will result in a gooey, underbaked center. When in doubt, give it a few more minutes!
-
Cooling is Key:
Once baked, remove the loaf pan from the oven. Let the banana bread cool in the pan for about 10-15 minutes on a wire rack. This allows the bread to set and prevents it from falling apart when you remove it. After this initial cooling, carefully lift the bread out of the pan (using those parchment paper handles if you used them) and transfer it directly to the wire rack to cool completely. Beginner Tip: Resist the urge to slice it warm! Warm banana bread is delicious, but it’s much more fragile and can crumble. Cooling completely makes for cleaner slices and a better texture.
-
Slice & Enjoy!:
Once fully cooled, grab a sharp, serrated knife and slice your magnificent no-flour banana bread. Enjoy it plain, with a smear of butter, or a dollop of Greek yogurt. Congratulations, you’ve just baked a delicious, gluten-free treat!
Tips & Tricks for Perfect No-Flour Banana Bread
Even though this recipe is super simple, a few extra pointers can elevate your baking experience and ensure consistent success every time.
- Overripe Bananas are Non-Negotiable: Seriously, the browner, the better! Green or yellow bananas won’t provide the necessary sweetness or moisture, resulting in a less flavorful and drier loaf. Let them sit on your counter until they’re almost black if you can!
- Don’t Overmix: As mentioned in the instructions, mix just until combined. While there’s no gluten to develop, over-mixing can still lead to a dense, tough texture. Gentle folds are your friend, especially when adding mix-ins.
- Customize Your Sweetness: Taste your mashed banana mixture before adding the eggs. If your bananas aren’t super sweet, or if you prefer a sweeter bread, you can add an extra tablespoon or two of maple syrup.
- Check Your Oven Temperature: Oven temperatures can vary significantly. Consider using an oven thermometer to ensure your oven is truly at 350°F (175°C). This can make a huge difference in baking time and outcome.
- Storage Secrets: Store your cooled banana bread in an airtight container at room temperature for up to 3-4 days. For longer storage, slice the bread and freeze individual slices in a freezer-safe bag for up to 2-3 months. Thaw at room temperature or gently reheat in the microwave.
- Embrace Add-Ins: Don’t be afraid to experiment! Beyond chocolate chips and nuts, try shredded coconut, dried cranberries, a swirl of cream cheese (add to the batter before baking), or a dash of nutmeg for different flavor profiles.
Essential Baking Tools
Having the right tools makes baking a breeze. Here are some essentials for this recipe:
- Mixing Bowl
- Whisk (or a fork/potato masher for bananas)
- Loaf Baking Pan (9×5 inches recommended)
- Measuring Cups & Measuring Spoons
- Rubber Spatula
- Wire Cooling Rack
- Wooden Skewer or Toothpick (for checking doneness)
Nutrition Information (per serving)
This is an approximate nutritional breakdown based on 10 servings per loaf, using peanut butter and maple syrup without optional add-ins. Values may vary.
| Nutrient | Amount |
|---|---|
| Calories | 220 kcal |
| Carbohydrates | 28 g |
| Protein | 7 g |
| Fat | 11 g |
| Fiber | 3 g |
| Sugar | 18 g |
Frequently Asked Questions (FAQs)
Q: Can I use almond butter instead of peanut butter?
Absolutely! This recipe is very versatile. Almond butter, cashew butter, or even sunflower seed butter (for nut-free options) work perfectly. Just ensure they are creamy, not chunky, for the best texture.
Q: My banana bread top is browning too fast, but the inside isn’t cooked. What should I do?
This is a common issue! Loosely tent a piece of aluminum foil over the top of the loaf pan for the remainder of the baking time. This will protect the top from further browning while allowing the inside to cook through.
Q: How do I know if my bananas are ripe enough for this recipe?
The ideal bananas for banana bread should have lots of brown spots or even be mostly black. They should be very soft to the touch. Underripe bananas (yellow with no brown spots) won’t mash easily, won’t provide enough natural sweetness, and your bread will be less flavorful and potentially drier.
Q: Can I make this recipe vegan?
Yes, with a few substitutions! Replace the eggs with “flax eggs” (2 tablespoons ground flaxseed mixed with 6 tablespoons water, let sit for 5 minutes). Ensure your chocolate chips (if using) are dairy-free. Otherwise, all other ingredients are typically vegan-friendly.
Q: My banana bread turned out too dense. What went wrong?
A dense texture can often be attributed to overmixing the batter. While there’s no flour, vigorously mixing the wet and dry ingredients can still cause the mixture to become tough. Remember to mix just until everything is combined. Also, ensure your baking soda is fresh, as old baking soda can lose its leavening power.
Q: Can I add less maple syrup or skip it entirely for a less sweet bread?
You can certainly reduce the maple syrup by half (e.g., use 2 tablespoons instead of ¼ cup). Skipping it entirely might make the bread less sweet than expected, depending on how ripe your bananas are. The syrup also adds a bit of moisture, so be aware that a slight texture change might occur.
Conclusion
And there you have it! Your very own delicious, moist, and utterly satisfying Banana Bread Recipe No Flour. We hope this detailed guide, packed with baking tips for beginners, has made your baking experience enjoyable and stress-free. This recipe proves that you don’t need flour to create a truly spectacular loaf. Whether you’re making it for a special occasion, a healthy snack, or just because you have a few overripe bananas calling your name, this recipe is a winner.

Don’t be afraid to experiment with your favorite add-ins and make it truly yours. We encourage you to share your baking journey with us! Happy baking, and enjoy every single slice of your homemade masterpiece!
“`
2 thoughts on “Banana Bread Recipe No Flour – Best Ever Recipe”