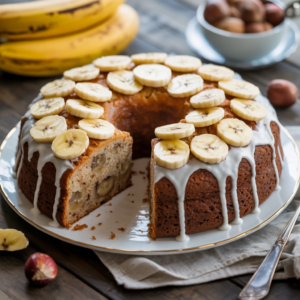
This Banana Cake Sara Lee Recipe is specifically designed to be one of the most easy baking recipes you’ll ever try. Forget complicated techniques; we’re focusing on simplicity, flavor, and guaranteed success. Even if you’re just starting out, our detailed baking tips for beginners will guide you every step of the way, transforming overripe bananas into a masterpiece. Get ready to impress yourself and everyone you share this delicious cake with!
Why You’ll Love This Banana Cake Sara Lee Recipe
This isn’t just any banana cake; it’s a celebration of flavor and ease. Inspired by the classic, comforting desserts we all love, this recipe promises a cake that is:
- Incredibly Moist: Thanks to ripe bananas and a touch of buttermilk, every bite is tender and rich.
- Full of Flavor: The natural sweetness of ripe bananas shines through, complemented by a hint of vanilla.
- Beginner-Friendly: With straightforward steps and plenty of tips, it’s perfect for new bakers.
- Versatile: Great for dessert, breakfast, or a lovely afternoon treat!
Ingredients List
Gather your ingredients! Using room temperature ingredients is a key **baking tip for beginners** that makes a huge difference in the texture of your cake.
For the Banana Cake
| Ingredient | Quantity | Unit |
|---|---|---|
| All-Purpose Flour | 2 | cups |
| Granulated Sugar | 1 | cup |
| Baking Soda | 1 | tsp |
| Salt | 1/2 | tsp |
| Unsalted Butter, softened | 1/2 (1 stick) | cup |
| Large Eggs, room temperature | 2 | large |
| Very Ripe Bananas, mashed | 3 (about 1 cup) | medium |
| Buttermilk, room temperature | 1/2 | cup |
| Vanilla Extract | 1 | tsp |
For the Cream Cheese Frosting (Optional, but highly recommended!)
| Ingredient | Quantity | Unit |
|---|---|---|
| Cream Cheese, softened | 8 | oz block |
| Unsalted Butter, softened | 1/4 (1/2 stick) | cup |
| Powdered Sugar (Confectioners’ Sugar) | 2-3 | cups |
| Vanilla Extract | 1 | tsp |
| Milk or Cream (optional, for consistency) | 1-2 | tbsp |
Step-by-Step Instructions: Baking Your Perfect Banana Cake
Follow these detailed steps carefully, and you’ll be enjoying a delicious homemade banana cake in no time. Remember, baking is a science, but it’s also a lot of fun!
Step 1: Get Prepped and Preheat Your Oven
- Preheat: Adjust your oven rack to the middle position and preheat your oven to 350°F (175°C). This ensures your oven is consistently hot when the cake goes in, promoting even baking.
- Prepare Your Pan: Take a 9×13 inch baking pan (or two 8-inch round pans). Lightly grease the inside with butter or non-stick cooking spray. Then, lightly dust with a tablespoon of flour, tapping out any excess. This creates a non-stick barrier and helps your cake release cleanly after baking.
- Room Temperature Ingredients: Ensure your butter, eggs, and buttermilk are at room temperature. This is crucial! Room temperature ingredients emulsify better, creating a smoother batter and a more uniform, tender cake texture. If you forgot, place eggs in warm water for 5-10 mins, and microwave butter in 10-second intervals until just softened (not melted).
- Mash Bananas: In a small bowl, mash your very ripe bananas with a fork until mostly smooth but with a few small lumps remaining for texture. Set aside.
Step 2: Combine Dry Ingredients
- In a large bowl, whisk together the all-purpose flour, granulated sugar, baking soda, and salt. Whisking ensures these ingredients are evenly distributed, especially the baking soda, which needs to be spread throughout for proper leavening. This is your “dry mixture.”
Step 3: Cream Butter and Sugar
- In a separate, medium-sized bowl (or the bowl of a stand mixer), cream together the softened unsalted butter and granulated sugar until light and fluffy. Use an electric mixer on medium speed for about 2-3 minutes. This process incorporates air into the butter, which helps the cake rise and contributes to a tender crumb.
Step 4: Add Eggs and Vanilla
- Add the large eggs to the butter-sugar mixture, one at a time, beating well after each addition. Scrape down the sides of the bowl as needed to ensure everything is fully combined.
- Stir in the vanilla extract. This adds a wonderful aromatic depth to your cake.
Step 5: Combine Wet and Dry Ingredients Alternately
This step is important for developing the right cake structure without overmixing.
- With the mixer on low speed, gradually add about one-third of the dry ingredient mixture to the wet ingredients. Mix until just combined.
- Next, pour in half of the buttermilk. Mix until just combined.
- Repeat: Add another third of the dry ingredients, mix, then the remaining buttermilk, mix.
- Finish by adding the last third of the dry ingredients. Mix only until *just* combined and no streaks of flour remain.
- Beginner Tip: Do NOT overmix! Overmixing develops the gluten in the flour too much, resulting in a tough, dense cake. Mix only until the ingredients are incorporated. A few small lumps are perfectly fine.
Step 6: Fold in Bananas
- Gently fold the mashed bananas into the batter using a spatula. Do this by hand to avoid overmixing and to preserve the banana texture.
Step 7: Bake Your Banana Cake
- Pour the batter evenly into your prepared baking pan. Spread it out gently with a spatula.
- Bake in the preheated oven for 30-40 minutes for a 9×13 inch pan, or 25-30 minutes for 8-inch round pans.
- How to Check for Doneness: The cake is done when a wooden skewer or toothpick inserted into the center comes out clean or with a few moist crumbs attached. The top should be golden brown and spring back when lightly touched.
- Common Mistake: Avoid opening the oven door too early (especially in the first 20 minutes) as this can cause the cake to sink.
Step 8: Cool the Cake
- Once baked, remove the cake from the oven and let it cool in the pan on a wire rack for 10-15 minutes. This allows the cake to set and prevents it from breaking when removed.
- After 10-15 minutes, carefully invert the cake onto the wire rack to cool completely. If using round pans, invert onto one rack, then place another rack on top and flip again so the top of the cake is facing up. Allow the cake to cool completely before frosting – this can take 1-2 hours. Frosting a warm cake will result in melted, runny frosting!
Step 9: Make the Cream Cheese Frosting (if using)
- In a medium bowl, beat the softened cream cheese and softened butter with an electric mixer until smooth and creamy, about 2-3 minutes.
- Gradually add the powdered sugar, one cup at a time, beating on low speed until incorporated, then increasing to medium speed until smooth.
- Stir in the vanilla extract.
- If the frosting is too thick, add milk or cream one tablespoon at a time until you reach your desired consistency. If it’s too thin, add a bit more powdered sugar.
Step 10: Frost and Serve!
- Once the cake is completely cool, spread the cream cheese frosting evenly over the top (and sides, if desired, for round cakes).
- Slice and serve! Enjoy your delicious, homemade **Banana Cake Sara Lee Recipe**!
Tips & Tricks for Beginner Bakers
Baking can seem daunting, but these simple **baking tips for beginners** will set you up for success with this **easy baking recipe** and many more!
- Room Temperature is Key: We mentioned it, but it’s worth repeating! Butter, eggs, and buttermilk at room temperature blend smoothly into a uniform batter, trapping air for a lighter, fluffier cake.
- Measure Accurately: Especially flour! Spoon flour into your measuring cup and then level it off with the back of a knife. Don’t scoop directly from the bag, as this compacts the flour and you’ll end up with too much, leading to a dry cake.
- Don’t Overmix: Once you add the flour, mix only until just combined. Overmixing develops gluten, which makes cakes tough and chewy instead of tender.
- Use Very Ripe Bananas: The riper the bananas (dark spots or even black peels are perfect!), the sweeter and more flavorful your cake will be. They also mash more easily and contribute to moisture.
- Buttermilk Substitute: No buttermilk? No problem! Add 1 tablespoon of white vinegar or lemon juice to a liquid measuring cup, then fill the rest of the way to 1/2 cup with regular milk. Let it sit for 5-10 minutes until it slightly curdles.
- Patience with Cooling: Resist the urge to frost a warm cake! It will melt your frosting into a gooey mess. Let the cake cool completely on a wire rack.
- Clean Your Pan: Always grease and flour your pan well to prevent sticking. You can also line the bottom with parchment paper for extra insurance, especially with round cakes.
- Know Your Oven: Ovens can vary. If your cake seems to be browning too quickly, you might lower the temperature slightly next time or tent it with foil. Invest in an oven thermometer for precise temperature readings.
Essential Baking Tools
Having the right tools makes baking much easier and more enjoyable. Here are a few essentials you might want to consider:
- Mixing Bowl Set: A good set of various sizes is invaluable.
- Whisk: For smoothly combining dry ingredients and light mixing.
- 9×13 Inch Baking Pan: The perfect size for this recipe!
- Measuring Cups and Spoons Set: Accurate measurements are crucial for baking success.
- Rubber Spatula: Essential for scraping bowls and gently folding ingredients.
- Electric Mixer (Handheld or Stand): Makes creaming butter and sugar, and making frosting, much easier.
- Wire Cooling Rack: Allows air to circulate around your cake for even cooling.
Nutrition Info (per serving, estimated for 16 servings)
Please note that these are approximate values and can vary based on specific ingredient brands and portion sizes. This estimate includes the cream cheese frosting.
| Nutrient | Amount |
|---|---|
| Calories | 410 kcal |
| Carbohydrates | 62 g |
| Protein | 5 g |
| Fat | 18 g |
| Fiber | 1 g |
| Sugar | 45 g |
Frequently Asked Questions (FAQs)
Q1: My cake turned out dry. What went wrong?
A: A common culprit for dry cake is overmixing the batter once the flour is added. This develops the gluten, leading to a tough, dry texture. Also, accurately measuring flour (spooning and leveling) is crucial, as too much flour will absorb too much moisture. Finally, baking for too long can also dry out your cake; always check for doneness with a toothpick.
Q2: Can I use less sugar in this recipe?
A: While you can slightly reduce the sugar (e.g., by 1/4 cup), be aware that sugar isn’t just for sweetness; it also contributes to the cake’s moisture, tenderness, and browning. Significantly reducing it might alter the texture and moisture content of the cake. The very ripe bananas do add a lot of natural sweetness, though!
Q3: How should I store the Banana Cake?
A: If your cake has cream cheese frosting, it should be stored in an airtight container in the refrigerator for up to 3-4 days. If it’s unfrosted, it can be kept at room temperature in an airtight container for 2-3 days, or refrigerated for up to 5 days. You can also freeze slices for up to 2-3 months.
Q4: My bananas aren’t very ripe. Can I still use them?
A: For the best flavor and moisture, very ripe bananas are highly recommended. If yours aren’t quite there, you can try to ripen them faster: place them on a baking sheet in a 300°F (150°C) oven for 15-30 minutes, until the peels turn black. Let them cool completely before mashing.
Q5: Can I make this into cupcakes instead of a cake?
A: Absolutely! This recipe works wonderfully for cupcakes. Line a muffin tin with paper liners and fill each about two-thirds full. Bake for approximately 18-22 minutes, or until a toothpick inserted comes out clean. The yield will be around 24 cupcakes.
Q6: Do I really need room temperature ingredients?
A: Yes, it truly makes a difference! Room temperature butter creams smoothly with sugar, incorporating air for a light texture. Cold ingredients, on the other hand, don’t emulsify well, leading to a lumpy batter and a denser, sometimes drier, cake. It’s a small step that yields big results!
Conclusion
And there you have it – your very own, incredibly delicious, and surprisingly easy Banana Cake Sara Lee Recipe! We hope this detailed guide has empowered you with the confidence and knowledge to bake a truly memorable cake. There’s something incredibly satisfying about transforming simple ingredients into a homemade treat, and this banana cake is perfect for sharing with loved ones or simply enjoying a slice (or two!) with a cup of coffee.
Don’t be afraid to get your hands a little messy, follow the steps, and most importantly, have fun in the kitchen! We’re confident that even as a beginner, you’ll achieve fantastic results with this easy baking recipe. Happy baking, and we can’t wait to hear about your banana cake creations!