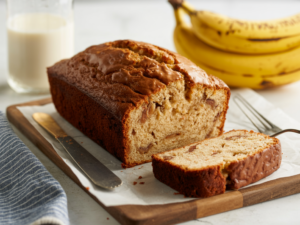
Using a bread machine for banana bread eliminates guesswork and ensures a consistent, perfectly baked loaf every time. It’s an absolute game-changer for busy mornings or an afternoon snack. So, grab those overripe bananas sitting on your counter, and let’s get baking!
Ingredients You’ll Need
Gathering your ingredients before you start is a key **baking tip for beginners**. It makes the whole process smoother and ensures you don’t miss anything crucial!
| Ingredient | Quantity | Unit |
|---|---|---|
| Warm Water (105-115°F) | 1/4 | cup |
| Vegetable Oil (or melted butter) | 1/4 | cup |
| Large Eggs | 2 | large |
| Very Ripe Bananas, mashed | 1 | cup (about 2-3 medium) |
| Vanilla Extract | 1 | teaspoon |
| All-Purpose Flour | 2 | cups |
| Granulated Sugar | 1/2 | cup |
| Light Brown Sugar, packed | 1/4 | cup |
| Baking Soda | 1 | teaspoon |
| Salt | 1/2 | teaspoon |
| Ground Cinnamon (optional) | 1/2 | teaspoon |
| Chopped Walnuts | 1/2 | cup |
Step-by-Step Instructions for Bread Machine Banana Nut Bread
Follow these detailed steps carefully for the best results. Remember, the order of adding ingredients to your bread machine is often important!
- Prepare Your Bananas: Start by mashing your very ripe bananas. The riper they are (think brown spots!), the sweeter and more flavorful your bread will be. Aim for about 1 cup of mashed banana. A fork works perfectly for this.
- Gather Liquid Ingredients: In a separate bowl or large measuring cup, lightly whisk together the warm water, vegetable oil (or melted butter), eggs, mashed bananas, and vanilla extract. Ensure everything is well combined. This is a crucial step for even distribution of moisture and flavor.
- Add Liquids to Bread Machine Pan: Pour the entire liquid mixture into the bread machine pan. Most bread machines prefer liquids to go in first, creating a barrier for the dry ingredients and allowing for proper mixing.
- Add Dry Ingredients: Carefully spoon the all-purpose flour over the liquid mixture in the bread machine pan. Do not stir. On top of the flour, add the granulated sugar, brown sugar, baking soda, salt, and optional ground cinnamon. Arrange the dry ingredients into a small mound in the center, ensuring the baking soda and salt don’t directly touch the liquid until mixing begins. This helps activate them at the right time.
- Add Walnuts (Timing is Key!): Place the chopped walnuts on top of the dry ingredients. Some bread machines have a “mix-in” dispenser that will add nuts automatically at the appropriate time during the mixing cycle. If yours does, place the walnuts in the dispenser. If not, don’t worry! You can add them manually when your machine signals with a “beep” for additions (usually about 5-10 minutes into the kneading cycle). If your machine doesn’t beep, you can add them about 10-15 minutes into the mixing cycle, once the dough has started to form.
- Select Your Cycle: Close the bread machine lid. Select the “Quick Bread” or “Sweet Bread” cycle on your bread machine. The exact name may vary by model. These cycles typically don’t include a long rise time with yeast, which is perfect for quick breads that use baking soda. If your machine has crust color settings, choose “Medium” for a golden-brown crust.
- Start the Machine: Press the “Start” button and let your bread machine work its magic! Resist the urge to open the lid during the baking process, as this can affect the internal temperature and the bread’s rise.
- Check for Doneness (Optional but Recommended): Towards the end of the baking cycle, you can gently open the lid (if safe to do so with your machine) and insert a toothpick into the center of the loaf. If it comes out clean or with a few moist crumbs, your bread is done. If it looks too pale, some machines allow for an extra few minutes of baking.
- Cooling Time: Once the cycle is complete, carefully remove the bread pan from the machine using oven mitts. Immediately invert the pan onto a wire cooling rack to release the loaf. If it sticks, gently tap the bottom of the pan.
- Slice and Enjoy: Let the banana nut bread cool on the wire rack for at least 30-60 minutes before slicing. This cooling period is essential! It allows the internal structure of the bread to set and prevents it from being gummy or falling apart when you cut into it. Slice with a serrated knife and savor every delicious bite!
Tips & Tricks for Perfect Bread Machine Banana Nut Bread
Even with an **easy baking recipe** like this, a few extra pointers can elevate your results and turn you into a bread-making pro!
- The Riper, The Better: Seriously, those ugly, spotty, nearly black bananas are your best friends for banana bread. They are sweeter and contribute more moisture and intense banana flavor. If your bananas aren’t ripe enough, you can speed up the process by baking them in their peels at 300°F (150°C) for 15-30 minutes until soft and dark.
- Measure Flour Correctly: For **baking tips for beginners**, this is crucial! Don’t scoop your flour directly with the measuring cup. Instead, spoon the flour into your measuring cup and then level it off with a straight edge (like the back of a knife). Scooping directly can compact the flour, leading to too much flour and a dense, dry loaf.
- Room Temperature Ingredients: Ensure your eggs and mashed bananas are at room temperature. This helps them incorporate more smoothly into the batter, leading to a more uniform texture and better rise.
- Don’t Peek! Resist the temptation to lift the lid during the baking cycle. Fluctuations in temperature can cause the bread to sink or affect its texture.
- Customize Your Mix-Ins: Walnuts are classic, but feel free to experiment! Try pecans, chocolate chips (milk, dark, or white), dried cranberries, or a mix of several. Add them at the same time as the walnuts.
- Proper Storage: Once cooled completely, store your banana bread in an airtight container at room temperature for up to 3-4 days. For longer storage, wrap it tightly in plastic wrap and then foil, and freeze for up to 3 months. Thaw at room temperature.
- Adjust for Altitude: If you live at a high altitude, you might need to slightly adjust leavening agents or liquids. This recipe is designed for sea-level baking, but resources are available online for high-altitude baking adjustments if needed.
Essential Baking Tools
While your bread machine does most of the work, a few basic tools will make preparation even easier. These links will take you to general search results on Amazon:
- Mixing Bowl
- Whisk
- Baking Pan (for serving slices, or if you ever decide to bake conventionally!)
- Measuring Cups
- Spatula
Approximate Nutrition Information
Here’s an estimated nutritional breakdown for one serving (assuming 12 slices per loaf). Please note that these are approximate values and can vary based on specific ingredient brands and quantities used.
| Nutrient | Amount (per serving) |
|---|---|
| Calories | ~280-320 kcal |
| Carbohydrates | ~45-55 g |
| Protein | ~4-6 g |
| Fat | ~10-15 g |
| Fiber | ~2-3 g |
| Sugar | ~25-35 g |
Frequently Asked Questions (FAQs)
Got questions? We’ve got answers, especially for **baking tips for beginners**!
- Q: Why didn’t my bread rise properly?
- A: For quick breads like banana bread (which use baking soda/powder, not yeast), common culprits include expired baking soda (always check the date!), too much flour (which makes the batter too heavy), or not enough mashed banana for moisture. Ensure your ingredients are fresh and measured accurately using the “spoon and level” method for flour.
- Q: Can I use less ripe bananas for this recipe?
- A: While you *can* use slightly less ripe bananas, it’s not recommended for the best flavor and moisture. Very ripe bananas are essential for that characteristic sweet, intense banana flavor and moist texture. Less ripe bananas will result in a less flavorful and potentially drier loaf.
- Q: How should I store leftover banana nut bread?
- A: Once completely cooled, store the banana bread in an airtight container or wrapped tightly in plastic wrap at room temperature for up to 3-4 days. For longer storage, you can refrigerate it for up to a week or freeze it for up to 3 months. Ensure it’s well-wrapped to prevent freezer burn.
- Q: Can I add other ingredients like chocolate chips or different nuts?
- A: Absolutely! This recipe is very versatile. Feel free to substitute walnuts with pecans, or add chocolate chips (milk, semi-sweet, or dark), dried cranberries, or even a sprinkle of nutmeg or allspice for extra flavor. Just keep the total amount of mix-ins to about 1/2 to 3/4 cup so as not to overload the bread.
- Q: What bread machine cycle should I use for quick bread?
- A: Most bread machines have a dedicated “Quick Bread” or “Sweet Bread” cycle. These cycles are designed for recipes that use baking soda or baking powder as leavening agents, rather than yeast. They typically involve a mixing phase, a short rest, and then baking, without the long rise times of yeast breads.
- Q: My bread came out dense or gummy. What went wrong?
- A: A dense or gummy texture often points to too much flour (again, the “spoon and level” method is key!) or not enough moisture. It can also happen if the bread is sliced before it has completely cooled, as the internal structure is still setting. Ensure your bananas are very ripe and moist, and always allow the bread to cool fully on a wire rack.
Enjoy Your Homemade Banana Nut Bread!
There you have it – a simple, foolproof Banana Nut Bread Recipe For Bread Machine that’s perfect for any home baker, especially those just starting their baking journey. The joy of pulling a warm, fragrant loaf from your bread machine is truly unmatched, and knowing you created it with such ease is incredibly satisfying.
Whether you’re making it for a cozy breakfast, a delightful snack, or to share with loved ones, this recipe is sure to become a staple in your collection of easy baking recipes. Don’t be afraid to experiment a little, and most importantly, have fun with the process! Happy baking!