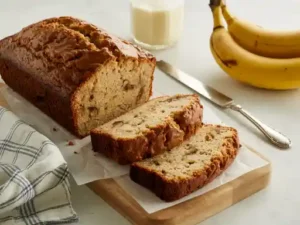
There’s nothing quite like the comforting aroma of freshly baked banana bread wafting through your home. It’s a classic for a reason moist, sweet, and utterly delicious. If you’ve been searching for the perfect Banana Nut Bread Recipe With Pecans that’s not only incredibly tasty but also super easy to follow, you’ve hit the jackpot! This recipe is specifically designed to be one of the best easy baking recipes for anyone, especially if you’re just starting your culinary journey.
Don’t be intimidated by baking; it’s a wonderfully rewarding experience. We’ll walk you through every step, providing essential baking tips for beginners to ensure your first (or hundredth!) loaf comes out perfect every single time. Get ready to transform those overripe bananas into a delightful treat that your family and friends will rave about. Let’s get baking!
Ingredients You’ll Need
Gathering your ingredients before you start is a crucial step in stress-free baking. This is called “mise en place” (everything in its place) and it helps ensure you don’t miss anything. Here’s what you’ll need for this delectable pecan banana bread:
| Ingredient | Quantity | Unit |
|---|---|---|
| All-purpose flour | 1 ½ | cups |
| Granulated sugar | ¾ | cup |
| Baking soda | 1 | teaspoon |
| Salt | ½ | teaspoon |
| Very ripe bananas (mashed) | 3 | large |
| Unsalted butter (softened) | ½ | cup (1 stick) |
| Large eggs (room temperature) | 2 | |
| Vanilla extract | 1 | teaspoon |
| Chopped pecans | 1 | cup |
Step-by-Step Instructions for Perfect Banana Nut Bread
Follow these detailed steps, and you’ll be enjoying warm, fragrant banana bread in no time. We’ve included beginner-friendly tips throughout!
Step 1: Prepare Your Oven and Pan
Preheat your oven to 350°F (175°C). This ensures the oven is at a consistent temperature when your bread goes in, leading to even baking. Next, lightly grease and flour a 9×5 inch loaf pan, or line it with parchment paper for easy removal. This prevents your bread from sticking, which is a common baking frustration!
Step 2: Mash Those Bananas!
In a medium bowl, use a fork or potato masher to thoroughly mash your very ripe bananas. The riper they are (think brown spots and soft to the touch), the sweeter and more flavorful your bread will be. Aim for a slightly lumpy consistency – a few small chunks are fine and add texture.
Step 3: Cream Butter and Sugar
In a large mixing bowl, using an electric mixer (or a whisk and some elbow grease!), beat the softened butter and granulated sugar together until the mixture is light and fluffy. This process, called “creaming,” incorporates air into your batter, which contributes to a tender, moist crumb in your finished bread.
Step 4: Add Eggs and Vanilla
Beat in the two large eggs, one at a time, making sure each egg is fully incorporated before adding the next. Then, stir in the vanilla extract. Adding ingredients gradually helps create a smooth, emulsified batter.
Step 5: Combine Dry Ingredients
In a separate bowl, whisk together the all-purpose flour, baking soda, and salt. Whisking dry ingredients together ensures they are evenly distributed throughout the flour, so you don’t get pockets of salt or baking soda in your bread.
Step 6: Gradually Combine Wet and Dry
Add the dry ingredient mixture to the wet mixture in three additions, mixing on low speed (or by hand with a spatula) just until combined after each addition. **Beginner Tip:** It’s crucial not to overmix at this stage! Overmixing develops the gluten in the flour too much, which can lead to tough, dry bread. A few lumps of flour are perfectly okay!
Step 7: Fold in Bananas and Pecans
Gently fold in your mashed bananas and chopped pecans into the batter. Use a spatula and fold until just incorporated. Again, be careful not to overmix. The goal is to distribute them evenly without overworking the batter.
Alternative: If pecans aren’t your favorite, feel free to substitute with walnuts, or even chocolate chips for a delightful twist!
Step 8: Bake Your Banana Bread
Pour the batter into your prepared loaf pan and spread it evenly. Place the pan in the preheated oven and bake for 55-65 minutes. Baking times can vary depending on your oven, so keep an eye on it.
How to Check for Doneness (Crucial Beginner Tip!): Insert a toothpick into the center of the loaf. If it comes out clean or with a few moist crumbs attached, your bread is done. If it comes out with wet batter, continue baking for another 5-10 minutes and test again. Undercooking is a common mistake that can result in a soggy center.
Step 9: Cool and Enjoy!
Once baked, remove the loaf pan from the oven and let it cool in the pan on a wire rack for 10-15 minutes. This allows the bread to set and prevents it from crumbling. After this initial cooling, carefully remove the banana bread from the pan and place it directly on the wire rack to cool completely. Slicing warm bread can be tempting, but waiting until it’s cooled will give you cleaner slices and better texture.
Slice, serve, and savor your homemade **Banana Nut Bread Recipe With Pecans**! It’s delicious on its own, with a pat of butter, or a dollop of cream cheese.
Tips & Tricks for Banana Bread Success
Mastering banana bread is easy with a few insider secrets. Here are some actionable tips to elevate your baking:
- Embrace Overripe Bananas: The browner and spottier your bananas are, the sweeter and more flavorful your bread will be. They also mash more easily and incorporate better into the batter. If your bananas aren’t quite ripe enough, you can bake them in their skins on a baking sheet at 300°F (150°C) for 15-20 minutes until they turn black – let them cool before mashing.
- Don’t Overmix: This is the golden rule for most quick breads! Overmixing develops gluten, which leads to a tough, dense texture. Mix just until the ingredients are combined. A few lumps are fine!
- Measure Flour Correctly: For accurate measuring, use the “spoon and level” method. Spoon flour into your measuring cup, then level it off with the back of a knife. Don’t scoop directly from the bag, as this compacts the flour and you’ll end up with too much.
- Room Temperature Ingredients: Ensure your butter and eggs are at room temperature. They emulsify and incorporate much more smoothly into the batter, creating a lighter, more uniform texture.
- Test for Doneness Reliably: Always use the toothpick test in the center of the loaf. If it comes out clean or with moist crumbs, it’s done. A clean toothpick is key to avoiding underbaked bread.
- Cool Completely Before Slicing: While it’s hard to resist, letting your banana bread cool completely on a wire rack prevents it from crumbling when sliced and allows the internal structure to set properly.
- Storage: Store leftover banana bread in an airtight container at room temperature for up to 3 days, or in the refrigerator for up to a week. For longer storage, slice the bread and freeze individual slices in an airtight bag for up to 3 months.
Essential Baking Tools
Having the right tools makes baking much easier and more enjoyable. Here are a few essentials for this recipe:
- Mixing Bowl (You’ll need at least two!)
- Whisk (For dry ingredients and light mixing)
- Baking Pan (A standard 9×5 inch loaf pan is perfect)
- Measuring Cups & Measuring Spoons (Accuracy is key!)
- Spatula (For scraping bowls and folding ingredients)
- Electric Mixer (Handheld or stand mixer makes creaming butter and sugar much easier)
- Wire Rack (For cooling your bread evenly)
Nutrition Information (Estimated Per Slice)
This information is an estimate based on 12 servings per loaf and standard ingredient values. Actual nutritional content may vary depending on specific ingredients and serving size.
| Nutrient | Amount |
|---|---|
| Calories | 320 kcal |
| Carbohydrates | 45 g |
| Protein | 5 g |
| Fat | 18 g |
| Fiber | 2 g |
| Sugar | 25 g |
Frequently Asked Questions (FAQs) for Beginners
Q1: What if my bananas aren’t ripe enough?
A: Very ripe bananas are crucial for sweetness and moisture. If yours are still green or yellow, you can speed up ripening by placing them in a paper bag with an apple overnight. For an immediate fix, you can bake unpeeled bananas on a baking sheet at 300°F (150°C) for 15-20 minutes until their skins turn black and they soften. Let them cool before mashing.
Q2: Can I use frozen bananas for this recipe?
A: Absolutely! Frozen ripe bananas are excellent for banana bread. Thaw them completely at room temperature or in the microwave. They will release a lot of liquid, so make sure to drain any excess before mashing and adding them to the batter.
Q3: How do I know if I’m overmixing the batter?
A: Overmixing develops the gluten in the flour, which can lead to tough, chewy bread. When combining wet and dry ingredients, mix only until the flour streaks have just disappeared. It’s okay to have a few small lumps; they will bake out. If you keep mixing until the batter is perfectly smooth, you’ve likely gone too far.
Q4: My banana bread came out dry. What went wrong?
A: A dry loaf usually means it was overbaked, or you used too much flour. Always use the toothpick test to check for doneness, and remove the bread from the oven as soon as it’s ready. For flour, make sure you’re using the “spoon and level” method to avoid compacting too much flour into your measuring cup.
Q5: Can I make this recipe dairy-free or gluten-free?
A: Yes, with some modifications! For dairy-free, substitute the unsalted butter with a plant-based butter alternative or an equal amount of oil (like vegetable or canola oil). For gluten-free, you can try using a 1:1 gluten-free baking flour blend, but results may vary slightly in texture. Always check that your baking soda is also gluten-free if you have severe sensitivities.
Q6: How long does homemade banana bread last?
A: At room temperature, wrapped tightly in plastic wrap or stored in an airtight container, your banana bread will stay fresh for 2-3 days. In the refrigerator, it can last up to a week. For longer storage, slice the bread and freeze individual slices in an airtight bag or container for up to 3 months. Thaw at room temperature or gently warm in the microwave.
Time to Bake Your Masterpiece!
Congratulations! You now have all the knowledge and detailed steps to bake the most incredible Banana Nut Bread Recipe With Pecans. Baking is a journey of discovery, and every loaf you make will teach you something new. Don’t be afraid to experiment with spices like cinnamon or nutmeg, or even add a handful of chocolate chips next time!
We hope this guide has made baking feel approachable and fun. There’s immense satisfaction in pulling a warm, golden-brown loaf from the oven that you made with your own hands. So go ahead, tie on that apron, and fill your kitchen with the irresistible scent of homemade banana bread. Happy baking!