Welcome, aspiring bakers! Are you ready to embark on a truly rewarding culinary adventure? There’s nothing quite like the aroma and taste of freshly baked sourdough bread, and with this Best Rye Sourdough Bread Recipe, you’re about to unlock that magic in your own kitchen. Many think sourdough is daunting,
but I promise, with the right baking tips for beginners and a little patience, you’ll be pulling out magnificent loaves in no time. Forget complicated techniques; we’re focusing on simplicity and clarity to make this one of the most easy baking recipes you’ll ever try. Get ready to impress yourself and everyone you share this incredible bread with!
Ingredients List
Gather your ingredients! Quality matters, especially for sourdough, so opt for good quality flours if you can.
| Ingredient | Quantity | Unit |
|---|---|---|
| Active Sourdough Starter | 100 | grams |
| Warm Water (90-95°F / 32-35°C) | 350 | grams |
| Strong Bread Flour (High Protein) | 300 | grams |
| Whole Rye Flour | 150 | grams |
| Fine Sea Salt | 10 | grams |
Step-by-Step Instructions: Baking Your Best Rye Sourdough
Patience is your secret ingredient in sourdough baking. Follow these steps carefully, and don’t be afraid to get your hands a little sticky!
1. Prepare Your Sourdough Starter (The Night Before or Morning Of)
For a successful bake, your starter needs to be active and bubbly. This means feeding it 4-12 hours before you plan to mix your dough. An active starter should have doubled in size, be full of bubbles, and pass the float test (a small spoonful floats in water).
- Feed your starter: Mix 25g mature starter, 50g warm water, and 50g bread flour. Cover loosely and let it sit at room temperature (70-75°F / 21-24°C) until it’s ripe and active.
- Beginner Tip: If your starter isn’t doubling or floating, it might be weak. Try feeding it a few times over 1-2 days before baking to strengthen it. Consistency is key!
2. Autolyse (Hydration & Gluten Development)
This is a simple but crucial step that allows the flours to fully hydrate before adding the starter and salt, making the dough easier to work with and improving gluten development.
- In a large mixing bowl, combine the 350g warm water, 300g bread flour, and 150g whole rye flour.
- Mix with your hands or a spatula until no dry clumps of flour remain. It will be shaggy and sticky.
- Cover the bowl with a damp towel or plastic wrap and let it rest for 30-60 minutes at room temperature.
- Beginner Tip: Don’t skip this step! It significantly improves the dough’s texture and makes kneading (or folding) much easier later on.
3. Incorporate Starter and Salt
Now it’s time to bring your active starter into the mix, along with the salt.
- Add the 100g active sourdough starter and 10g fine sea salt directly on top of your autolysed dough.
- Using wet hands, gently squeeze and fold the dough for 2-3 minutes until the starter and salt are fully incorporated. The dough might feel a little stiffer at first, but keep going until it’s uniform.
- Cover the bowl again and let it rest for 30 minutes.
- Common Mistake & Fix: If the salt isn’t fully incorporated, you might get dense spots in your bread. Ensure it’s evenly distributed by squeezing and folding thoroughly.
4. Bulk Fermentation & Stretch and Folds (Building Strength)
This phase is where your dough builds strength and develops its characteristic sourdough flavor. We’ll perform a series of “stretch and folds” to strengthen the gluten without traditional kneading.
- Over the next 3-4 hours (this can vary based on your room temperature and starter strength), you will perform 3-4 sets of stretch and folds. Aim for about 30-45 minutes between each set.
- To perform a stretch and fold: With wet hands, grab a portion of the dough from one side, stretch it upwards, and fold it over to the opposite side of the dough. Rotate the bowl a quarter turn and repeat this process 3-4 times until you’ve worked your way around the dough.
- After each set, cover the bowl and let it rest.
- What to look for: As you progress, the dough will become smoother, more elastic, and less sticky. It will hold its shape better. By the end of bulk fermentation, the dough should have increased in volume by about 20-30% and show some bubbles on the surface.
- Beginner Tip: Don’t overdo the folds! Gentle handling is best. If your dough is very sticky, wet your hands more. If your kitchen is cold, find a warmer spot for your dough (like an oven with just the light on).
5. Pre-Shaping (Developing Tension)
This step helps to organize the dough and build initial surface tension, preparing it for the final shape.
- Lightly flour your work surface.
- Gently tip the dough out onto the floured surface.
- Using a bench scraper (or your hands), gently pat the dough into a loose round or rectangle.
- Perform a gentle pre-shape: Fold the top third of the dough down to the center, then the bottom third up over that. Turn the dough over and gently cup it with your hands, rotating it to create a tight, round ball.
- Cover the dough with the bowl or a damp cloth and let it rest for 20-30 minutes. This is called the “bench rest” and allows the gluten to relax.
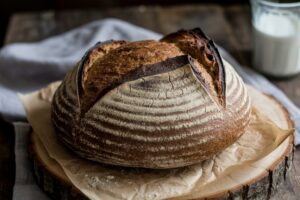
6. Final Shaping (Building Structure)
This is where you give your loaf its final form before proofing. The goal is to create a tight skin on the outside of the dough, which helps with oven spring.
- Lightly flour your work surface and the top of your dough.
- Gently flip the dough over so the floured side is down.
- For a Boule (round loaf): Gently pull the bottom edge of the dough towards you, then fold the right side towards the center, then the left side, then the top. Flip the dough over and, using the palms of your hands, cup the dough and rotate it, dragging it across the lightly floured surface to create a tight, smooth ball.
- For a Batard (oval loaf): Gently stretch the dough into an oval. Fold the top third down, then the bottom third up and over. Pinch the seam. Then, starting from the top, roll the dough downwards, tucking in the sides as you go, to create a tight log. Pinch the final seam closed.
- Beginner Tip: The tighter you can get the surface tension without tearing the dough, the better your oven spring will be. Practice makes perfect here!
7. Cold Proofing (Retarding Flavor Development)
This slow, cold fermentation develops deeper flavors and makes the dough easier to handle for scoring and baking.
- Carefully transfer your shaped dough, seam-side up, into a well-floured banneton (proofing basket) or a bowl lined with a floured linen towel.
- Place the banneton/bowl inside a plastic bag or cover tightly with plastic wrap to prevent a skin from forming.
- Refrigerate for 12-18 hours (or up to 24 hours).
- Common Mistake & Fix: Under-proofing in the fridge can lead to dense bread with poor oven spring. Ensure enough time for the flavors to develop and the dough to firm up. Over-proofing can make the dough difficult to score and cause it to spread.
8. Preheat Oven & Baking (The Moment of Truth!)
A very hot oven and a Dutch oven (or baking stone with steam) are crucial for a great crust and oven spring.
- About 1 hour before baking, place your Dutch oven (with its lid) inside your oven. Preheat your oven to 475°F (245°C). This ensures the Dutch oven is scorching hot.
- Beginner Tip: Don’t rush the preheat! A properly hot Dutch oven traps steam around the dough, creating that beautiful crust.
- Once preheated, carefully remove the hot Dutch oven from the oven.
- Gently invert your proofed dough from the banneton directly into the hot Dutch oven.
- Score the dough: Using a sharp razor blade (lame) or a very sharp knife, quickly make one deep score across the top of the dough (about 1/2 to 3/4 inch deep). Or, create a decorative pattern.
- Place the lid back on the Dutch oven.
- Bake with the lid on for 20 minutes.
- Remove the lid and reduce the oven temperature to 450°F (230°C).
- Continue baking for another 25-30 minutes, or until the crust is a deep golden brown and the internal temperature reaches 200-210°F (93-99°C).
- Alternative: If you don’t have a Dutch oven, you can bake on a preheated baking stone or heavy baking sheet. To create steam, place a pan of hot water on the bottom rack of your oven during the first 20 minutes of baking.
9. Cool Completely
This is arguably the hardest step for many, but absolutely essential for the best texture and flavor.
- Carefully remove the bread from the Dutch oven and place it on a wire rack to cool completely.
- This can take 2-3 hours. Slicing too early traps steam, leading to a gummy interior.
- Beginner Tip: Resisting the urge to slice warm bread is tough, but it’s worth it! Cooling allows the starches to set and the crumb to develop properly.
Tips & Tricks for Sourdough Success
- Know Your Starter: An active, healthy starter is 80% of sourdough success. Observe it daily, understand its feeding schedule, and ensure it’s lively before baking.
- Temperature Matters: Room temperature significantly impacts bulk fermentation time. Warmer rooms speed things up, colder rooms slow them down. Adjust your fermentation times accordingly.
- Hydration is Key: Don’t be afraid of sticky dough. High hydration contributes to an open, airy crumb. Wet hands make handling easier.
- Don’t Be Afraid to Get Your Hands Dirty: Sourdough is a tactile process. Feeling the dough, understanding its texture, and knowing when it’s ready comes from experience.
- Practice Makes Perfect: Your first loaf might not be Instagram-perfect, and that’s okay! Each bake is a learning experience. Pay attention to what worked and what didn’t.
- Invest in a Scale: Baking by weight (grams) is far more accurate than by volume (cups) for sourdough. It ensures consistent results.
- Listen to Your Dough: Instead of strictly following timings, learn to read the dough. Look for visual cues like bubbles, increased volume, and changes in texture during bulk fermentation and proofing.
Essential Baking Tools
Having the right tools can make your sourdough journey much smoother. Here are some essentials:
- Large Mixing Bowl
- Whisk (for starter, though often just a spoon is fine)
- Dutch Oven (for baking, highly recommended)
- Digital Kitchen Scale (essential for accuracy)
- Dough Scraper / Spatula (for handling sticky dough)
- Banneton / Proofing Basket (or a bowl lined with a floured towel)
- Lame / Razor Blade (for scoring)
- Wire Rack (for cooling)
Nutrition Information (Per Slice, approx. 50g)
Please note that these values are approximate and can vary based on specific ingredients and loaf size.
| Nutrient | Amount |
|---|---|
| Calories | 130-150 kcal |
| Carbohydrates | 25-30 g |
| Protein | 4-5 g |
| Fat | 0.5-1 g |
| Fiber | 2-3 g |
| Sugar | 0-1 g |
Frequently Asked Questions (FAQs)
Q1: My sourdough starter isn’t very active. What should I do?
A1: This is common! Try feeding it more consistently (every 12-24 hours) with a 1:2:2 ratio (starter:water:flour by weight). Use warm water and keep it in a warm spot (75-80°F / 24-27°C) until it consistently doubles in size within 4-8 hours after feeding. It might take a few days to strengthen.
Q2: Can I use different types of flour for this recipe?
A2: Yes, to a degree! This recipe specifies rye, which adds unique flavor and texture. You can experiment with different ratios of bread flour to rye flour, but be aware that different flours absorb water differently, so you might need to adjust the water slightly. For beginners, stick to the recipe first!
Q3: How do I know if my dough is properly proofed before baking?
A3: For cold proofing, the dough should feel firm but still have some “jiggle.” If you gently poke it with a floured finger, it should spring back slowly, leaving a slight indentation. If it springs back immediately, it’s likely underproofed. If it doesn’t spring back at all and feels deflated, it’s overproofed.
Q4: My bread came out dense. What went wrong?
A4: A dense crumb is usually due to one of a few things: an inactive starter, insufficient bulk fermentation (not enough rise), under-proofing in the final stage, or not enough oven spring (often due to not preheating the Dutch oven enough or poor scoring). Review these steps for your next bake!
Q5: How should I store my homemade sourdough bread?
A5: Store cooled sourdough at room temperature. A cut loaf can be placed cut-side down on a cutting board, or stored in a paper bag or a bread box for 2-3 days. For longer storage, slice the bread and freeze it in an airtight bag. Toast directly from frozen!
Conclusion
Congratulations, you’ve made it to the end of your Best Rye Sourdough Bread Recipe journey! Baking sourdough is a craft, a science, and an art all rolled into one. It requires patience and observation, but the rewards are truly extraordinary. The satisfaction of pulling a warm, crusty, fragrant loaf from your oven is unparalleled. Don’t be discouraged if your first attempt isn’t perfect; every loaf teaches you something new. Keep baking, keep experimenting, and most importantly, keep enjoying the process. Your kitchen is now a sourdough haven!