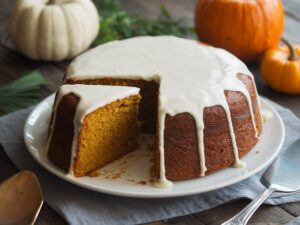
Welcome, fellow dessert lovers and aspiring bakers! Get ready to embark on a culinary adventure that will redefine your autumn cravings. Today, we’re diving headfirst into one of the most talked-about, utterly delicious, and surprisingly simple desserts: the Better Than Sex Pumpkin Cake Recipe. Don’t let the bold name intimidate you; this cake truly lives up to its hype with layers of moist pumpkin goodness, decadent caramel, sweet condensed milk, and a dreamy whipped topping.
If you’re new to baking, fear not! This post is packed with easy baking recipes principles and specific baking tips for beginners to ensure your success. You’ll be amazed at how effortlessly you can create a show-stopping dessert that will have everyone begging for the recipe. So, tie on your apron, preheat your oven, and let’s make some magic!
Ingredients You’ll Need
Gathering your ingredients before you start is one of the best **baking tips for beginners**. It ensures you have everything on hand and makes the process smooth and enjoyable.
For the Pumpkin Cake:
| Quantity | Unit | Ingredient |
|---|---|---|
| 1 | (15.25 oz) box | Yellow or Spice Cake Mix (e.g., Betty Crocker, Duncan Hines) |
| 1 | (15 oz) can | Pumpkin Puree (NOT pumpkin pie filling) |
| 3 | large | Eggs |
| 1/2 | cup | Vegetable Oil (or other neutral oil) |
| 1/2 | cup | Water or Milk |
| 2 | teaspoons | Pumpkin Pie Spice (if using yellow cake mix; optional if using spice cake mix) |
For the Decadent Filling:
| Quantity | Unit | Ingredient |
|---|---|---|
| 1 | (14 oz) can | Sweetened Condensed Milk |
| 1 | (12 oz) jar | Caramel Sauce (store-bought or homemade) |
For the Whipped Topping:
| Quantity | Unit | Ingredient |
|---|---|---|
| 2 | cups | Heavy Cream (cold) |
| 1/2 | cup | Powdered Sugar (confectioners’ sugar), or to taste |
| 1 | teaspoon | Vanilla Extract |
| Optional: | 1/2 cup | Toffee Bits, chopped pecans, or a sprinkle of cinnamon for garnish |
Step-by-Step Instructions: Your Path to Pumpkin Perfection
Follow these detailed steps, and you’ll create a masterpiece. Remember, baking is a science, but it’s also about having fun!
Step 1: Preheat and Prep Your Pan
- Preheat your oven: Set your oven to 350°F (175°C). This is a crucial first step for even baking.
- Prepare your baking pan: Lightly grease and flour a 9×13 inch baking pan. You can use cooking spray with flour or butter and a sprinkle of flour, tapping out the excess. This prevents your cake from sticking – a common beginner frustration!
Step 2: Mix the Cake Batter
- Combine dry ingredients: In a large mixing bowl, empty the contents of your cake mix. If you’re using a yellow cake mix, add the 2 teaspoons of pumpkin pie spice now.
- Add wet ingredients: Pour in the canned pumpkin puree, eggs, vegetable oil, and water or milk.
- Mix gently: Using an electric mixer on low speed, or a whisk by hand, mix the ingredients until just combined. Then, increase to medium speed and beat for about 2 minutes, scraping down the sides of the bowl as needed. Beginner Tip: Do not overmix! Overmixing develops gluten, which can lead to a tough, dry cake. Mix only until no dry streaks of flour remain.
Step 3: Bake the Cake
- Pour into pan: Pour the prepared cake batter evenly into your greased 9×13 inch baking pan.
- Bake: Place the pan in your preheated oven. Bake for approximately 28-32 minutes, or until a wooden skewer or toothpick inserted into the center comes out clean. Beginner Tip: Oven temperatures can vary! Start checking around 28 minutes. If it’s still gooey, give it a few more minutes. Avoid opening the oven door too frequently, especially during the first 20 minutes, as this can cause the cake to sink.
- Cool slightly: Once baked, remove the cake from the oven and let it cool in the pan on a wire rack for about 10-15 minutes. It needs to be warm, but not piping hot, for the next step.
Step 4: Poke and Pour the Filling
- Poke holes: While the cake is still warm, use the handle of a wooden spoon (or a round, sturdy chopstick, or even a skewer) to poke holes all over the top of the cake. Aim for about 1/2 to 1 inch apart, going about two-thirds of the way down into the cake. Don’t poke all the way through to the bottom of the pan.
- Pour condensed milk: Slowly and evenly pour the entire can of sweetened condensed milk over the warm, poked cake. Make sure to get it into all those holes!
- Pour caramel sauce: Next, pour the caramel sauce evenly over the condensed milk layer. You can use a spatula to gently spread it if needed.
- Chill: Cover the cake loosely with plastic wrap and transfer it to the refrigerator. Chill for at least 2-4 hours, or preferably overnight. This chilling time is essential for the condensed milk and caramel to soak into the cake, creating that incredibly moist and flavorful texture. Beginner Tip: Patience is key here! Don’t rush this step.
Step 5: Prepare the Whipped Topping
- Chill your bowl and whisk: For the best whipped cream, place your mixing bowl (preferably metal) and whisk attachment (if using an electric mixer) in the freezer for 10-15 minutes before you start. Cold equipment helps the cream whip faster and hold its shape better.
- Whip the cream: Pour the cold heavy cream into the chilled bowl. Add the powdered sugar and vanilla extract.
- Beat until stiff peaks: Using an electric mixer on medium-high speed, beat the mixture until stiff peaks form. This means when you lift the whisk, the cream stands up in firm peaks that don’t flop over. Beginner Tip: Watch carefully! Whipped cream can go from perfect to over-whipped (and grainy) very quickly. Stop as soon as you reach stiff peaks.
Step 6: Assemble and Serve
- Spread topping: Once the cake is thoroughly chilled, remove it from the refrigerator. Spread the freshly whipped cream evenly over the top of the caramel layer.
- Garnish (optional): If desired, sprinkle with toffee bits, chopped pecans, or a light dusting of cinnamon or pumpkin pie spice for an extra touch of flavor and visual appeal.
- Serve: Slice and serve chilled. This cake is best enjoyed cold!
Tips & Tricks for Baking Success
Even with **easy baking recipes**, a few extra pointers can elevate your experience and results. These **baking tips for beginners** will make you feel like a pro!
- Room Temperature Eggs: For the cake batter, bringing your eggs to room temperature helps them incorporate better into the batter, resulting in a more uniform and tender crumb. Just set them out on the counter for 30 minutes before you start.
- Don’t Substitute Pumpkin Pie Filling: This is a common mistake! Pumpkin puree is 100% pumpkin, while pumpkin pie filling has added sugar and spices, which will throw off the flavor and texture of your cake.
- Test Your Oven Temperature: If you suspect your oven runs hot or cold, an inexpensive oven thermometer can be a game-changer. Accurate temperature is crucial for consistent baking.
- Chill Your Whipped Cream Components: We mentioned this in the steps, but it bears repeating! A cold bowl, cold whisk, and very cold heavy cream are your best friends for achieving perfectly stiff whipped cream.
- Make Ahead Magic: This cake is fantastic for making ahead! It tastes even better the next day after the flavors have had more time to meld. You can bake the cake, poke, pour the fillings, and chill it overnight. Add the whipped topping just a few hours before serving for the freshest result.
- Storage: Store any leftover cake covered in the refrigerator for up to 3-4 days.
- Customize Your Topping: While whipped cream is classic, a cream cheese frosting would also be divine. You could also experiment with different garnishes like mini chocolate chips, crumbled gingersnaps, or a drizzle of white chocolate.
Essential Baking Tools
Having the right tools makes all the difference! Here are some basics that will serve you well for this recipe and many others:
- Mixing Bowl
- Whisk
- 9×13 inch Baking Pan
- Measuring Cups
- Measuring Spoons
- Rubber Spatula
- Electric Mixer (handheld or stand mixer)
- Wooden Spoon (for poking holes)
- Wire Rack
Nutrition Information (Estimated per serving)
Please note: These are approximate values and can vary based on specific ingredients, brands, and serving sizes.
| Nutrient | Amount |
|---|---|
| Calories | 450-550 kcal |
| Carbohydrates | 55-70 g |
| Protein | 5-7 g |
| Fat | 25-35 g |
| Fiber | 1-3 g |
| Sugar | 40-55 g |
Frequently Asked Questions (FAQs)
Q1: Can I make this cake from scratch instead of using a cake mix?
A: Absolutely! If you have a favorite pumpkin cake recipe from scratch, feel free to use it. Just make sure it bakes in a 9×13 inch pan and then follow the poking, pouring, and topping steps as written. Adjust baking time according to your scratch recipe.
Q2: My whipped cream isn’t getting stiff. What am I doing wrong?
A: The most common reasons are warm cream or warm equipment. Ensure your heavy cream is very cold, and chill your mixing bowl and whisk attachment in the freezer for 10-15 minutes before whipping. Also, make sure you are using “heavy cream” or “heavy whipping cream” (which has at least 36% fat content) and not “light cream” or “half-and-half.”
Q3: How far in advance can I make this cake?
A: This cake is fantastic for making ahead! You can bake the cake and add the condensed milk and caramel layers up to 2 days in advance, storing it covered in the refrigerator. Add the fresh whipped topping no more than 12-24 hours before serving for the best texture.
Q4: Can I use a different size baking pan?
A: While a 9×13 inch pan is ideal for this recipe, you could use two 8 or 9-inch round pans. You would need to adjust the baking time (likely shorter) and potentially the amount of filling and topping to ensure full coverage. The “poke cake” effect is best in a single layer, so it might be harder to get the full effect in a multi-layer cake.
Q5: What if I don’t have pumpkin pie spice?
A: No problem! You can create your own blend. A good substitute for 2 teaspoons of pumpkin pie spice would be: 1 teaspoon ground cinnamon, 1/2 teaspoon ground ginger, 1/4 teaspoon ground nutmeg, and 1/4 teaspoon ground cloves.
Conclusion: Your New Favorite Fall Dessert!
And there you have it! Your very own Better Than Sex Pumpkin Cake Recipe, a dessert so unbelievably delicious and surprisingly simple, it’s bound to become a fall tradition. Whether you’re a seasoned baker or just dipping your toes into the wonderful world of baking, this recipe proves that incredible flavors don’t have to be complicated. With our easy baking recipes approach and detailed baking tips for beginners, you’ve got all the tools you need to succeed.
Imagine the smiles around your table as you serve up this moist, rich, and utterly irresistible pumpkin treat. Don’t be shy – dive in, enjoy the process, and savor every single bite. We’d love to hear how your cake turns out, so feel free to share your experiences and photos in the comments below! Happy baking!
“`