Forget complicated techniques and intimidating jargon; this is one of the most easy baking recipes you’ll ever encounter, designed specifically with baking tips for beginners in mind. There’s a profound satisfaction that comes from baking your own bread, from feeling the dough transform under your hands to the intoxicating aroma filling your home. Get ready to embark on a delicious, rewarding adventure that results in a rustic, flavorful loaf perfect for sharing with loved ones.
Gather Your Provisions: The Ingredients List
Simplicity is key! You likely have most of these staples in your pantry already. Fresh ingredients make all the difference, so ensure your yeast is active!
| Quantity | Unit | Ingredient |
|---|---|---|
| 3 ½ – 4 | cups | All-Purpose Flour (plus more for dusting) |
| 1 | packet (2 ¼ tsp) | Active Dry Yeast |
| 1 ½ | cups | Warm Water (105-115°F / 40-46°C) |
| 1 | tablespoon | Honey (optional, for flavor and browning) |
| 1 | teaspoon | Salt |
| 1 | tablespoon | Olive Oil (plus extra for greasing) |
Instructions: Your Journey to Homemade Bread
Baking bread is a sensory experience. Take your time, enjoy the process, and don’t be afraid to get your hands a little floury!
Step 1: Activate the Yeast – The Breath of Life
- In a large mixing bowl, combine the warm water (105-115°F / 40-46°C) with the honey (if using) and sprinkle the active dry yeast over the top.
- Beginner Tip: The water temperature is crucial! If it’s too hot, it will kill the yeast. If it’s too cold, the yeast won’t activate. It should feel like a warm bath – comfortable to the touch.
- Let this mixture sit for 5-10 minutes. You should see a foamy, bubbly layer form on the surface. This means your yeast is alive and ready to work its magic! If it doesn’t foam, your yeast might be old or the water temperature was off. Don’t worry, just start again with fresh yeast and check your water temperature.
Step 2: Mixing the Dough – Bringing it All Together
- Once your yeast is bubbly, add the salt and olive oil to the bowl. Stir gently to combine.
- Gradually add 3 cups of the all-purpose flour, one cup at a time, mixing with a wooden spoon or a sturdy spatula after each addition.
- Once the dough starts to come together and becomes shaggy, add the remaining ½ cup of flour, or just enough until the dough is too stiff to stir. It will still be a bit sticky, but you should be able to gather it into a ball.
- Common Mistake: Adding too much flour too early can result in a dry, dense loaf. It’s always better to add flour gradually until the dough reaches the right consistency – slightly sticky but manageable.
Step 3: Kneading – Developing the Structure
- Lightly flour a clean work surface (your kitchen counter is perfect!). Turn the dough out onto the floured surface.
- Begin kneading the dough. This involves folding the dough over itself, pressing down with the heels of your hands, turning it a quarter turn, and repeating.
- Knead for 8-10 minutes. As you knead, the dough will become smoother, more elastic, and less sticky. It should spring back when you gently poke it with your finger.
- Beginner Tip: Don’t be afraid to put some muscle into it! Kneading develops the gluten, which gives your bread its structure and chewiness. If the dough feels too sticky, add a tiny sprinkle of flour to your hands and the work surface, but resist adding too much.
- No-Knead Alternative: If kneading seems daunting, you can try a “stretch and fold” method. Instead of kneading for 8-10 minutes, simply stretch and fold the dough in the bowl every 30 minutes for 2 hours, covering it between folds. This develops gluten over time with less effort.
Step 4: First Rise (Proofing) – Letting the Dough Grow
- Lightly grease a clean large bowl with a little olive oil. Place the kneaded dough ball into the bowl, turning it once to coat the top with oil. This prevents it from drying out.
- Cover the bowl tightly with plastic wrap or a clean kitchen towel.
- Place the bowl in a warm, draft-free spot. A slightly warm oven (turned off, or just warmed for a minute and then turned off) or near a sunny window works well.
- Let the dough rise for 1 to 1 ½ hours, or until it has doubled in size.
- Beginner Tip: Patience is key here! The rising time can vary based on your room temperature. If your kitchen is cool, it might take longer. If it’s warm, it might be quicker. The visual cue of “doubled in size” is more important than the exact time.
Step 5: Shaping the Loaf – Crafting Your Masterpiece
- Once the dough has doubled, gently punch it down to release the air. This is called “degassing” and helps create a fine crumb structure.
- Turn the dough out onto a lightly floured surface.
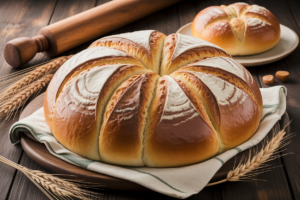
- Shape the dough into your desired loaf shape. For a classic rustic loaf, you can simply form it into a round ball (a “boule”) by gently tucking the edges under to create surface tension on top. For a sandwich loaf, flatten it into a rectangle, then roll it up tightly, pinching the seam closed.
- Lightly grease a baking sheet or a loaf pan (8.5 x 4.5 inches or 9×5 inches) with olive oil. Place your shaped dough onto the prepared pan.
Step 6: Second Rise – The Final Ascent
- Cover the shaped dough loosely with plastic wrap or a clean kitchen towel.
- Let it rise again in a warm, draft-free spot for another 30-45 minutes, or until it has nearly doubled in size again.
- Beginner Tip: This second rise is crucial for a light, airy texture. Don’t rush it!
Step 7: Bake Your Bread – The Transformation
- Preheat your oven to 400°F (200°C) during the last 15 minutes of the second rise.
- If desired, you can make a few shallow slashes (about ¼ inch deep) on the top of your loaf with a sharp knife or razor blade. This is called “scoring” and helps the bread expand evenly without tearing.
- Place the baking sheet or loaf pan in the preheated oven.
- Bake for 25-35 minutes, or until the crust is golden brown and the internal temperature reaches 200-210°F (93-99°C) when measured with an instant-read thermometer.
- Beginner Tip: For an extra crispy crust, you can place a pan of water on the bottom rack of your oven during preheating and baking to create steam.
- Doneness Test: If you don’t have a thermometer, tap the bottom of the loaf. It should sound hollow.
Step 8: Cool and Enjoy – The Reward!
- Once baked, immediately remove the bread from the pan and transfer it to a wire rack to cool completely.
- Why Cool? Cutting into hot bread can make it gummy and dense. Cooling allows the internal structure to set and the moisture to redistribute, resulting in the perfect texture.
- Slice and enjoy your magnificent homemade bread! It’s wonderful served with olive oil, a sprinkle of salt, or simply butter.
Unlock Your Inner Baker: Top Tips & Tricks
Baking bread is an art and a science, but these simple tips will set you up for success, even if it’s your very first loaf!
- Accurate Measuring: Always measure flour by spooning it into your measuring cup and then leveling it off with a straight edge. Scooping directly from the bag can compact the flour, leading to too much in your recipe.
- Yeast is Alive: Treat your yeast with care! Ensure your water is warm, not hot. If your kitchen is cold, warm your mixing bowl slightly before adding ingredients.
- The “Windowpane Test”: During kneading, you can test for proper gluten development. Pinch off a small piece of dough and gently stretch it. If you can stretch it thin enough to see light through it without tearing, your gluten is well-developed.
- Proofing Environment: A warm, humid environment is ideal for rising. If your kitchen is dry, place a bowl of hot water in the oven with your covered dough (oven turned OFF!) to create a mini proofing box.
- Patience is a Virtue: Don’t rush the rising times. The dough will tell you when it’s ready, not the clock. Look for it to double in size.
- Cool Completely: Resist the urge to slice into your bread right out of the oven. Letting it cool on a wire rack allows the starches to set, giving you a better texture and flavor.
- Customize Your Loaf: Feel free to experiment! Add herbs like rosemary or thyme, a handful of seeds (sesame, poppy, flax), or even some dried fruit (raisins, cranberries) during the mixing stage for a personalized touch.
Your Baking Arsenal: Essential Tools
You don’t need a professional kitchen to bake amazing bread. Here are a few basic tools that will make your baking journey smoother:
- Large Mixing Bowl
- Whisk (for combining dry ingredients)
- Loaf Pan or Baking Sheet
- Measuring Cups and Spoons
- Rubber Spatula or Wooden Spoon
- Kitchen Scale (optional, but highly recommended for accuracy)
- Instant-Read Thermometer (optional, for checking water and bread temperature)
Nourishment from the Earth: Nutritional Information
Here’s an estimated nutritional breakdown per slice (assuming 12 slices per loaf) of your homemade bread. Please note these are approximations and can vary based on exact ingredients and portion sizes.
| Nutrient | Amount (per serving) |
|---|---|
| Calories | 150 kcal |
| Carbohydrates | 28g |
| Protein | 5g |
| Fat | 2g |
| Fiber | 1g |
| Sugar | 1g |
Your Questions Answered: FAQs for Beginner Bakers
Why didn’t my bread rise?
The most common culprits are inactive yeast or incorrect water temperature. Ensure your yeast is fresh (check the expiration date!) and your water is between 105-115°F (40-46°C). Also, make sure your dough is in a warm, draft-free spot during rising. Patience is also key – sometimes it just needs more time!
Can I use different types of flour?
Absolutely! While all-purpose flour is great for beginners, you can experiment. For a more “biblical” feel, try substituting up to half of the all-purpose flour with whole wheat flour for a denser, nuttier loaf. Keep in mind that whole wheat flour absorbs more liquid, so you might need an extra tablespoon or two of water. Bread flour will give you a chewier, more structured crumb due to its higher protein content.
How do I know if the yeast is active?
When you mix the yeast with warm water and a little sugar (like honey), it should become foamy and bubbly within 5-10 minutes. If you don’t see this activity, your yeast is likely dead or inactive, and you should start over with fresh yeast.
How should I store homemade bread?
Homemade bread doesn’t contain preservatives, so it’s best enjoyed fresh! Store it at room temperature in an airtight container, a bread box, or a paper bag inside a plastic bag for 2-3 days. For longer storage, slice the cooled bread and freeze it in a freezer-safe bag for up to 2-3 months. Thaw slices as needed.
What if I don’t have a stand mixer?
No problem at all! This recipe is perfectly suited for hand-kneading, which is a wonderful, meditative process. Just be sure to set aside 8-10 minutes for thorough kneading on a lightly floured surface to develop the gluten properly.
Can I add seeds or herbs to this recipe?
Yes, and it’s highly encouraged! After the first rise, when you punch down the dough, you can gently knead in about ¼ to ½ cup of seeds (like sesame, poppy, or flax seeds) or 1-2 tablespoons of dried herbs (like rosemary or thyme). This adds wonderful flavor and texture.
Your Bread, Your Story: A Concluding Thought
Congratulations, you’ve just baked your very own loaf of bread! From a handful of simple ingredients, you’ve created something truly magical, connecting with a tradition that spans thousands of years. There’s a profound sense of accomplishment in pulling a warm, fragrant loaf from your oven. Don’t worry if your first loaf isn’t “perfect” – every bake is a learning experience, and the taste of homemade bread, no matter its shape, is always superior. Share your creation, savor its warmth, and remember the joy that simple acts of baking can bring. Happy baking!