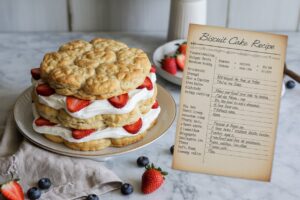
Welcome, aspiring bakers and dessert lovers! Have you ever yearned to create a decadent, impressive dessert without the intimidation of turning on an oven? Look no further. This Biscuit Cake Recipe is your ticket to sweet success. Perfect for those diving into easy baking recipes, it’s a no-fuss, no-bake wonder that promises rich chocolatey goodness and a delightful texture.
We’ll guide you through every step, offering baking tips for beginners to ensure your first (or fiftieth!) attempt is absolutely perfect. This classic dessert is not only incredibly simple to make but also incredibly versatile, allowing you to customize it to your heart’s content. Get ready to impress yourself and your loved ones with this unbelievably simple yet utterly delicious treat!
Ingredients You’ll Need
Gathering your ingredients beforehand is a great habit for any baker, ensuring a smooth and enjoyable process. Here’s what you’ll need for this delightful Biscuit Cake:
| Ingredient | Quantity | Unit | Notes |
|---|---|---|---|
| Digestive Biscuits | 300 | grams | Approximately 25-30 biscuits; or similar plain, firm cookies |
| Unsalted Butter | 1/2 | cup | (113g or 1 stick), melted |
| Powdered Sugar | 1/2 | cup | (60g), sifted for smoothness |
| Unsweetened Cocoa Powder | 1/4 | cup | (20g) |
| Milk (whole or 2%) | 1/4 | cup | (60ml) |
| Vanilla Extract | 1 | teaspoon | |
| For the Chocolate Glaze (Optional): | |||
| Dark Chocolate Chips or Bar | 4 | ounces | (113g), chopped |
| Heavy Cream | 1/4 | cup | (60ml) |
Step-by-Step Instructions
Follow these detailed steps carefully, and you’ll have a gorgeous, delicious biscuit cake ready to chill in no time!
Step 1: Prepare Your Biscuits
The first step is to break down your biscuits. Place the 300g of digestive biscuits into a large Ziploc bag. Using a rolling pin or the bottom of a heavy pan, gently crush the biscuits until they are broken into small pieces. You don’t want them to be a fine powder; some larger chunks are actually desirable as they add wonderful texture to the finished cake. Alternatively, you can pulse them in a food processor a few times, being careful not to over-process. Once crushed, transfer the biscuit pieces to a large mixing bowl and set aside.
Beginner Tip: Don’t stress about uniform pieces! The varying sizes will create an interesting and satisfying bite in your cake.
Step 2: Prepare Your Baking Pan
For easy removal and clean slices, it’s essential to prepare your baking pan. Line an 8×8 inch square baking pan or a 9-inch round springform pan with parchment paper. Leave an overhang on two opposite sides; this will act as “handles” to lift the cake out once it’s set. Make sure the parchment paper covers the bottom and sides of the pan as much as possible. This simple step will save you a lot of hassle later!
Step 3: Create the Chocolate Mixture
In a medium microwave-safe bowl, melt the 1/2 cup (113g) of unsalted butter. You can do this in the microwave in 30-second intervals, stirring in between, or over low heat on the stovetop. Once melted, add the 1/2 cup (60g) of sifted powdered sugar, 1/4 cup (20g) of unsweetened cocoa powder, 1/4 cup (60ml) of milk, and 1 teaspoon of vanilla extract to the melted butter. Whisk everything together thoroughly until the mixture is completely smooth and free of any lumps. It should be a rich, glossy chocolate sauce.
Beginner Tip: Sifting your powdered sugar and cocoa powder before adding them helps prevent lumps and ensures a super smooth chocolate mixture. A small sieve works wonders here!
Step 4: Combine Biscuits and Chocolate
Pour the warm, smooth chocolate mixture over the crushed biscuits in the large mixing bowl. Using a spatula, gently fold and mix the biscuits until every single piece is thoroughly coated in the chocolate. Take your time to ensure an even coating; this is crucial for the cake’s texture and to prevent dry, crumbly spots. You want all the biscuit pieces to be glistening with chocolate.
Common Mistake: Not coating all the biscuits can lead to a dry, uneven cake. Keep mixing until everything is well-combined!
Step 5: Press into Pan
Transfer the chocolate-coated biscuit mixture into your prepared baking pan. Using the back of a spoon or a spatula, press the mixture down very firmly and evenly across the bottom of the pan. The more compact you make it, the sturdier and more sliceable your cake will be. Pay attention to the corners and edges to ensure they are just as compacted as the center.
Beginner Tip: For extra firmness, you can place a piece of plastic wrap directly on top of the mixture and press down with your hands or another flat object.
Step 6: Chill to Perfection
Once the biscuit mixture is firmly pressed into the pan, cover the pan tightly with plastic wrap. Place the pan in the refrigerator and chill for a minimum of 4 hours, but ideally overnight. This chilling time is absolutely critical! It allows the butter to firm up and bind all the ingredients together, creating a stable, sliceable cake. Don’t rush this step!
Common Mistake: Impatience with chilling time is the number one reason for a crumbly or messy biscuit cake. Give it ample time to set!
Step 7: Prepare Optional Chocolate Glaze (If Using)
If you’re adding a chocolate glaze, do this after the cake has thoroughly chilled. In a small saucepan, heat the 1/4 cup (60ml) of heavy cream over medium heat until it just begins to simmer around the edges (don’t boil!). Remove from heat and pour the hot cream over the 4 ounces (113g) of chopped dark chocolate chips or bar in a heatproof bowl. Let it sit undisturbed for 5 minutes, then whisk gently until the chocolate is completely melted and the mixture is smooth and glossy. This is your ganache.
Remove the chilled biscuit cake from the refrigerator. Carefully pour the ganache over the top of the cake, spreading it evenly with a spatula. Place the cake back in the refrigerator for another 15-30 minutes to allow the glaze to set slightly.
Step 8: Slice and Serve
Once the cake is fully chilled and the glaze (if used) is set, gently lift the cake out of the pan using the parchment paper overhangs. Place it on a cutting board. For neat, clean slices, use a sharp knife that has been warmed under hot water and wiped dry. Wipe the knife clean after each slice. Serve your delicious Biscuit Cake with a dusting of cocoa powder, fresh berries, or a scoop of vanilla ice cream. Enjoy!
Tips & Tricks for Success
Even though this is an easy recipe, a few extra tips can make your Biscuit Cake truly exceptional:
- Biscuit Choice: While digestive biscuits are traditional and highly recommended for their texture and ability to absorb the chocolate mixture, feel free to experiment! Marie biscuits, shortbread, or even graham crackers can be used for a different flavor profile.
- Flavor Variations: Get creative with your chocolate mixture! Add a teaspoon of instant coffee granules for a mocha twist, a pinch of chili powder for subtle heat, or orange zest for a vibrant citrus note. A splash of rum or brandy can also elevate the adult version.
- Exciting Add-ins: Fold in chopped nuts (walnuts, pecans, almonds), dried fruits (raisins, cranberries), mini marshmallows, or chocolate chips with the crushed biscuits for extra texture and flavor bursts.
- Achieving a Smooth Glaze: If your chocolate glaze seems too thick after whisking, add a tiny bit more warm cream (1 teaspoon at a time) until it reaches your desired consistency. If it’s too thin, let it cool slightly to thicken before pouring.
- Perfect Slices Every Time: For incredibly clean cuts, use a sharp knife that has been warmed under hot water and wiped completely dry. Re-warm and wipe the knife after each slice to prevent sticking and dragging.
- Storage is Key: Store any leftover biscuit cake in an airtight container in the refrigerator. It will stay fresh and delicious for up to 5-7 days. Many people find it tastes even better the next day as the flavors meld and deepen!
- Don’t Rush the Chill: This is arguably the most important tip! The chilling time is non-negotiable for this no-bake recipe. It allows the butter to firm up and bind all the ingredients together, resulting in a stable, sliceable cake. Impatience here will almost certainly lead to a crumbly, disappointing mess.
Essential Baking Tools
Having the right tools makes any baking adventure easier and more enjoyable. Here are the essentials for this Biscuit Cake:
- Mixing Bowl
- Whisk
- Baking Pan (8×8 inch square or 9-inch round springform)
- Measuring Cups & Spoons
- Spatula
- Parchment Paper
- Rolling Pin (optional, for crushing biscuits)
Nutrition Information (per serving, estimated)
Please note that these values are approximate and can vary based on specific ingredients and portion sizes. This estimate is for one of 8 servings.
| Nutrient | Amount (per serving) |
|---|---|
| Calories | 380 kcal |
| Carbohydrates | 48 g |
| Protein | 5 g |
| Fat | 22 g |
| Fiber | 3 g |
| Sugar | 32 g |
Frequently Asked Questions (FAQs)
Q1: Can I use different types of biscuits for this recipe?
A: Yes! While digestive biscuits are traditional and highly recommended, you can absolutely use other plain, firm cookies like Marie biscuits, Graham crackers, shortbread, or even plain butter cookies. Just ensure they are relatively firm and plain enough to absorb the chocolate flavor without overpowering it.
Q2: How long does the Biscuit Cake need to chill?
A: It’s crucial to chill the cake for at least 4 hours, but preferably overnight. This extended chilling time allows the butter to set properly and bind all the ingredients, making the cake firm and stable enough to slice neatly without crumbling. Patience truly is a virtue for this recipe!
Q3: How should I store the Biscuit Cake, and how long does it last?
A: Always store your Biscuit Cake in an airtight container in the refrigerator. It will stay fresh and delicious for up to 5-7 days. In fact, many people find that the flavors meld and deepen over time, making it taste even better the second or third day!
Q4: Can I make this recipe vegan or gluten-free?
A: Absolutely! For a vegan version, simply substitute the unsalted butter with a good quality plant-based butter, use plant-based milk (almond, soy, or oat work well), and ensure your chosen biscuits are vegan-friendly. For a gluten-free option, substitute with gluten-free digestive biscuits or other suitable plain gluten-free cookies.
Q5: Why is my biscuit cake crumbly/too soft?
A: This usually happens for one of two main reasons: either the chocolate mixture wasn’t rich enough (perhaps not enough butter or the ratios were off), or, more commonly, the cake wasn’t chilled for long enough. Ensure you press the mixture very firmly into the pan to compact it, and always allow ample chilling time (at least 4 hours, ideally overnight) for the butter to set properly and bind everything together.
Q6: Do I need to melt the butter for the chocolate mixture?
A: Yes, melting the butter is essential. It helps create a smooth, liquid chocolate mixture that thoroughly coats every piece of biscuit. As the cake chills, this melted butter solidifies, acting as the primary binding agent that holds the entire cake together. Without melted butter, your cake would be dry and crumbly.
Conclusion
And there you have it – your very own homemade Biscuit Cake Recipe, a testament to how simple and rewarding baking (or in this case, no-baking!) can be! We hope this detailed guide has empowered you to create a truly delightful dessert with confidence. Remember, every great baker started as a beginner, and this recipe is the perfect stepping stone to more culinary adventures.
Don’t hesitate to personalize it with your favorite add-ins, glazes, or even a different type of biscuit. The possibilities are endless! We encourage you to share your creations with us, and most importantly, enjoy every single delicious bite of your masterpiece. Happy no-baking!