Ingredients List
Gather your ingredients! Using Bisquick streamlines the process, but quality ingredients still make a big difference. Make sure your butter is at room temperature for the best results in your streusel.
For the Coffee Cake:
| Ingredient | Quantity | Unit |
|---|---|---|
| Bisquick Baking Mix | 2 | cups |
| Granulated Sugar | ½ | cup |
| Milk (any kind) | ⅔ | cup |
| Large Egg | 1 | |
| Vanilla Extract | 1 | teaspoon |
| Unsalted Butter (melted) | 2 | tablespoons |
For the Streusel Topping:
| Ingredient | Quantity | Unit |
|---|---|---|
| Bisquick Baking Mix | ½ | cup |
| Packed Light Brown Sugar | ½ | cup |
| Ground Cinnamon | 1 | teaspoon |
| Unsalted Butter (cold, cut into small pieces) | ¼ | cup (4 tablespoons) |
For the Optional Glaze:
| Ingredient | Quantity | Unit |
|---|---|---|
| Powdered Sugar | ½ | cup |
| Milk or Water | 1-2 | tablespoons |
| Vanilla Extract | ¼ | teaspoon |
Step-by-Step Instructions: Your Path to Perfect Coffee Cake

Follow these detailed steps carefully, and you’ll have a gorgeous coffee cake that tastes as good as it looks. Remember, baking is a science, but it’s also about having fun!
-
Prepare for Baking: Preheat and Pan Prep
First things first, let’s get your oven ready. Preheat your oven to 375°F (190°C). While it’s heating, grab an 8×8 inch square baking pan or a 9-inch round cake pan. Lightly grease the bottom and sides of the pan with butter or baking spray. This crucial step prevents your delicious coffee cake from sticking, ensuring a clean release later. Beginner Tip: Don’t skip greasing your pan! A little butter goes a long way in preventing sticking.
-
Craft the Crumbly Streusel Topping
In a medium bowl, combine the ½ cup Bisquick, ½ cup packed light brown sugar, and 1 teaspoon ground cinnamon. Whisk them together until they are well combined. Now, add the ¼ cup of cold butter (cut into small pieces). Using your fingertips or a pastry blender, cut the butter into the dry ingredients until the mixture resembles coarse crumbs. You want distinct little buttery bits mixed throughout. Beginner Tip: Cold butter is key here! It helps create that lovely crumbly texture. If your butter is too warm, it will melt into the mixture instead of forming crumbs.
-
Whip Up the Coffee Cake Batter
In a large mixing bowl, whisk together the ⅔ cup milk, 1 large egg, 1 teaspoon vanilla extract, and 2 tablespoons melted butter until smooth. Once the wet ingredients are combined, add the 2 cups of Bisquick Coffee Cake Recipes mix. Mix with a spatula or spoon just until the dry ingredients are moistened and no streaks of dry mix remain. It’s vital not to overmix the batter! Overmixing develops the gluten in the Bisquick, which can lead to a tough, dense cake instead of a light, tender one. A few small lumps are perfectly fine.
-
Assemble Your Masterpiece
Pour the coffee cake batter evenly into your prepared baking pan. Use your spatula to spread it gently to the edges. Now, evenly sprinkle the streusel topping over the entire surface of the batter. Don’t press it down; just let it rest lightly on top. This allows the streusel to get perfectly crispy during baking.
-
Bake to Golden Perfection
Place your pan into the preheated oven. Bake for 25-30 minutes, or until a wooden toothpick inserted into the center of the cake comes out clean or with moist crumbs attached, but no wet batter. The streusel topping should be golden brown and fragrant. Beginner Tip: Oven temperatures can vary, so start checking around the 25-minute mark. If you notice the streusel browning too quickly, you can loosely tent the pan with aluminum foil for the last few minutes of baking.
-
Cool Down
Once baked, carefully remove the pan from the oven. Place it on a wire rack to cool for at least 15-20 minutes before attempting to slice. Allowing it to cool slightly in the pan helps the cake firm up and prevents it from falling apart when you cut it. For the best texture, let it cool completely before adding the glaze.
-
Drizzle with Optional Glaze (If Desired)
If you’re making the glaze, whisk together the ½ cup powdered sugar, 1-2 tablespoons milk or water, and ¼ teaspoon vanilla extract in a small bowl until smooth. Start with 1 tablespoon of liquid and add more slowly, a few drops at a time, until you reach a consistency that’s thick enough to drizzle but still pourable. Once the cake has cooled completely (or is just slightly warm), drizzle the glaze generously over the top. Let the glaze set for a few minutes before serving.
Tips & Tricks for Bisquick Coffee Cake Success
Baking can be an art and a science, and these little nuggets of wisdom will help you achieve perfection every time you bake this Bisquick Coffee Cake Recipes. First and foremost, do not overmix your batter! This is the most common mistake in baking and leads to a dense, tough cake. Mix until just combined, even if there are a few lumps. For an even bake, try to ensure your ingredients, especially milk and eggs, are at room temperature. This helps them emulsify better, leading to a smoother batter and a more uniform texture in the final product.
To customize your coffee cake, feel free to add a handful of chocolate chips, chopped nuts (like pecans or walnuts), or even fresh berries (blueberries are fantastic!) to the batter before spreading it into the pan. If you’re worried about sticking, you can also line your baking pan with parchment paper, leaving an overhang on two sides to create “handles” for easy lifting. Always use a toothpick or skewer to test for doneness; if it comes out clean or with moist crumbs, your cake is ready. For storage, keep leftover coffee cake in an airtight container at room temperature for up to 3 days, or in the refrigerator for up to 5 days. You can even freeze individual slices for a quick future treat!
Essential Baking Tools for Your Kitchen
Having the right tools makes all the difference! Here are some basics that will make baking this coffee cake (and many other recipes) a breeze:
- Mixing Bowl
- Whisk
- Baking Pan (8×8 inch square or 9-inch round recommended)
- Measuring Cups
- Spatula
- Measuring Spoons
- Wire Rack (for cooling)
- Toothpicks (for testing doneness)
Estimated Nutrition Information (per serving)
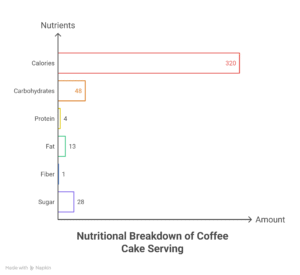
Please note: This is an estimated nutritional breakdown based on typical ingredients for 1/9th of an 8×8-inch coffee cake. Actual values may vary based on specific brands and portion sizes.
| Nutrient | Amount |
|---|---|
| Calories | 320 kcal |
| Carbohydrates | 48 g |
| Protein | 4 g |
| Fat | 13 g |
| Fiber | 1 g |
| Sugar | 28 g |
Frequently Asked Questions (FAQs)
Can I make this Bisquick Coffee Cake Recipes ahead of time?
Absolutely! This coffee cake is wonderful to make a day in advance. Store it covered at room temperature. The flavors often meld even better overnight. If you’ve added a glaze, it’s best to add it right before serving for the freshest look and texture, or store the cake unglazed and glaze just before serving.
How do I store leftover coffee cake?
To keep your coffee cake fresh, store it in an airtight container at room temperature for up to 3 days. If you live in a warm or humid climate, or if your cake has a cream cheese-based streusel (not this recipe, but good to know), it’s best to refrigerate it for up to 5 days. Bring it to room temperature or warm slightly before serving for the best taste.
Can I add fruit or nuts to the recipe?
Yes, definitely! This recipe is very forgiving. You can fold about ½ cup of fresh blueberries, chopped pecans, walnuts, or even chocolate chips into the batter before pouring it into the pan. This adds an extra layer of flavor and texture. Just be mindful not to add too much, as it could affect the baking time and consistency.
Why is my coffee cake dry or tough?
The most common culprits for a dry or tough coffee cake are overmixing the batter or overbaking. Remember to mix the batter just until the dry ingredients are moistened. Also, keep a close eye on your cake in the oven and pull it out as soon as the toothpick test indicates it’s done. Every oven is different, so baking times can vary slightly.
What if I don’t have Bisquick? Can I use a substitute?
While this recipe is specifically designed for Bisquick for convenience and consistent results, you can make your own “homemade Bisquick” substitute. Generally, it’s a mix of all-purpose flour, baking powder, salt, and shortening or cold butter. However, for this recipe’s ease, we highly recommend sticking with Bisquick. If you’re a beginner, using the boxed mix ensures a successful outcome!
How do I know when the coffee cake is perfectly baked?
The best way to tell if your coffee cake is done is to insert a wooden toothpick or a thin skewer into the very center. If it comes out clean or with only a few moist crumbs attached (no wet batter!), your cake is ready. The streusel topping should also be golden brown and fragrant. If it’s still wobbly in the center, give it a few more minutes, checking every 2-3 minutes.
Your Delicious Bisquick Coffee Cake Adventure Awaits!
There you have it! A comprehensive, beginner-friendly guide to making a truly spectacular Bisquick Coffee Cake Recipes. We hope you feel empowered and excited to try this delightful recipe. It’s a testament to how simple yet rewarding baking can be, especially when you have a trusty shortcut like Bisquick by your side. Imagine the joy of that first bite—a soft, tender cake, a sweet, crumbly streusel, and perhaps a delicate vanilla glaze. Whether it’s for a cozy breakfast, an afternoon snack, or a sweet ending to any meal, this coffee cake is sure to become a beloved staple in your home.
Don’t be afraid to get a little flour on your hands; that’s part of the fun! With these detailed instructions and helpful tips, you’re well on your way to baking success. So, tie on your apron, gather your ingredients, and let the aroma of freshly baked coffee cake fill your kitchen. Happy baking!
1 thought on “Bisquick Coffee Cake Recipes – Perfect Homemade Dessert”