Hello, fellow baking enthusiasts! Are you ready to dive into the wonderful world of homemade treats without the fuss? Today, we’re bringing you one of the most comforting and satisfying easy baking recipes out there: a delightful Zucchini Bread, made effortlessly in your bread machine! If you’re looking for a simple, foolproof way to turn garden-fresh zucchini into a moist, spiced loaf, you’ve come to the right place.
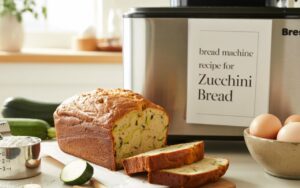
This Bread Machine Recipe For Zucchini Bread is perfect for new bakers and seasoned pros alike, promising a delicious result with minimal effort. Get ready to learn some fantastic baking tips for beginners as we whip up this incredible bread together!
Ingredients You’ll Need
Gathering your ingredients is the first step to baking success. Accuracy matters, especially for quick breads, so make sure to level your measurements!
| Ingredient | Quantity | Unit |
|---|---|---|
| Large Eggs (room temperature) | 2 | |
| Vegetable Oil (or other neutral oil like canola) | 1/2 | cup |
| Vanilla Extract | 1 | teaspoon |
| All-Purpose Flour (spooned & leveled) | 2 | cups |
| Granulated Sugar | 3/4 | cup |
| Baking Soda | 1 | teaspoon |
| Baking Powder | 1/2 | teaspoon |
| Ground Cinnamon | 1 | teaspoon |
| Salt | 1/2 | teaspoon |
| Shredded Zucchini (packed, squeezed dry) | 1.5 | cups |
| Optional: Chopped Walnuts or Chocolate Chips | 1/2 | cup |
Step-by-Step Instructions for Your Bread Machine Zucchini Bread
This is where the magic happens! Follow these detailed steps to ensure a perfect loaf every time. Remember, the key to great quick bread in a bread machine is proper layering of ingredients.
1. Prepare Your Zucchini
The first and arguably most crucial step for a moist (not soggy!) zucchini bread is to prepare your zucchini correctly. Using a box grater or food processor, shred about 1.5 cups of zucchini. Once shredded, place the zucchini in a clean kitchen towel or several layers of paper towels and **squeeze out as much excess liquid as possible**. This step is vital because zucchini contains a lot of water, and too much moisture will result in a dense, gummy, or even undercooked loaf. Don’t skip this!
2. Add Wet Ingredients to Bread Machine Pan
Remove the bread machine pan from your machine. First, add the liquid ingredients. Crack your two large eggs directly into the pan. Pour in the 1/2 cup of vegetable oil and the 1 teaspoon of vanilla extract. For best results, ensure your eggs are at room temperature; this helps them emulsify better with the oil, leading to a more consistent batter.
3. Layer Dry Ingredients
Next, carefully add the dry ingredients on top of the wet ones. This layering technique is common for bread machine quick breads as it helps prevent early activation of leavening agents. Add the 2 cups of all-purpose flour (remember to spoon it into your measuring cup and level it off for accuracy – scooping directly can compact the flour, leading to too much flour!), followed by the 3/4 cup of granulated sugar, 1 teaspoon of baking soda, 1/2 teaspoon of baking powder, 1 teaspoon of ground cinnamon, and 1/2 teaspoon of salt. Spread these dry ingredients evenly over the wet ones.
Beginner Tip: When measuring flour, spoon it lightly into your measuring cup until it overflows, then use the straight edge of a knife or a flat spatula to level it off. This prevents packing the flour, which can make your bread dry and dense.
4. Add Zucchini and Optional Mix-ins
Finally, spread the squeezed, shredded zucchini evenly over the dry ingredients. If you’re using optional add-ins like 1/2 cup of chopped walnuts or chocolate chips, sprinkle them on top of the zucchini. For quick breads, you generally add all ingredients at the beginning, unlike yeast breads where you might wait for a “beep” for mix-ins. The machine will handle all the mixing.
5. Select Your Bread Machine Setting
Place the bread machine pan back into the machine, ensuring it’s securely locked in place. Close the lid. Select the **”Quick Bread”** or **”Sweet Bread”** cycle on your bread machine. If your machine doesn’t have a specific “Quick Bread” setting, a “Cake” cycle can often work as well, as these cycles typically mix, rest briefly, and then bake without a prolonged rise. Most quick bread cycles are about 1.5 to 2 hours long. Choose your desired crust color if your machine offers that option (light or medium is usually good for zucchini bread).
Common Mistake & Solution: Accidentally choosing a “Basic” or “Whole Wheat” cycle will lead to a disaster! These cycles include long kneading and rising times meant for yeast breads, which will overmix and over-proof your quick bread, resulting in a very dense, heavy loaf. **Always double-check your cycle selection!**
6. Bake and Cool
Press start and let your bread machine do its work! During the initial mixing phase, you can peek to ensure all ingredients are being incorporated. If you notice any dry pockets of flour clinging to the sides, you can gently scrape them down with a rubber spatula, but avoid opening the lid once the baking cycle has truly begun, as this can cause the bread to sink.
Once the cycle is complete, the machine will usually beep. Carefully remove the bread pan from the machine using oven mitts. Immediately invert the pan onto a wire cooling rack to release the loaf. If the paddle is stuck in the bottom of the loaf, you can gently remove it with a small non-metal utensil (like a wooden skewer or plastic knife) once the bread has cooled slightly. Allowing the bread to cool completely on the wire rack is crucial. This prevents the bottom from becoming soggy and allows the internal structure to set properly. Resist the urge to slice into it right away!
Beginner Tip: The internal temperature of a perfectly baked quick bread should be between 200-205°F (93-96°C) when tested with an instant-read thermometer. A toothpick inserted into the center should come out clean, though a few moist crumbs are okay.
Tips & Tricks for the Best Bread Machine Zucchini Bread
Even with an easy bread machine recipe, a few extra tips can elevate your baking game:
- Don’t Skimp on Squeezing: We can’t stress this enough! Excess moisture from zucchini is the most common culprit for a gummy loaf. Squeeze, squeeze, squeeze!
- Room Temperature Ingredients: Eggs at room temperature mix more evenly and create a smoother, more uniform batter.
- Accurate Measurements: Baking is a science. Use proper measuring cups and spoons. For flour, always spoon and level rather than scooping directly from the bag.
- Experiment with Spices: While cinnamon is classic, feel free to add a pinch of nutmeg, allspice, or ginger for a different flavor profile.
- Add-in Variations: Beyond walnuts and chocolate chips, consider dried cranberries, pecans, or even a mix of shredded carrots for an extra nutritional boost and flavor.
- Store Properly: Once completely cooled, store your zucchini bread in an airtight container at room temperature for up to 3-4 days, or in the refrigerator for up to a week. For longer storage, slice the bread, wrap individual slices in plastic wrap, and freeze for up to 3 months. Thaw at room temperature or warm gently.
- Check for Doneness: If you’re unsure, use a wooden skewer or toothpick. If it comes out clean or with moist crumbs (not wet batter), your bread is done.
- Clean Your Pan: Make sure to clean your bread machine pan and paddle thoroughly after each use to prevent buildup that can affect future loaves.
Essential Baking Tools
While your bread machine does most of the heavy lifting, a few basic tools will make your prep even smoother:
- Mixing Bowl (for initial wet ingredients if not adding directly to pan, or for zucchini prep)
- Whisk (for beating eggs if you choose to do so before adding)
- Baking Pan (not strictly needed for the bread machine, but useful for other recipes!)
- Measuring Cups
- Spatula (rubber or silicone for scraping down sides of the pan if needed during mixing)
- Box grater or food processor (for shredding zucchini)
- Clean kitchen towel or paper towels (for squeezing zucchini)
- Wire cooling rack
Nutrition Information (Estimated per slice, 1/12th of a 1.5lb loaf)
Please note: These values are approximate and can vary based on specific ingredient brands and quantities used, especially if adding optional ingredients like nuts or chocolate chips.
| Nutrient | Amount |
|---|---|
| Calories | 220-250 kcal |
| Carbohydrates | 30-35 g |
| Protein | 3-4 g |
| Fat | 10-12 g |
| Fiber | 1-2 g |
| Sugar | 18-22 g |
Frequently Asked Questions (FAQs)
Q1: Why is my bread machine zucchini bread soggy or gummy?
A: The most common reason for soggy or gummy quick bread is too much moisture from the zucchini. It’s crucial to **squeeze out as much excess liquid as possible** from the shredded zucchini before adding it to the bread machine. Also, ensure you’re using the correct “Quick Bread” or “Sweet Bread” cycle; a cycle with too much kneading or rising time will overmix the batter, leading to a dense texture.
Q2: Can I substitute other flours for all-purpose flour?
A: Yes, with some considerations. You can substitute up to half of the all-purpose flour with whole wheat flour for a nuttier, more wholesome loaf, but you might need to add a tablespoon or two of extra liquid (like milk or water) as whole wheat flour absorbs more moisture. Gluten-free flour blends can also work, but results may vary, and you might need to follow the specific instructions for that blend.
Q3: How should I store leftover zucchini bread?
A: Once completely cooled, store your zucchini bread in an airtight container at room temperature for 3-4 days. For longer storage, you can refrigerate it for up to a week. Zucchini bread also freezes beautifully! Wrap individual slices tightly in plastic wrap, then place them in a freezer-safe bag for up to 3 months. Thaw slices at room temperature or warm them gently in the microwave or toaster oven.
Q4: My bread machine paddle got stuck in the loaf. What do I do?
A: This is a very common occurrence with bread machines! Once you’ve removed the loaf from the pan and it has cooled slightly, you can gently dig around the bottom of the loaf with a small, non-metal utensil (like a wooden skewer, a plastic knife, or even your finger if it’s cool enough) to dislodge and remove the paddle. Some people prefer to leave it in and just cut around it, but most remove it for easier slicing.
Q5: Can I reduce the sugar in this recipe?
A: You can slightly reduce the sugar, but be mindful that sugar contributes to moisture, browning, and structure, not just sweetness. Reducing it by 1/4 cup (so using 1/2 cup total) should be fine without drastically altering the texture, but reducing it further might affect the loaf’s moisture and browning.
Q6: What if my bread machine doesn’t have a “Quick Bread” or “Sweet Bread” setting?
A: Many older or simpler bread machines might not have a specific “Quick Bread” setting. In this case, look for a “Cake” cycle, which often follows a similar pattern of mixing and baking without the extended kneading and rising stages. If neither of these is available, some machines have a “Custom” or “Manual” setting, but that’s more advanced. As a last resort, you could use the “Dough” cycle just for mixing, then remove the dough and bake it in a conventional oven, but this defeats the purpose of the bread machine’s convenience.
Conclusion
And there you have it – a perfectly baked, wonderfully moist, and utterly delicious Zucchini Bread, all thanks to your amazing bread machine! We hope this Bread Machine Recipe For Zucchini Bread has shown you just how accessible and rewarding baking can be, especially for beginners. The aroma filling your kitchen right now is proof of your success!
Don’t be afraid to experiment with your favorite add-ins or spices next time. Baking is a journey of discovery, and every loaf is a step forward. So go ahead, slice into your masterpiece, grab a cup of coffee, and enjoy the fruits of your effortless labor. Happy baking, and we’d love to hear how your zucchini bread turned out in the comments below!
“`