Welcome, aspiring bakers! Are you ready to fill your home with the irresistible aroma of freshly baked bread without all the fuss? Our Bread Machine Recipes Italian Bread is the perfect starting point for anyone looking for truly easy baking recipes. This comprehensive guide is designed with baking tips for beginners in mind, ensuring your first foray into bread making is a resounding success. Forget complicated kneading and endless rising times – your trusty bread machine does all the hard work, leaving you with a beautiful, crusty, and tender Italian loaf that’s perfect for dipping in olive oil, making sandwiches, or simply enjoying on its own. Get ready to impress yourself and your loved ones with this incredibly simple yet delicious recipe!
Ingredients List
Gather these simple ingredients to create your delightful Italian bread. For a 1.5 lb loaf:
| Quantity | Unit | Ingredient |
|---|---|---|
| 1 ¼ | cups | Warm Water (105-115°F / 40-46°C) |
| 2 | tablespoons | Olive Oil, plus extra for brushing |
| 1 ½ | teaspoons | Salt |
| 1 ½ | tablespoons | Granulated Sugar |
| 3 ½ | cups | All-Purpose Flour or Bread Flour |
| 2 ¼ | teaspoons | Active Dry Yeast or Bread Machine Yeast |
| Optional: 1 | teaspoon | Dried Italian Herbs (like oregano, basil, rosemary) |
Step-by-Step Instructions: Your Guide to Perfect Bread
Follow these detailed steps carefully for the best results. Remember, precise measuring is key in baking!
Step 1: Prepare Your Bread Machine Pan
First things first, make sure your bread machine pan is clean and dry. Remove the kneading paddle(s) and ensure they are securely attached to the shaft at the bottom of the pan. This is crucial for proper mixing and kneading. Beginner tip: Always double-check your paddle placement before adding ingredients – a loose paddle can lead to an unmixed dough!
Step 2: Add Liquids First
Pour the warm water into the bread machine pan. The temperature of the water is important: too hot and it will kill the yeast; too cold and the yeast won’t activate properly. Aim for a temperature that feels like a warm bath on your wrist (105-115°F / 40-46°C). Next, add the olive oil. Why liquids first? This common bread machine practice helps protect the yeast from the salt and sugar until mixing begins, ensuring optimal activation.
Step 3: Add Dry Ingredients (Excluding Yeast)
Carefully add the salt and granulated sugar to the pan. Try to place them in separate corners, away from where the yeast will go. Now, gently spoon the flour over the liquids, forming a mound that completely covers the water and oil. If you’re adding optional dried Italian herbs, sprinkle them over the flour at this stage. Beginner tip: When measuring flour, spoon it into your measuring cup and then level it off with a straight edge (like the back of a knife) rather than scooping directly from the bag. Scooping can compact the flour, leading to too much flour and a dry, dense loaf.
Step 4: Add the Yeast – The Star of the Show!
Using your finger, create a small indentation or “well” in the center of the flour mound. Pour the active dry yeast or bread machine yeast directly into this well. It’s important that the yeast does not come into direct contact with the water, salt, or sugar at this stage, as these can inhibit its activation. Common mistake: Old or expired yeast is a frequent culprit for bread that doesn’t rise. Always check the expiration date on your yeast package!
Step 5: Select Your Bread Machine Program
Place the bread machine pan back into the bread machine, ensuring it’s securely locked in place. Close the lid. Select the “Basic,” “White Bread,” or “French Bread” program on your machine. For the crust setting, “Medium” is usually a good choice for Italian bread, giving you a nice golden crust. If your machine has a loaf size option, select “1.5 lb.” Beginner tip: Refer to your bread machine’s manual if you’re unsure which program or setting to use. They often have specific recommendations for different bread types.
Step 6: The Magic Begins (and a Quick Check)
Press “Start” and let your bread machine do its work! During the first kneading cycle (usually within the first 5-10 minutes), take a peek at the dough. It should form a smooth, soft, and slightly sticky ball. If it looks too dry and crumbly, add water one tablespoon at a time. If it looks too wet and sticky, add flour one tablespoon at a time. Beginner tip: This is your opportunity to adjust the dough! Don’t be afraid to add a little extra liquid or flour if needed. Environmental factors like humidity can affect flour absorption.
Step 7: The Rest is Hands-Off
Once you’ve made any necessary adjustments, simply let the machine complete its cycle. It will knead, rise, and bake your bread to perfection. The total time will vary depending on your machine and chosen program, typically ranging from 3 to 4 hours.
Step 8: Remove and Cool
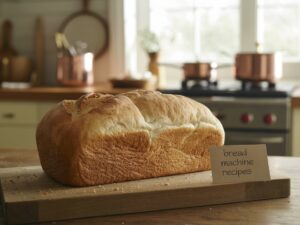
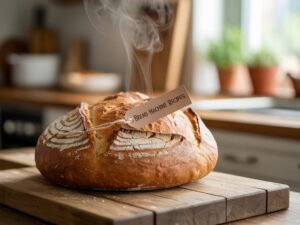
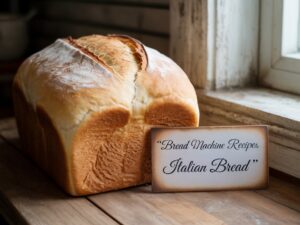
When the baking cycle is complete and your kitchen smells incredible, carefully remove the bread pan from the machine using oven mitts. Gently shake the bread out of the pan onto a wire cooling rack. If the kneading paddle(s) are stuck in the bottom of the loaf, use a wooden or plastic utensil to carefully pry them out (avoid metal, which can scratch the pan’s non-stick coating). Important: Allow the bread to cool completely on the wire rack for at least 1-2 hours before slicing. Slicing hot bread can make it gummy and dense inside. Cooling allows the internal structure to set and steam to escape, resulting in a better texture.
Step 9: Slice and Enjoy!
Once cooled, slice your beautiful homemade Italian bread with a serrated knife. Serve it warm with butter, olive oil and balsamic vinegar, or alongside your favorite Italian meal. Congratulations, you’ve just baked a fantastic loaf of bread!
Tips & Tricks for Bread Machine Success
Making bread in a bread machine is incredibly forgiving, but a few extra tips can elevate your results from good to absolutely amazing!
- Ingredient Temperature Matters: Always use room temperature ingredients (except for the warm water). Cold ingredients can slow down yeast activation, leading to a less impressive rise.
- Measure Accurately: We’ve said it before, but it bears repeating! Use proper measuring cups and spoons, and level your flour correctly. Baking is a science, and precision helps.
- Fresh Yeast is Key: Yeast is a living organism. Ensure your yeast is fresh and active. If you’re unsure, you can “proof” it by dissolving 1 teaspoon of sugar in ¼ cup of warm water, then stirring in 2 ¼ teaspoons of yeast. If it foams within 5-10 minutes, it’s good to go!
- Don’t Open the Lid Too Much: Resist the temptation to constantly peek during the rising and baking cycles. Opening the lid can cause significant temperature drops, which can affect the rise and final texture of your bread. A quick peek during the initial kneading is fine.
- Experiment with Flavors: Once you’ve mastered the basic recipe, try adding a tablespoon of dried rosemary, garlic powder, or even grated Parmesan cheese to the dough during the mix cycle for different variations of Italian bread.
- Store Properly: Store your cooled bread in an airtight container or a bread bag at room temperature for up to 3-4 days. For longer storage, slice the bread and freeze it in an airtight freezer bag for up to 3 months. Toast slices as needed!
- Clean Your Machine: Regularly clean your bread machine, especially around the kneading paddle shaft, to prevent old dough bits from affecting future loaves or causing mechanical issues.
Essential Baking Tools
While your bread machine does most of the heavy lifting, a few basic tools will make your baking experience even smoother:
- Mixing Bowl (for any preliminary ingredient mixing or if you ever try hand-kneading)
- Whisk (useful for combining dry ingredients evenly)
- Baking Pan (not strictly for this recipe, but good to have for other baking adventures!)
- Measuring Cups (essential for accurate ingredient measurements)
- Spatula (for scraping down sides of bowls or removing dough if needed)
- Wire Cooling Rack (crucial for proper bread cooling)
- Serrated Knife (for easy slicing of crusty bread)
Nutrition Information (per slice, estimated)
This information is an estimate based on the ingredients used for a 1.5 lb loaf, yielding approximately 12 slices. Actual values may vary.
| Nutrient | Amount |
|---|---|
| Calories | 145 kcal |
| Carbohydrates | 28 g |
| Protein | 4 g |
| Fat | 2 g |
| Fiber | 1 g |
| Sugar | 2 g |
Frequently Asked Questions (FAQs)
Q1: Why didn’t my bread rise?
A: The most common reasons for a bread not rising are inactive or expired yeast, water that was too hot (killing the yeast) or too cold (not activating it), or too much salt (which can inhibit yeast activity). Always check your yeast’s expiration date and the water temperature.
Q2: Can I add other herbs or ingredients?
A: Absolutely! This is a great way to customize your bread. You can add up to 1-2 tablespoons of dried herbs like oregano, basil, rosemary, or even garlic powder. For ingredients like olives, sun-dried tomatoes, or cheese, add them during the “mix-in” beep (if your machine has one), or about 5-10 minutes into the first kneading cycle.
Q3: My bread is too dense or too crumbly, what went wrong?
A: This usually comes down to the flour-to-water ratio. If your bread is dense, it might have had too much flour or not enough water. If it’s crumbly, it might have been too dry. Remember to monitor the dough during the first kneading cycle and adjust with small amounts of water or flour as needed.
Q4: How do I store leftover Italian bread?
A: Once completely cooled, store your bread in an airtight container, a plastic bag, or a bread box at room temperature for up to 3-4 days. For longer storage, slice the bread and freeze it in a freezer-safe bag for up to 3 months. You can toast individual slices directly from the freezer.
Q5: What if the kneading paddle gets stuck in the bread?
A: This is very common! After removing the bread from the pan and allowing it to cool slightly, use a wooden or plastic utensil (never metal, to protect your pan’s coating) to gently pry the paddle out. You can also carefully use your fingers once the bread has cooled enough to handle.
Conclusion
There you have it – your complete guide to baking delicious Bread Machine Recipes Italian Bread! We hope this detailed, beginner-friendly recipe empowers you to create mouth-watering loaves with ease.
There’s truly nothing quite like the taste and aroma of homemade bread, and your bread machine makes it incredibly accessible. Don’t be afraid to experiment, and remember that every loaf is a learning experience. So go ahead, give it a try, and enjoy the wonderful world of home baking. Happy baking, and happy eating!