Welcome, fellow baking enthusiasts! Are you ready to embark on a delicious journey into the world of homemade bread? There’s truly nothing quite like the aroma of freshly baked bread filling your kitchen, and with our Bread With Whey Recipe, you’re in for an extra special treat. This recipe takes advantage of liquid whey (a byproduct of yogurt or cheese making) to create a loaf with an incredibly soft crumb, a beautiful golden crust, and a subtle, delightful tang that sets it apart from your everyday bread.
If you’ve been searching for easy baking recipes that yield impressive results, or if you’re keen to pick up some invaluable baking tips for beginners, you’ve come to the right place. We’ve meticulously crafted this guide to be as detailed and foolproof as possible, ensuring your first (or fiftieth!) loaf is a resounding success. Forget the intimidation; baking bread can be a wonderfully rewarding experience, and we’re here to guide you every step of the way. Let’s get baking!
Ingredients List
Gathering your ingredients correctly is the first step to baking success. Here’s what you’ll need for this delicious whey bread:
| Ingredient | Quantity | Unit |
|---|---|---|
| All-Purpose Flour | 3.5 – 4 | cups |
| Warm Liquid Whey* | 1.5 | cups |
| Active Dry Yeast | 2.25 | teaspoons (1 standard packet) |
| Granulated Sugar or Honey | 2 | tablespoons |
| Salt | 1.5 | teaspoons |
| Olive Oil or Melted Butter | 3 | tablespoons |
| Egg (for egg wash, optional) | 1 | large |
| Water (for egg wash, optional) | 1 | tablespoon |
*Note on Whey: Ensure your whey is liquid, not powdered. It should be lukewarm, ideally between 105-115°F (40-46°C), to properly activate the yeast.
Step-by-Step Instructions: Your Path to Perfect Whey Bread
This section is designed to walk you through every single stage of making your bread, with plenty of helpful notes for beginners. Take your time, read through each step before you start, and enjoy the process!
Step 1: Activate the Yeast (The Wake-Up Call)
- Warm the Whey: Gently warm your 1.5 cups of liquid whey. The ideal temperature is crucial for yeast activation – too cold, and the yeast won’t wake up; too hot, and you’ll kill it. Aim for 105-115°F (40-46°C). You should be able to comfortably stick your finger in it without feeling it’s too hot. A kitchen thermometer is your best friend here!
- Combine and Bloom: Pour the warm whey into a large mixing bowl (or the bowl of your stand mixer). Sprinkle the 2.25 teaspoons of active dry yeast and 2 tablespoons of sugar (or honey) over the surface. The sugar acts as food for the yeast.
- Wait and Watch: Give it a gentle stir and let it sit for 5-10 minutes. You should see a foamy, bubbly layer form on the surface. This is a good sign! It means your yeast is alive and active. If it doesn’t foam, your whey might have been too hot or too cold, or your yeast might be old. In this case, it’s best to start over with fresh yeast and properly tempered whey.
Step 2: Mix the Dough (Bringing it All Together)
- Add the Essentials: Once your yeast is foamy, add the 1.5 teaspoons of salt and 3 tablespoons of olive oil (or melted butter) to the bowl. Stir them in briefly.
- Incorporate the Flour: Begin adding the all-purpose flour, about 1 cup at a time. Use a sturdy wooden spoon or the dough hook attachment if using a stand mixer.
- Beginner Tip: Start with 3.5 cups of flour. The exact amount of flour can vary based on humidity and how wet your whey is. It’s always better to add less and gradually incorporate more if needed.
- Mix Until Shaggy: Continue mixing until a shaggy, somewhat sticky dough forms and pulls away from the sides of the bowl. It might still look a bit rough, and that’s perfectly normal at this stage.
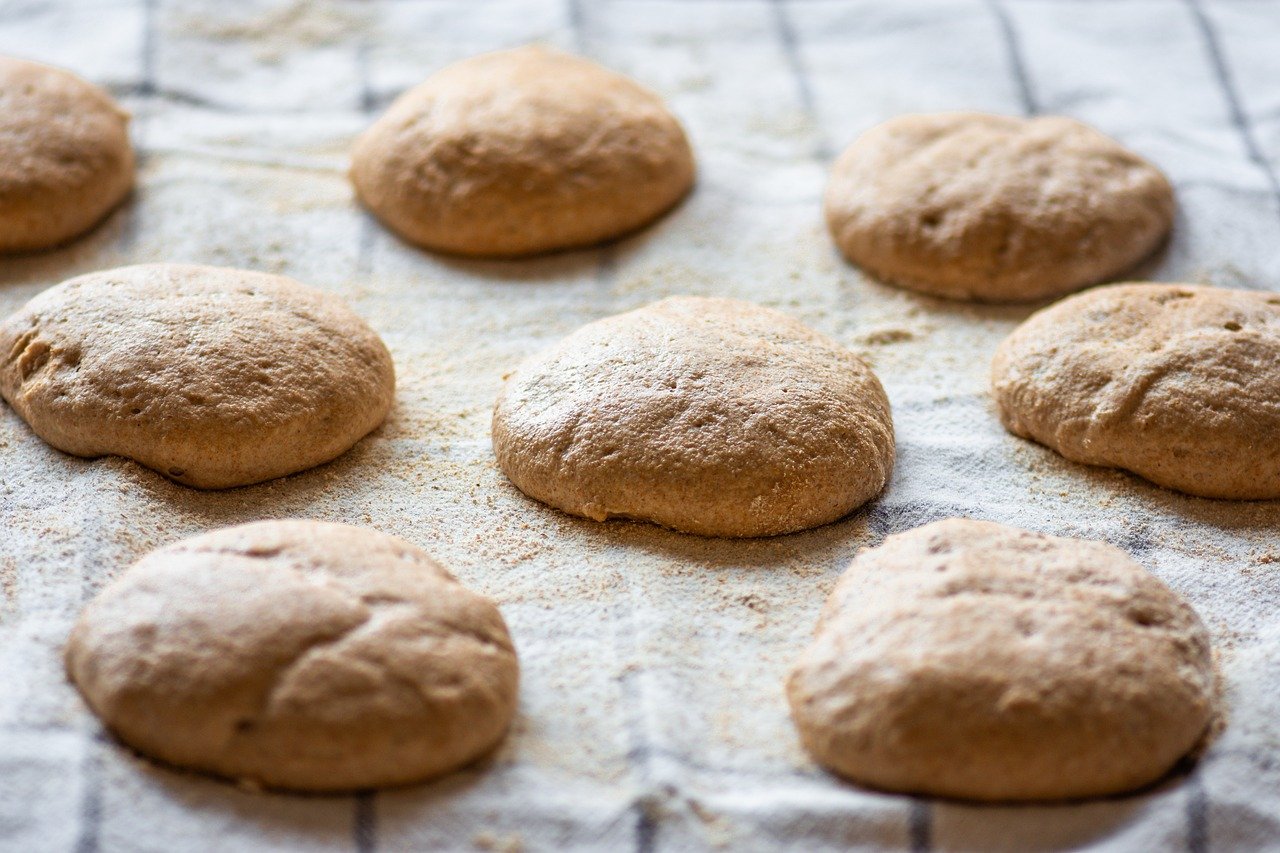
Step 3: Knead the Dough (Developing the Gluten)
Kneading is crucial for developing the gluten structure, which gives bread its chewiness and allows it to rise properly.
- Prepare Your Surface: Lightly flour a clean countertop or a large kneading board. Turn the shaggy dough out onto this surface.
- Hand Kneading (The Therapeutic Way):
- Push the dough away from you with the heels of your hands, then fold it back towards you.
- Rotate the dough a quarter turn and repeat the push-fold-rotate motion.
- Continue kneading for 8-10 minutes. Your dough will start off sticky but become smoother, more elastic, and less sticky as you knead. It should feel soft and pliable.
- Common Mistake: Don’t be tempted to add too much flour during kneading. A slightly tacky dough is good. If it’s sticking excessively, add just a tiny sprinkle of flour at a time. The goal is to develop gluten, not dry out the dough.
- Stand Mixer Kneading (The Easy Way):
- If using a stand mixer with a dough hook, knead on medium-low speed for 6-8 minutes.
- The dough should eventually clear the sides of the bowl and cling to the dough hook, becoming smooth and elastic.
- Windowpane Test (Optional but Recommended): To check if your dough is sufficiently kneaded, pinch off a small piece (about the size of a golf ball). Gently stretch it with your fingers. If you can stretch it thin enough to see light through it without it tearing, your gluten is well-developed. If it tears easily, knead for another minute or two and re-test.
Step 4: First Rise (Bulk Fermentation)
This is where the yeast does its magic, making the dough light and airy.
- Prepare the Bowl: Lightly grease a clean large bowl with a little olive oil or cooking spray.
- Place the Dough: Transfer your kneaded dough to the greased bowl, turning it once to coat the entire surface with oil. This prevents it from drying out.
- Cover and Rise: Cover the bowl tightly with plastic wrap or a clean kitchen towel. Place the bowl in a warm, draft-free spot. A slightly warm oven (turned off, but warmed for a minute then turned off again), or near a sunny window, works well.
- Proofing Time: Let the dough rise for 1 to 1.5 hours, or until it has doubled in size. The exact time will depend on the warmth of your environment. You’ll know it’s ready when you gently poke it with a floured finger, and the indentation remains.
Step 5: Shape the Loaf (Giving it Form)
Now we turn the airy dough into a beautiful loaf shape.
- Prepare Loaf Pan: Lightly grease a standard 9×5-inch loaf pan with butter or cooking spray.
- Deflate the Dough: Gently punch down the risen dough to release the air. Turn it out onto a lightly floured surface.
- Pre-Shape (Optional but Helpful): Gently pat the dough into a rectangle, then fold the sides into the middle, creating a somewhat round shape. Let it rest for 5-10 minutes. This helps relax the gluten, making it easier to shape.
- Shape into a Loaf:
- Roll the dough into a rectangle, roughly 9 inches wide and 12-14 inches long.
- Starting from one of the longer sides, tightly roll the dough into a log, pinching the seam closed as you go. Ensure the seam is sealed well to prevent it from bursting open during baking.
- Tuck the ends of the log under slightly to create a neat, compact loaf shape.
- Transfer to Pan: Carefully place the shaped dough into your prepared loaf pan, seam-side down.
Step 6: Second Rise (Proofing)
This final rise ensures a light, airy texture.
- Cover Again: Loosely cover the loaf pan with plastic wrap (you can lightly grease the underside of the plastic wrap to prevent sticking) or a clean kitchen towel.
- Second Proof: Let it rise again in a warm, draft-free place for another 30-45 minutes, or until the dough has risen significantly above the rim of the pan and looks puffy. When gently poked, the indentation should spring back slowly.
- Preheat Oven: About 15-20 minutes before the end of the second rise, preheat your oven to 375°F (190°C).
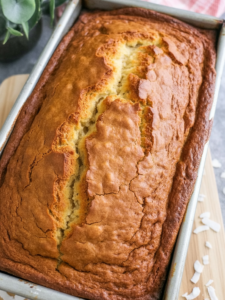
Step 7: Bake the Bread (The Grand Finale)
- Egg Wash (Optional, for a Golden Crust): If you want a shiny, golden-brown crust, whisk together 1 large egg with 1 tablespoon of water. Gently brush this mixture over the top of the risen loaf.
- Bake: Place the loaf pan in the preheated oven. Bake for 30-35 minutes.
- Check for Doneness: The bread should be deeply golden brown on top. To be sure it’s fully baked, carefully remove the bread from the loaf pan (you might need to run a knife around the edges) and tap the bottom. It should sound hollow. The internal temperature, if you have a thermometer, should register 200-210°F (93-99°C).
- Adjust Baking Time: If it’s browning too quickly, you can loosely tent it with aluminum foil for the last 10-15 minutes of baking.
Step 8: Cool and Enjoy!
- Cooling is Crucial: Immediately after removing it from the oven, take the bread out of the loaf pan and transfer it to a wire cooling rack.
- Resist the Urge: Let the bread cool completely, or at least for 1-2 hours, before slicing. Slicing hot bread can lead to a gummy texture inside, as the steam needs time to redistribute.
- Slice and Serve: Once cooled, slice your beautiful, homemade Bread With Whey and enjoy! It’s fantastic with butter, jam, or as a side to your favorite meal.
Tips & Tricks for Baking Success
Here are some extra nuggets of wisdom to ensure your bread baking experience is smooth and successful, especially for beginners:
- Accurate Measuring: Always measure your flour using the “spoon and level” method. Spoon flour into your measuring cup until it overflows, then level off the excess with a straight edge (like the back of a knife). Don’t scoop directly from the bag, as this compacts the flour and you’ll end up with too much.
- Whey Temperature is Key: As mentioned, 105-115°F (40-46°C) is ideal for yeast. Invest in a good kitchen thermometer; it’s a game-changer for baking!
- Warm Proofing Environment: Yeast loves warmth. If your kitchen is cold, find a warm spot for your dough to rise. A microwave (turned off, of course!) with a cup of hot water placed alongside the dough can create a mini proofing chamber.
- Don’t Over-Flour: When kneading, resist the urge to add too much extra flour. A slightly tacky dough is better than a dry, dense one. A bench scraper can be very helpful for managing sticky dough on your counter.
- Listen to Your Dough: The times given for rising and kneading are estimates. Always go by how the dough looks and feels (doubled in size, smooth and elastic) rather than strictly by the clock.
- Storage: Store your cooled bread in an airtight container or a bread bag at room temperature for up to 3-4 days. For longer storage, slice and freeze it in a freezer-safe bag for up to 3 months.
- Customization: Feel free to experiment! Add 1/4 cup of rolled oats, flax seeds, or even a tablespoon of dried herbs (like rosemary or thyme) to the dough along with the flour for extra flavor and texture.
Essential Baking Tools
Having the right tools makes all the difference in baking. Here are a few essentials you’ll want to have on hand:
- Mixing Bowl (large for dough)
- Whisk (for egg wash, if using)
- Loaf Pan (standard 9×5 inch)
- Measuring Cups
- Measuring Spoons
- Spatula or Wooden Spoon
- Kitchen Thermometer (for whey temperature)
- Wire Cooling Rack
Nutrition Information (Estimated per slice, 1/12th of a loaf)
Please note that these are approximate values and can vary based on exact ingredients and portion sizes.
| Nutrient | Amount |
|---|---|
| Calories | 180-200 kcal |
| Carbohydrates | 35-40g |
| Protein | 6-8g |
| Fat | 3-5g |
| Fiber | 1-2g |
| Sugar | 3-5g |
Frequently Asked Questions (FAQs)
Q: Can I substitute regular milk or water for whey?
A: Yes, absolutely! If you don’t have liquid whey, you can use an equal amount of lukewarm water or milk. The bread will still be delicious, but you might miss the subtle tang and extra tenderness that whey provides. If using milk, warm it to the same temperature as you would the whey.
Q: My dough isn’t rising, what went wrong?
A: The most common reasons for dough not rising are: 1) Your yeast was dead or expired. Always check the expiration date and ensure it foams up in the first step. 2) The liquid (whey/water/milk) was too hot and killed the yeast, or too cold and didn’t activate it. 3) Your environment is too cold for proofing. Try a warmer spot.
Q: How do I know if my bread is fully baked?
A: The bread should be a deep golden brown on top. The best way to check is to carefully remove it from the pan and tap the bottom. It should sound hollow. For ultimate accuracy, an internal temperature of 200-210°F (93-99°C) confirms it’s done.
Q: Can I prepare the dough ahead of time?
A: Yes! After the first rise, you can gently punch down the dough, shape it, and place it in your loaf pan. Then, cover it tightly with plastic wrap and refrigerate it overnight (up to 12-18 hours). The next morning, take it out of the fridge and let it come to room temperature and complete its second rise (this might take 1-2 hours) before baking as usual.
Q: What kind of whey should I use?
A: This recipe calls for liquid whey, which is the yellowish liquid leftover from straining yogurt (to make Greek yogurt) or making cheese. Do not use powdered protein whey, as it will not yield the same results.
Conclusion: Your Journey to Homemade Bread Starts Now!
Congratulations! You’ve just walked through all the steps to create a truly wonderful loaf of Bread With Whey. We hope this detailed guide has demystified the bread-making process and given you the confidence to dive into your kitchen. Remember, baking is a journey, and every loaf is a learning experience. Don’t be afraid to get your hands a little messy, trust the process, and most importantly, enjoy the incredible aroma and taste of your homemade creation.
Whether you’re serving it with a hearty dinner, alongside a bowl of soup, or simply toasted with butter, this whey bread is sure to become a new favorite. We’d love to hear about your baking adventures and see your beautiful loaves! Feel free to leave a comment below with any questions or to share your successes. Happy baking!