This recipe is specifically designed to be super beginner-friendly, leveraging the magic of your breadmaker to do all the hard work. No complicated kneading, no endless waiting around – just perfect, fluffy, golden-brown bread infused with the irresistible taste of pineapple. If you’ve been hesitant to dive into breadmaking, fear not! We’re here to provide all the essential baking tips for beginners to ensure your first loaf (and every loaf after!) is a resounding success. Let’s get baking and bring a little slice of paradise home!
Ingredients You’ll Need
Gather your ingredients! For best results, ensure your wet ingredients are at room temperature.
| Ingredient | Quantity | Unit |
|---|---|---|
| Warm Water (105-115°F / 40-46°C) | 1/2 | cup |
| Pineapple Juice (room temperature) | 1/2 | cup |
| Large Egg (room temperature) | 1 | |
| Unsalted Butter (softened) | 3 | tablespoons |
| All-Purpose Flour | 3 | cups |
| Granulated Sugar | 1/4 | cup |
| Dry Milk Powder | 2 | tablespoons |
| Salt | 1 | teaspoon |
| Active Dry Yeast (or Instant Yeast) | 2 1/4 | teaspoons |
Step-by-Step Instructions for Breadmaker Hawaiian Bread
Follow these simple steps for a perfect loaf every time. Remember, the order of adding ingredients is crucial for breadmakers!
- Prepare Your Breadmaker Pan: Carefully remove the bread pan from your breadmaker. Ensure the kneading paddle is securely in place at the bottom of the pan. This is a common oversight for beginners – make sure it’s snug!
- Add Liquids First: Pour the warm water and room temperature pineapple juice into the bread pan. Next, crack in your large egg and add the softened unsalted butter.
- Beginner Tip: Using room temperature liquids and egg helps the yeast activate more effectively, leading to a better rise. If your butter isn’t soft, you can microwave it for 10-15 seconds, but be careful not to melt it completely!
- Add Dry Ingredients (Layering is Key!): Carefully add the all-purpose flour over the wet ingredients. Don’t mix it yet! On top of the flour, add the granulated sugar, dry milk powder, and salt. Try to keep the salt and sugar in separate corners, away from where the yeast will go.
- Why Layer? Salt can inhibit yeast activity if it comes into direct contact for too long. Layering helps create a barrier until the mixing cycle begins.
- Add the Yeast Last: Make a small indentation in the center of the dry ingredients (on top of the flour, but not touching the wet layer below) and pour in the active dry yeast.
- Yeast Type: If using instant yeast, you can mix it in with the flour. If using active dry yeast, it’s best to place it on top to allow it to activate properly when it eventually meets the liquids.
- Place Pan in Breadmaker: Return the bread pan to your breadmaker, ensuring it clicks firmly into place. Close the lid.
- Select Your Cycle: Choose the “Sweet Bread” or “Basic/White Bread” cycle on your breadmaker. Select your desired crust color (light, medium, or dark) and loaf size (if applicable, typically 1.5 lb or 2 lb). For a first-timer, “medium” crust is usually a safe bet.
- Common Mistake: Accidentally selecting a “Dough” cycle instead of a “Bread” cycle. Double-check your setting!
- Start the Breadmaker: Press the start button and let your breadmaker do its magic! It will go through cycles of kneading, rising, and baking.
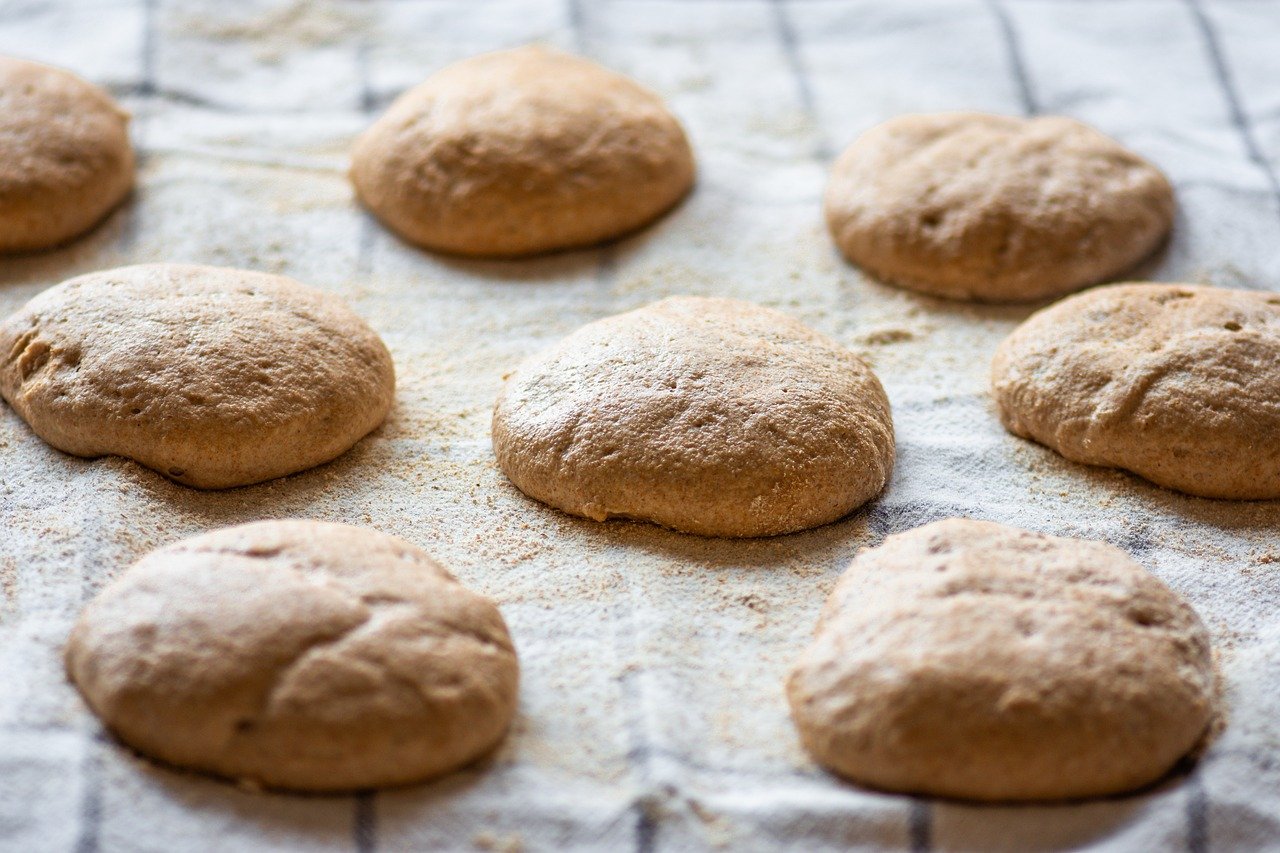
- Dough Consistency Check (Optional but Recommended!): About 5-10 minutes into the first kneading cycle, open the lid and check the dough. It should form a smooth, elastic ball. If it’s too sticky (clinging to the sides excessively), add flour 1 tablespoon at a time. If it’s too dry and crumbly, add water 1 teaspoon at a time. Close the lid quickly after checking. This is one of the best **baking tips for beginners** to perfect your loaf!
- Cool the Bread: Once the breadmaker beeps to signal completion, carefully remove the bread pan using oven mitts. Immediately invert the pan onto a wire cooling rack and gently shake to release the loaf. The kneading paddle might stick to the bottom of the loaf – carefully remove it with a small non-metallic utensil.
- Why Cool? Cooling on a rack allows steam to escape, preventing a soggy bottom and giving you a perfectly textured crust and crumb. Don’t slice hot bread, as it can be gummy.
- Slice and Enjoy: Let the bread cool completely (at least 1-2 hours) before slicing with a serrated knife. Serve warm with butter, jam, or simply enjoy plain! This bread is fantastic for toast, sandwiches, or just a delightful treat.
Tips & Tricks for Breadmaker Success
Achieving the perfect loaf is easy with a few insider secrets. These **baking tips for beginners** will elevate your breadmaking game!
- Measure Accurately: This is perhaps the most crucial tip. Use proper measuring cups and spoons. For flour, spoon it into your measuring cup and then level it off with a straight edge (like the back of a knife). Scooping directly can pack too much flour, leading to a dense, dry loaf.
- Ingredient Temperature Matters: As mentioned, room temperature ingredients (especially liquids, eggs, and butter) are vital for yeast activity. Cold ingredients can shock the yeast, hindering its ability to rise effectively.
- Check Your Yeast: If you’re unsure about your yeast’s freshness, you can “proof” it. Mix 1/2 teaspoon of sugar with your warm water (from the recipe) and then stir in the yeast. Let it sit for 5-10 minutes. If it becomes foamy, your yeast is active and ready to go! If not, it’s time for new yeast.
- Don’t Peek Too Often: While checking the dough consistency during the first knead is fine, try to resist opening the lid during the rising and baking cycles. Each time you open it, warm air escapes, which can affect the rise and final texture of your bread.
- Store It Right: Once completely cooled, store your Hawaiian bread in an airtight container or bread bag at room temperature for 3-4 days. For longer storage, slice the bread and freeze it in a freezer-safe bag for up to 2-3 months.
- Experiment with Flavors: While this recipe is perfect as is, you can add a tablespoon of shredded unsweetened coconut for an extra tropical twist, or a teaspoon of vanilla extract for added warmth.
Essential Baking Tools for Your Kitchen
Having the right tools makes all the difference, especially for beginners. Here are some essentials:
- Breadmaker (of course!)
- Mixing Bowl (for prep, even with a breadmaker)
- Whisk (for light mixing)
- Measuring Cups
- Measuring Spoons
- Spatula (for scraping bowls)
- Wire Cooling Rack
- Serrated Bread Knife
(Note: The Amazon links provided are generic search links and not affiliate links to specific products.)
Nutrition Information (Estimated per slice, 12 slices per loaf)
Please note: These are estimated values and may vary based on specific ingredients and loaf size.
| Nutrient | Amount |
|---|---|
| Calories | 170 kcal |
| Carbohydrates | 32 g |
| Protein | 5 g |
| Fat | 4 g |
| Fiber | 1 g |
| Sugar | 9 g |
Frequently Asked Questions (FAQs)
Q1: Can I make this Hawaiian bread without a breadmaker?
A1: Yes, you can! You’ll need to follow a traditional kneading, rising, and baking process. After the dough cycle in your breadmaker, you’d transfer the dough to a floured surface, knead it briefly, shape it into a loaf, let it rise in a greased loaf pan until doubled (about 45-60 minutes), and then bake at 350°F (175°C) for 30-35 minutes, or until golden brown and cooked through. This recipe focuses on the breadmaker for ease, but it’s totally adaptable!
Q2: My dough isn’t rising. What went wrong?
A2: The most common culprits are inactive yeast (check the expiration date or proof it first), water that’s too hot (which kills the yeast) or too cold (which inhibits it), or too much salt coming into direct contact with the yeast. Ensure your water is between 105-115°F (40-46°C) and your yeast is fresh.
Q3: What kind of flour should I use for this recipe?
A3: All-purpose flour works perfectly for this recipe, giving a tender crumb. You can also use bread flour if you prefer a slightly chewier texture, but all-purpose is a great starting point for beginners.
Q4: Can I substitute fresh pineapple for the juice?
A4: While fresh pineapple adds great flavor, it contains enzymes that can interfere with gluten development, potentially leading to a dense loaf. Canned pineapple juice (not fresh-squeezed) works best as the enzymes are usually denatured during processing. If you want to add chunks, do so during the “add-ins” beep on your breadmaker, but keep the quantity small (1/4 cup finely diced).
Q5: How do I store leftover Hawaiian bread?
A5: Once completely cooled, store your bread in an airtight container or a bread bag at room temperature for up to 3-4 days. For longer storage, slice the loaf and freeze the slices in a freezer-safe bag for up to 2-3 months. Thaw individual slices as needed or pop them straight into the toaster.
Q6: Can I make this recipe dairy-free?
A6: To make it dairy-free, you would need to substitute the dry milk powder with a non-dairy equivalent (like soy milk powder or oat milk powder) and use a plant-based butter alternative. Ensure your breadmaker pan is well-greased if using different fats.
Your Tropical Baking Adventure Awaits!
Congratulations, future bread baking master! You’re now equipped with everything you need to bake the most delicious, fluffy, and fragrant Breadmaker Hawaiian Bread Recipe right in your own kitchen. This isn’t just a recipe; it’s an invitation to explore the joy of baking, made incredibly simple thanks to your breadmaker. Don’t be afraid to experiment, and remember that every loaf is a learning experience. The satisfaction of pulling a warm, golden loaf from your breadmaker, knowing you made it yourself, is truly unmatched. So go ahead, gather your ingredients, follow these easy baking recipes steps, and treat yourself and your loved ones to a little taste of paradise. Happy baking, and enjoy every single slice!