
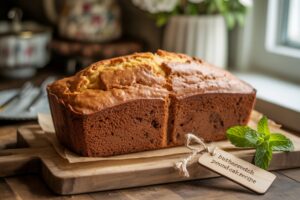
Are you ready to bake something truly special that will fill your home with the most inviting aroma? This Butterscotch Pound Cake Recipe is not just any cake; it’s a moist, tender, and intensely flavorful dessert bursting with rich butterscotch goodness. Perfect for any occasion, from a cozy evening at home to a celebratory gathering. If you’re looking for easy baking recipes that deliver impressive results, you’ve come to the right place!

We’ve crafted this guide specifically with baking tips for beginners in mind, breaking down every step to ensure your first (or hundredth!) pound cake is an absolute triumph. Get ready to discover the joy of baking and create a dessert that will have everyone asking for more!
Ingredients You’ll Need
Gathering your ingredients before you start is a key step to successful baking. Make sure your butter and eggs are at room temperature – this helps create a smooth, emulsified batter.
For the Butterscotch Pound Cake:
| Quantity | Unit | Ingredient |
|---|---|---|
| 3 | cups | All-Purpose Flour, sifted |
| 1/2 | teaspoon | Baking Powder |
| 1/4 | teaspoon | Salt |
| 1 | cup (2 sticks) | Unsalted Butter, softened to room temperature |
| 1 1/2 | cups | Granulated Sugar |
| 1/2 | cup | Light Brown Sugar, packed |
| 4 | large | Eggs, room temperature |
| 1 | teaspoon | Vanilla Extract |
| 1/2 | cup | Buttermilk, room temperature |
| 1 | cup | Butterscotch Chips (optional, for extra flavor/texture) |
For the Butterscotch Glaze:
| Quantity | Unit | Ingredient |
|---|---|---|
| 2 | cups | Powdered Sugar, sifted |
| 3-4 | tablespoons | Milk or Heavy Cream |
| 2 | tablespoons | Unsalted Butter, melted |
| 1/2 | teaspoon | Vanilla Extract |
| 1/4 | teaspoon | Butterscotch Extract (optional, for intense flavor) |
Step-by-Step Instructions: Bake Your Perfect Butterscotch Pound Cake
Follow these detailed steps carefully, and you’ll be enjoying a slice of homemade heaven in no time!
Step 1: Prepare Your Pan and Preheat Oven
- Preheat your oven to 325°F (160°C). Pound cakes bake best at a slightly lower temperature for a longer time, which helps prevent over-browning and ensures a thoroughly cooked center.
- Grease and flour a 10-12 cup Bundt pan or a 9×5 inch loaf pan. For Bundt pans, be very thorough in greasing all the nooks and crannies. You can use baking spray with flour, or apply softened butter with a pastry brush and then dust with flour, tapping out the excess. This prevents sticking, which is a common beginner frustration!
Step 2: Whisk Dry Ingredients
- In a medium bowl, whisk together the sifted all-purpose flour, baking powder, and salt. Sifting flour ensures there are no lumps and helps aerate it, leading to a lighter cake. Set aside.
Step 3: Cream Butter and Sugars
- In a large mixing bowl (preferably using a stand mixer with a paddle attachment or a hand mixer), beat the softened unsalted butter, granulated sugar, and light brown sugar together on medium-high speed for 5-7 minutes. This is crucial for a tender pound cake! You want the mixture to become light, pale, and fluffy, almost like whipped cream. This process incorporates air, which is a primary leavening agent in pound cakes.
- Beginner Tip: Don’t rush this step! Undercutting the creaming process will result in a dense cake.
Step 4: Add Eggs Gradually
- Reduce the mixer speed to medium-low. Add the room temperature eggs one at a time, beating well after each addition until fully incorporated. Scrape down the sides of the bowl with a spatula after each egg to ensure everything is evenly mixed.
- Common Mistake: Adding eggs too quickly can cause the mixture to curdle. If it looks a little curdled, don’t panic! It will usually come together once the flour is added.
- Stir in the vanilla extract.
Step 5: Alternate Dry and Wet Ingredients
- With the mixer on low speed, alternately add the dry ingredients mixture and the room temperature buttermilk to the butter-egg mixture, beginning and ending with the dry ingredients.
- Start by adding about one-third of the flour mixture, mix until just combined.
- Then add half of the buttermilk, mix until just combined.
- Repeat with another third of the flour, then the remaining buttermilk, and finally the last third of the flour.
- Important: Mix only until just combined after each addition. Do not overmix! Overmixing develops the gluten in the flour too much, leading to a tough, dry cake. A few small streaks of flour are okay; you’ll mix them in by hand.
Step 6: Fold in Butterscotch Chips (Optional)
- Remove the bowl from the mixer. Using a spatula, gently fold in the butterscotch chips, if using, until evenly distributed. This ensures they don’t sink to the bottom during baking.
Step 7: Bake the Pound Cake
- Pour the batter evenly into your prepared Bundt or loaf pan. Smooth the top with a spatula.
- Bake for 60-75 minutes for a Bundt pan, or 70-90 minutes for a loaf pan, or until a wooden skewer or toothpick inserted into the center of the cake comes out clean or with a few moist crumbs attached (no wet batter).
- Beginner Tip: Avoid opening the oven door frequently, especially in the first 45 minutes, as this can cause the cake to sink.
- If the top starts browning too quickly, you can lightly tent it with aluminum foil for the last 15-20 minutes of baking.
Step 8: Cool the Cake
- Once baked, remove the cake from the oven and let it cool in the pan on a wire rack for 15-20 minutes. This cooling period allows the cake to set and firm up, making it easier to remove without breaking.
- After 15-20 minutes, carefully invert the cake onto the wire rack to cool completely. This can take 1-2 hours.
- Common Mistake: Trying to remove the cake too soon will likely result in it breaking apart! Be patient.
Step 9: Prepare the Butterscotch Glaze
- While the cake is cooling, prepare the glaze. In a medium bowl, whisk together the sifted powdered sugar, melted butter, vanilla extract, and butterscotch extract (if using).
- Gradually add the milk or heavy cream, one tablespoon at a time, until you reach a smooth, pourable consistency. You want it thick enough to coat a spoon but thin enough to drizzle.
Step 10: Glaze and Serve!
- Once the cake is completely cool, drizzle the butterscotch glaze generously over the top. Let the glaze set for a few minutes before slicing and serving.
- Enjoy your magnificent homemade Butterscotch Pound Cake!
Tips & Tricks for Pound Cake Perfection
Baking is a science, but with a few pointers, you’ll feel like a pro in no time!
- Room Temperature is Key: This is perhaps the most important tip! Softened butter and room temperature eggs and buttermilk emulsify much better, creating a smooth, cohesive batter that traps more air, resulting in a lighter, more tender crumb. If your butter isn’t soft, cut it into small pieces and let it sit for 30 minutes. For eggs, place them in a bowl of warm water for 10 minutes.
- Measure Flour Correctly: Don’t scoop flour directly from the bag with your measuring cup. This compacts it and you’ll end up with too much flour, leading to a dry cake. Instead, spoon the flour into your measuring cup and then level it off with the back of a knife.
- Don’t Overmix: Once you add flour, mix only until just combined. Overmixing develops gluten, which makes the cake tough and chewy instead of tender and melt-in-your-mouth.
- Know Your Oven: Ovens can vary widely in temperature. Consider getting an oven thermometer to ensure your oven is truly at 325°F (160°C). This can prevent uneven baking or burning.
- Cooling Patience: Resist the urge to unmold your cake too early. The cooling time in the pan allows the cake to finish setting and prevents it from sticking or breaking when inverted.
- Storage: Store your pound cake at room temperature, covered tightly, for up to 3-4 days. For longer storage, you can freeze individual slices or the whole cake (unglazed is best for freezing) wrapped tightly in plastic wrap and then foil for up to 3 months. Thaw at room temperature.
Essential Baking Tools for Your Kitchen
Having the right tools makes all the difference, especially for beginners. Here are some essentials to get you started:
- Mixing Bowl – Essential for combining ingredients.
- Whisk – Great for aerating dry ingredients and making glazes.
- Baking Pan – A good quality Bundt or loaf pan is crucial for pound cake.
- Measuring Cups & Spoons – Accurate measurements are key in baking.
- Spatula – For scraping bowls and gently folding ingredients.
- Electric Mixer (Handheld or Stand) – Highly recommended for creaming butter and sugar effectively.
- Wire Rack – For cooling your cake evenly and preventing sogginess.
Nutrition Information (Estimated per serving)
Please note: These are estimated values and can vary based on specific ingredients and serving size (approx. 1/12th of the cake).
| Nutrient | Amount |
|---|---|
| Calories | 420 kcal |
| Carbohydrates | 65 g |
| Protein | 5 g |
| Fat | 17 g |
| Fiber | 1 g |
| Sugar | 45 g |
Frequently Asked Questions (FAQs)
Q1: My cake sank in the middle – what happened?
A1: A sunken cake is often due to opening the oven door too early (especially in the first 45 minutes), underbaking, or an oven that’s too hot causing the outside to set before the inside is fully cooked. Make sure your oven temperature is accurate and resist peeking until later in the baking process!
Q2: Can I use a different pan size?
A2: Yes, but you might need to adjust baking time. A 9×13 inch pan might bake faster (around 45-60 minutes), while smaller loaf pans will also have different times. Always check for doneness with a toothpick. If using a smaller pan, you may need to make multiple cakes or reduce the recipe quantity.
Q3: How do I know when my butter and eggs are at room temperature?
A3: Butter is at room temperature when you can easily press an indentation into it with your finger, but it’s still firm and not melted. Eggs are at room temperature when they no longer feel cool to the touch. This usually takes about 30-60 minutes sitting on the counter, or a quick warm water bath for eggs.
Q4: My cake is dry – what went wrong?
A4: A dry cake is usually a result of overbaking or measuring too much flour. Ensure you’re measuring your flour correctly (spoon and level!) and always check for doneness at the earliest recommended time. An oven thermometer can also help prevent overbaking.
Q5: Can I make this cake without butterscotch chips?
A5: Absolutely! The cake will still have a wonderful butterscotch flavor from the brown sugar in the batter and the optional butterscotch extract in the glaze. The chips just add an extra burst of flavor and texture. You can omit them or substitute with other chips like chocolate or toffee bits.
Q6: Can I use regular milk instead of buttermilk?
A6: Buttermilk adds tenderness and a slight tang to pound cakes. If you don’t have buttermilk, you can make a DIY version: add 1/2 tablespoon of lemon juice or white vinegar to a 1/2 cup measuring cup, then fill the rest with regular milk (dairy or non-dairy). Let it sit for 5-10 minutes until it slightly curdles before using.
Ready to Impress? Your Butterscotch Pound Cake Awaits!
There you have it – a comprehensive guide to baking a truly delightful Butterscotch Pound Cake. We hope these detailed instructions and baking tips for beginners empower you to confidently create this stunning dessert. There’s nothing quite like the satisfaction of pulling a perfectly baked cake from the oven, especially one as rich and comforting as this.
Don’t be afraid to get your hands a little messy, enjoy the process, and savor every moment of baking. We’re confident that this recipe will become a cherished favorite in your kitchen. Go ahead, gather your ingredients, and let the magic begin. Happy baking!