
Welcome, budding bakers and dessert enthusiasts! Are you ready to dive into the wonderful world of home baking with a recipe that’s as rewarding as it is delicious? Today, we’re tackling a true classic that’s incredibly forgiving and perfect for anyone just starting their culinary journey: our Carrot Cake Bars With Cream Cheese Frosting Recipe.
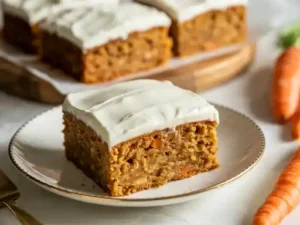
Forget complicated techniques; this is one of those easy baking recipes that promises big flavor with minimal fuss. We’ll walk you through every single step, offering all the baking tips for beginners you need to achieve moist, spiced carrot cake bars topped with luscious, tangy cream cheese frosting. Get ready to impress yourself (and everyone else!) with this delightful treat that’s perfect for any occasion. Let’s get baking!
Ingredients
For the Carrot Cake Bars:
| Item | Quantity | Unit |
|---|---|---|
| All-Purpose Flour | 1 ½ | cups |
| Granulated Sugar | 1 | cup |
| Brown Sugar (packed) | ½ | cup |
| Baking Soda | 1 | teaspoon |
| Salt | ½ | teaspoon |
| Ground Cinnamon | 1 | teaspoon |
| Ground Nutmeg | ½ | teaspoon |
| Large Eggs | 2 | |
| Vegetable Oil | ½ | cup |
| Vanilla Extract | 1 | teaspoon |
| Grated Carrots | 2 | cups |
| Chopped Pecans or Walnuts (optional) | ½ | cup |
For the Cream Cheese Frosting:
| Item | Quantity | Unit |
|---|---|---|
| Cream Cheese (softened) | 8 | ounces |
| Unsalted Butter (softened) | ½ | cup (1 stick) |
| Powdered Sugar (sifted) | 3 | cups |
| Vanilla Extract | 1 | teaspoon |
| Pinch of Salt |
Step-by-Step Instructions
Follow these detailed steps carefully, and you’ll be enjoying your homemade carrot cake bars in no time!
For the Carrot Cake Bars:
- Prepare Your Pan & Preheat Oven: Start by preheating your oven to 350°F (175°C). This ensures your oven is at the correct temperature when your batter is ready to go in, preventing uneven baking. Lightly grease and flour a 9×13 inch baking pan, or line it with parchment paper leaving an overhang on the sides – this makes lifting the cooled bars out incredibly easy.
- Combine Dry Ingredients: In a large mixing bowl, whisk together the all-purpose flour, granulated sugar, brown sugar, baking soda, salt, ground cinnamon, and ground nutmeg. Whisking ensures that all the dry ingredients are evenly distributed, especially the leavening agents like baking soda, which are crucial for the cake’s rise. Beginner Tip: When measuring flour, spoon it into your measuring cup and then level it off with a straight edge (like the back of a knife). Don’t scoop directly from the bag, as this compacts the flour and you’ll end up with too much, leading to a dry cake.
- Whisk Wet Ingredients: In a separate, medium-sized bowl, whisk together the large eggs, vegetable oil, and vanilla extract until well combined. The vegetable oil contributes to the incredible moistness of these bars, and using oil instead of butter makes the texture lighter and often keeps cakes moist for longer.
- Combine Wet and Dry: Pour the wet ingredients into the dry ingredients. With a rubber spatula or a wooden spoon, mix until *just* combined. Do not overmix! Overmixing develops the gluten in the flour, which can lead to a tough, chewy cake. A few lumps are perfectly fine and will disappear during baking.
- Fold in Carrots & Nuts: Gently fold in the grated carrots. If using, also fold in the chopped pecans or walnuts. The carrots add moisture, natural sweetness, and that signature carrot cake flavor. Alternative: If you don’t like nuts, feel free to omit them! You could also add ½ cup of raisins or shredded coconut for extra texture and flavor.
- Pour into Pan & Bake: Pour the batter evenly into your prepared 9×13 inch baking pan. Spread it out with your spatula to ensure an even layer. Bake for 25-30 minutes, or until a wooden skewer or toothpick inserted into the center comes out clean or with a few moist crumbs attached. If it comes out with wet batter, bake for a few more minutes and check again.
- Cool Completely: This step is crucial! Let the carrot cake bars cool completely in the pan on a wire rack before frosting. Attempting to frost warm bars will result in a melted, runny mess. Patience is a virtue here!
For the Cream Cheese Frosting:
- Cream Butter and Cream Cheese: In a large mixing bowl (or the bowl of a stand mixer fitted with the paddle attachment), beat the softened cream cheese and softened unsalted butter together on medium speed until smooth and creamy. This usually takes about 2-3 minutes. Make sure both ingredients are truly at room temperature – this prevents lumps and ensures a smooth, emulsified frosting.
- Add Vanilla & Salt: Beat in the vanilla extract and a pinch of salt. The salt helps to balance the sweetness and enhance the other flavors.
- Gradually Add Powdered Sugar: Gradually add the sifted powdered sugar, one cup at a time, beating on low speed until combined, then increasing to medium speed until smooth after each addition. Sifting the powdered sugar beforehand is a key beginner tip to avoid a lumpy frosting. If your frosting seems too thick, you can add a tablespoon of milk or cream. If it’s too thin, add a bit more sifted powdered sugar.
- Beat Until Fluffy: Once all the powdered sugar is incorporated, increase the speed to medium-high and beat for another 1-2 minutes until the frosting is light and fluffy. This incorporates air and gives it a wonderful texture.
- Frost the Cooled Bars: Once your carrot cake bars are completely cool, spread the cream cheese frosting evenly over the top using an offset spatula or the back of a spoon. You can get creative with swirls or just smooth it out.
- Chill and Serve: For best results, chill the frosted bars in the refrigerator for at least 30 minutes before cutting and serving. This helps the frosting set, making for cleaner slices.
Pro Tips for Perfect Carrot Cake Bars
- Room Temperature Ingredients are Key: For both the cake and the frosting, make sure your eggs, butter, and cream cheese are at room temperature. This allows them to combine more smoothly and creates a more even texture in your final product.
- Don’t Overmix the Batter: Once you add the wet ingredients to the dry, mix only until *just* combined. Overmixing develops gluten, leading to a dense, tough cake. A few small lumps are perfectly fine!
- Grate Your Carrots Finely: Use the fine side of a box grater or a food processor with a grating attachment for the best texture. Finely grated carrots melt into the cake, providing moisture without large, chunky bits.
- Sift Your Powdered Sugar: Especially for the frosting, sifting powdered sugar prevents lumps and ensures a silky-smooth texture. Don’t skip this step for a truly professional-looking frosting.
- Cool Completely Before Frosting: This cannot be stressed enough! Frosting warm cake bars will lead to a melted, messy frosting. Patience will reward you with beautiful, intact bars.
- Adjust Spices to Taste: The spice levels in this recipe are a good starting point. If you love a bolder spice profile, feel free to add a little more cinnamon, nutmeg, or even a pinch of ground ginger or cloves.
- Storage: Store frosted carrot cake bars in an airtight container in the refrigerator for up to 3-4 days due to the cream cheese frosting.
Essential Baking Tools You’ll Need
Having the right tools makes baking much easier and more enjoyable. Here are a few essentials for this recipe:
- Mixing Bowl (You’ll need at least two, one large and one medium)
- Whisk (For dry ingredients and wet ingredients)
- 9×13 Inch Baking Pan (A sturdy metal one is best for even baking)
- Measuring Cups and Measuring Spoons (Accurate measurements are vital!)
- Rubber Spatula (For folding and scraping bowls clean)
- Electric Mixer (Handheld or Stand Mixer – highly recommended for the frosting)
- Wire Rack (For cooling your baked goods)
- Box Grater or Food Processor (For grating carrots)
Nutrition Information (per serving, estimated for 16 servings)
Please note: This is an approximate nutritional breakdown and can vary based on specific ingredients and portion sizes.
| Nutrient | Amount |
|---|---|
| Calories | 350-400 kcal |
| Carbohydrates | 45-50 g |
| Protein | 3-4 g |
| Fat | 18-22 g |
| Fiber | 1-2 g |
| Sugar | 30-35 g |
Frequently Asked Questions (FAQs)
Q: Can I make these carrot cake bars ahead of time?
Absolutely! The unfrosted carrot cake bars can be stored in an airtight container at room temperature for up to 2 days, or frozen for up to 2 months. The cream cheese frosting can also be made a day or two in advance and stored in the refrigerator. Just bring it to room temperature and give it a quick whip before frosting.
Q: My cream cheese frosting is lumpy. What went wrong?
Lumpy frosting is usually caused by using cold cream cheese or butter. Ensure both ingredients are at true room temperature before you start mixing. You can also try beating the cream cheese by itself first to smooth it out before adding the butter.
Q: Can I use pre-shredded carrots from the store?
While convenient, pre-shredded carrots can sometimes be drier and thicker than freshly grated carrots, which might affect the moisture of your bars. If you do use them, consider giving them a quick chop to make them finer, and be aware your bars might be slightly less moist.
Q: Why are my carrot cake bars dry?
Dry bars are often a result of overbaking or using too much flour. Make sure to measure your flour correctly (spoon and level!) and keep a close eye on your baking time. Start checking for doneness at the lower end of the suggested baking range.
Q: Can I add other mix-ins to the batter?
Yes, absolutely! Feel free to customize. Raisins, shredded coconut, or even a handful of chocolate chips can be delicious additions. Just be mindful not to add too many, as it can change the batter consistency.
Q: How should I store the leftover bars?
Because of the cream cheese frosting, these bars must be stored in an airtight container in the refrigerator. They will stay fresh and delicious for 3-4 days.
Conclusion
And there you have it – your very own batch of incredibly moist and flavorful Carrot Cake Bars With Cream Cheese Frosting Recipe! We hope this detailed, beginner-friendly guide has given you the confidence and inspiration to get into your kitchen and create something truly special. Baking doesn’t have to be intimidating; it’s a journey of delicious discovery, and every perfect bite is a testament to your growing skills.
Don’t be afraid to experiment, and remember that even experienced bakers have their off days. The most important ingredient is always a bit of love and enthusiasm. Enjoy your homemade treat, share it with loved ones, and savor the accomplishment. Happy baking, and we can’t wait to hear about your successes!
“`