Are you ready to bake something incredibly delicious without the fuss? If you’ve been searching for easy baking recipes or just need some solid baking tips for beginners, you’ve come to the right place! Today, we’re diving into the wonderful world of the Carrot Cake Box Mix Recipe.
Forget complicated steps and intimidating ingredient lists; this recipe is designed to give you a moist, flavorful carrot cake that tastes homemade, all with the convenience of a box mix. It’s perfect for first-time bakers or anyone looking for a quick, impressive dessert. Get ready to discover how simple and rewarding baking can be!
Gather Your Ingredients
Before we begin, let’s make sure you have everything you need. This recipe uses a standard carrot cake box mix as its base, but we’ll be adding a few extra touches to elevate the flavor and texture, making it truly special.
For the Carrot Cake:
| Ingredient | Quantity | Unit |
|---|---|---|
| Carrot Cake Box Mix | 1 | (standard 15.25 oz/432g box) |
| Large Eggs | 3 | |
| Vegetable Oil | 1/2 | cup |
| Water | 1 | cup |
| Grated Carrots | 1 | cup (about 2 medium carrots, finely grated) |
| Chopped Pecans or Walnuts (optional) | 1/2 | cup |
| Ground Cinnamon (optional, for extra spice) | 1/2 | teaspoon |
For the Easy Cream Cheese Frosting:
While you can absolutely use a store-bought cream cheese frosting, making your own is surprisingly simple and tastes so much better! Here’s what you’ll need for a basic, delicious frosting.
| Ingredient | Quantity | Unit |
|---|---|---|
| Cream Cheese, softened | 8 | ounces (1 block) |
| Unsalted Butter, softened | 1/2 | cup (1 stick) |
| Powdered Sugar (Confectioners’ Sugar) | 3-4 | cups (to desired sweetness/consistency) |
| Vanilla Extract | 1 | teaspoon |
| Pinch of Salt |
Step-by-Step Baking Instructions for Beginners
Follow these detailed steps carefully, and you’ll be enjoying a fantastic carrot cake in no time. Don’t rush, and remember that baking should be fun!
Step 1: Preheat Your Oven & Prep Your Pan
- Preheat: Before you even think about mixing, preheat your oven to 350°F (175°C). This is crucial because a properly preheated oven ensures your cake bakes evenly from the moment it goes in.
- Prepare Your Baking Pan: You’ll need a 9×13 inch baking pan, two 8 or 9-inch round cake pans, or a 12-cup bundt pan.
- Grease and Flour: Lightly grease the inside of your pan(s) with butter or cooking spray. Then, dust it with a tablespoon or two of flour, rotating the pan to coat all surfaces. Tap out any excess flour. This creates a non-stick barrier, helping your cake release easily.
- Parchment Paper (Optional but Recommended for Rounds): If using round pans, you can cut circles of parchment paper to fit the bottom of the pans after greasing. Grease the parchment too! This is an extra layer of insurance against sticking.
Step 2: Prepare Your Carrots (and Nuts!)
- Grate Carrots: Peel your carrots and grate them using the small or medium holes of a box grater. You want finely grated carrots, as they will blend seamlessly into the cake batter without being chunky. Measure out 1 cup.
- Chop Nuts (Optional): If you’re adding pecans or walnuts, give them a rough chop. Smaller pieces distribute better in the cake.
Step 3: Mix the Cake Batter
- Combine Dry Ingredients: Empty the entire contents of the carrot cake box mix into a large mixing bowl. If you’re adding extra cinnamon, sprinkle it in now and give it a quick whisk to combine with the dry mix.
- Add Wet Ingredients: Create a small well in the center of the dry mix. Crack the 3 large eggs directly into the well. Pour in the 1/2 cup of vegetable oil and 1 cup of water.
- Mix Carefully: Using an electric mixer (handheld or stand mixer), start on low speed to moisten the dry ingredients. Once moistened, increase the speed to medium and beat for about 2 minutes.
- Beginner Tip: Avoid overmixing! Overmixing develops the gluten in the flour too much, which can lead to a tough, dry cake. Mix just until the batter is smooth and no streaks of dry mix remain.
- Fold in Carrots and Nuts: Gently fold in the grated carrots and chopped nuts (if using) with a spatula. Do this by hand to ensure they are evenly distributed without overmixing the batter.
Step 4: Bake Your Cake
- Pour Batter: Carefully pour the batter into your prepared baking pan(s), spreading it evenly with your spatula.
- Bake: Place the pan(s) into your preheated oven.
- For a 9×13 inch pan: Bake for approximately 30-35 minutes.
- For two 8 or 9-inch round pans: Bake for approximately 25-30 minutes.
- For a Bundt pan: Bake for approximately 35-45 minutes.
- Beginner Tip: Do NOT open the oven door during the first two-thirds of the baking time, as this can cause the cake to sink.
- Check for Doneness: The cake is done when a wooden skewer or toothpick inserted into the center comes out clean or with only a few moist crumbs attached. The top should spring back when lightly touched.
- Cool in Pan: Once baked, remove the cake from the oven and let it cool in the pan on a wire rack for 10-15 minutes. This allows the cake to set and firm up before moving.
- Transfer to Rack: After 10-15 minutes, carefully invert the cake onto the wire rack to cool completely. If you used round pans, you might need to place another rack on top and flip them together. Let the cake cool completely before frosting – this can take 1-2 hours. Frosting a warm cake will result in melted, messy frosting!
Step 5: Make the Easy Cream Cheese Frosting
While your cake is cooling, let’s whip up that delicious frosting!
- Soften Ingredients: Ensure your cream cheese and butter are at room temperature. This is crucial for a smooth, lump-free frosting. If they’re too cold, your frosting will be lumpy.
- Cream Butter and Cream Cheese: In a large mixing bowl (using an electric mixer), beat the softened cream cheese and softened butter together on medium speed until light, fluffy, and well combined (about 2-3 minutes). Scrape down the sides of the bowl as needed.
- Add Vanilla and Salt: Beat in the vanilla extract and a pinch of salt until just combined.
- Gradually Add Powdered Sugar: With the mixer on low speed, gradually add the powdered sugar, one cup at a time, until fully incorporated. Once all the sugar is added, increase the speed to medium-high and beat for another 1-2 minutes until the frosting is light, fluffy, and spreadable.
- Beginner Tip: Start with 3 cups of powdered sugar and add more if you want a thicker or sweeter frosting. If it’s too thick, you can add a tiny splash of milk or cream (1 teaspoon at a time) to thin it out.
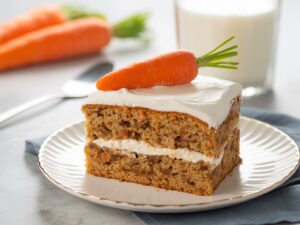
Step 6: Assemble and Serve Your Carrot Cake
- Frost the Cooled Cake: Once your cake is completely cool, use an offset spatula or knife to spread the cream cheese frosting evenly over the top (and sides, if desired, for round layers).
- Garnish (Optional): For an extra touch, sprinkle some additional chopped pecans or walnuts over the top of the frosted cake.
- Slice and Enjoy: Cut into generous slices and serve! Your homemade-tasting carrot cake is ready to impress.
Expert Tips & Tricks for a Perfect Box Mix Carrot Cake
Even with a box mix, a few simple tricks can elevate your cake from good to absolutely amazing. These baking tips for beginners will help you achieve consistent, delicious results every time.
- Room Temperature Ingredients: For the frosting, always use room temperature cream cheese and butter. This ensures a smooth, lump-free texture. For the cake batter, cold eggs are fine, but room temperature can sometimes create a slightly fluffier cake.
- Don’t Overmix: This is arguably the most common beginner mistake. Mix the cake batter only until the ingredients are just combined and no dry streaks remain. Overmixing develops gluten, leading to a tough, dense cake.
- Measure Accurately: Especially for the frosting, powdered sugar should be spooned into the measuring cup and then leveled off, not scooped directly from the bag, which can compact it and lead to too much sugar.
- Use an Oven Thermometer: Oven temperatures can vary widely from what the dial says. An inexpensive oven thermometer ensures your oven is truly at the temperature you set, preventing under or over-baking.
- Cool Completely: Patience is key! Frosting a warm cake is a recipe for disaster, as the frosting will melt and slide off. Ensure your cake is completely cool to the touch before applying frosting.
- Enhance the Flavor: Don’t be afraid to add extra spices like nutmeg, ginger, or a hint of allspice to your cake mix for a deeper, more complex flavor profile. A teaspoon of vanilla extract in the batter also works wonders.
- Storage: Store frosted carrot cake in an airtight container in the refrigerator due to the cream cheese frosting. It will stay fresh for up to 3-4 days.
Essential Baking Tools
Having the right tools makes baking easier and more enjoyable. Here are a few basics you’ll want to have on hand:
- Mixing Bowl
- Whisk (for dry ingredients)
- Electric Mixer (handheld or stand mixer – highly recommended for ease)
- Baking Pan (9×13 inch, two 8 or 9-inch rounds, or a Bundt pan)
- Measuring Cups
- Measuring Spoons
- Spatula (for scraping bowls and folding)
- Wire Cooling Rack
- Box Grater (for carrots)
Nutrition Information (Estimated Per Serving)
Please note that this is an approximation and can vary based on specific brands of box mix, oil, and exact quantities of add-ins and frosting used. This estimate is for one slice of cake (assuming 12 slices from a 9×13 inch cake) with frosting.
| Nutrient | Per Serving |
|---|---|
| Calories | ~450-550 kcal |
| Carbohydrates | ~60-75g |
| Protein | ~4-6g |
| Fat | ~25-35g |
| Fiber | ~1-2g |
| Sugar | ~45-60g |
Frequently Asked Questions (FAQs)
Q: Can I add more carrots than the recipe calls for?
A: While you might be tempted to load up on carrots, it’s best to stick to the recommended 1 cup for a box mix. Adding too many fresh ingredients can throw off the wet-to-dry ingredient ratio, making the cake too dense or wet. If you want more carrot flavor, consider adding a pinch more cinnamon or other warm spices.
Q: How do I know when my carrot cake is perfectly baked?
A: The most reliable way is the toothpick test! Insert a wooden skewer or toothpick into the very center of the cake. If it comes out clean or with only a few moist crumbs attached, your cake is done. If it comes out with wet batter, it needs a few more minutes. Also, the edges of the cake should start to pull away slightly from the pan, and the top should spring back when gently touched.
Q: Can I make cupcakes instead of a whole cake?
A: Absolutely! This box mix recipe works wonderfully for cupcakes. Line a muffin tin with paper liners and fill each about two-thirds full with batter. Bake at 350°F (175°C) for approximately 18-22 minutes, or until a toothpick inserted into the center of a cupcake comes out clean. This recipe should yield about 24 standard cupcakes.
Q: How should I store leftover carrot cake?
A: Because the frosting contains cream cheese, your carrot cake should always be stored in an airtight container in the refrigerator. It will stay fresh and delicious for 3-4 days. You can also freeze individual slices (unfrosted or lightly frosted) for up to 2-3 months; just wrap them well in plastic wrap and then foil.
Q: What if I don’t have all the ingredients for homemade cream cheese frosting?
A: No problem at all! A store-bought cream cheese frosting is a perfectly acceptable and convenient alternative. Just make sure to let your cake cool completely before applying it. You can also whip up a simple vanilla buttercream with just butter, powdered sugar, milk/cream, and vanilla extract if you prefer.
Time to Enjoy Your Masterpiece!
Congratulations, baker! You’ve just created a wonderfully moist and flavorful carrot cake using a simple box mix, elevated with a few extra touches and a homemade cream cheese frosting. Whether you’re a seasoned pro or just starting your baking journey, this Carrot Cake Box Mix Recipe proves that delicious results don’t have to be complicated. Don’t be afraid to experiment with your favorite add-ins next time – maybe some golden raisins, shredded coconut, or a touch of orange zest. The possibilities are endless! Share your creation with friends and family, and bask in the compliments. Happy baking!
“`