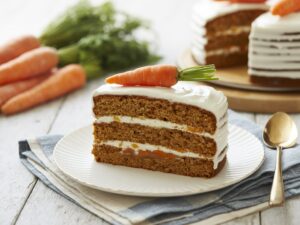
Forget endless ingredient lists and complicated techniques this recipe focuses on simplicity, flavor, and incredible results. We’ll walk you through every step, providing essential baking tips for beginners to ensure your success. Get ready to impress your friends and family with a cake that’s bursting with warm spices, tender carrots, and a luscious cream cheese frosting, all with minimal fuss!
Ingredients List
Gather your ingredients! For the best results, try to have perishable items like eggs and butter at room temperature before you begin.
| Ingredient | Quantity | Unit |
|---|---|---|
| Yellow or White Cake Mix | 1 | (15.25 oz) box |
| Large Eggs | 3 | |
| Vegetable Oil | 1/2 | cup |
| Water | 1 | cup |
| Shredded Carrots | 1.5 | cups |
| Ground Cinnamon | 2 | teaspoons |
| Ground Nutmeg | 1/2 | teaspoon |
| Chopped Pecans or Walnuts (optional) | 1/2 | cup |
| Raisins (optional) | 1/4 | cup |
| For the Cream Cheese Frosting | ||
| Cream Cheese, softened | 8 | ounces (1 block) |
| Unsalted Butter, softened | 1/2 | cup (1 stick) |
| Powdered Sugar (Confectioners’ Sugar) | 3-4 | cups |
| Vanilla Extract | 1 | teaspoon |
| Pinch of Salt | ||
Step-by-Step Instructions: Bake Your Perfect Carrot Cake!
Follow these detailed steps, and you’ll have a gorgeous, delicious carrot cake ready in no time. We’ve included tips to help beginners avoid common pitfalls!
Step 1: Preheat and Prepare Your Pan
- Preheat Oven: Set your oven to 350°F (175°C). This is a standard baking temperature that works well for most cakes.
- Prepare Baking Pan: Grease and flour a 9×13 inch baking pan. You can use cooking spray, then dust with flour, tapping out the excess. For extra insurance against sticking, you can also line the bottom of the pan with parchment paper after greasing, then grease and flour the parchment paper too. This makes removing the cake much easier!
- Beginner Tip: A well-prepared pan prevents your cake from sticking, which is crucial for a clean release and a beautiful finished product.
Step 2: Shred Your Carrots
- Wash and Peel: Wash your carrots thoroughly and peel them.
- Shred: Using a box grater (the side with the medium-sized holes) or a food processor with a shredding attachment, shred 1.5 cups of carrots. You want them finely shredded but not pureed.
- Beginner Tip: Don’t make the carrot pieces too large, or they might not soften enough during baking. Avoid shredding them *too* finely, though, as they can release too much moisture and make the cake gummy.
Step 3: Mix the Cake Batter
- Combine Wet Ingredients: In a large mixing bowl, combine the 3 large eggs, 1/2 cup vegetable oil, and 1 cup water. Whisk these together until they are well combined. Using room temperature eggs can help them incorporate more smoothly into the batter.
- Add Cake Mix: Pour the entire box of yellow or white cake mix into the bowl with the wet ingredients.
- Mix Gently: Using an electric mixer on low speed, or a whisk by hand, mix until just combined. Be careful not to overmix! Overmixing develops the gluten in the flour, leading to a tough, dry cake. Mix only until no dry streaks of flour remain, usually about 1-2 minutes.
- Add Carrot Cake Elements: Gently fold in the shredded carrots, ground cinnamon, and ground nutmeg. If you’re using optional pecans or walnuts and raisins, fold them in now too.
- Alternative: If you don’t have fresh carrots, you *can* use pre-shredded carrots from the grocery store, but fresh often yields better moisture and flavor.
Step 4: Bake Your Cake
- Pour Batter: Pour the prepared cake batter evenly into your greased and floured 9×13 inch baking pan.
- Bake: Place the pan in the preheated oven. Bake for 30-35 minutes.
- Check for Doneness: The cake is done when a wooden skewer or toothpick inserted into the center comes out clean or with a few moist crumbs attached (but no wet batter). If it’s not done, bake for a few more minutes and check again.
- Common Mistake: Opening the oven door too frequently or too early can cause the cake to sink in the middle. Resist the urge to peek until at least 25 minutes have passed!
Step 5: Cool the Cake
- Cool in Pan: Once baked, remove the cake from the oven and let it cool in the pan on a wire rack for about 10-15 minutes. This allows the cake to set and firm up before you attempt to move it.
- Remove from Pan: After 10-15 minutes, carefully invert the cake onto the wire rack to cool completely. If you used parchment paper, peel it off now.
- Crucial Beginner Tip: It is ABSOLUTELY essential that the cake is completely cool before you apply the frosting. If the cake is even slightly warm, your beautiful cream cheese frosting will melt and slide right off, creating a mess. This can take 1-2 hours, or even longer. You can even bake the cake the day before and let it cool overnight.
Step 6: Prepare the Cream Cheese Frosting
- Soften Ingredients: Make sure your cream cheese and unsalted butter are both softened to room temperature. This is key for a smooth, lump-free frosting.
- Cream Butter and Cream Cheese: In a large mixing bowl, using an electric mixer, beat the softened cream cheese and softened butter together on medium speed until smooth and creamy, about 2-3 minutes. Scrape down the sides of the bowl as needed.
- Add Vanilla and Salt: Beat in the vanilla extract and a pinch of salt. The salt helps to balance the sweetness.
- Gradually Add Powdered Sugar: With the mixer on low speed, gradually add the powdered sugar, one cup at a time, until fully incorporated. Once all the sugar is added, increase the speed to medium-high and beat for another 2-3 minutes until the frosting is light, fluffy, and smooth.
- Adjust Consistency: If your frosting is too thick, add a tiny splash of milk or cream (about 1 teaspoon at a time) until it reaches your desired consistency. If it’s too thin, add a bit more powdered sugar.
- Alternative: If you’re short on time, you can use a good quality store-bought cream cheese frosting. However, homemade is always superior!
Step 7: Frost and Serve!
- Frost the Cake: Once the cake is completely cooled, use an offset spatula or a knife to spread the cream cheese frosting evenly over the top of the cake.
- Garnish (Optional): For a professional touch, you can sprinkle a few extra chopped nuts on top, or even some finely shredded carrot curls.
- Slice and Enjoy: Slice your beautiful homemade carrot cake and serve!
- Storage: Store leftover carrot cake in an airtight container in the refrigerator due to the cream cheese frosting. It will stay fresh for 3-4 days.
Tips & Tricks for Carrot Cake Success
- Room Temperature Ingredients are Key (Especially for Frosting!): For the smoothest cream cheese frosting, ensure your cream cheese and butter are thoroughly softened. This prevents lumps and ensures everything combines perfectly. For the cake, room temperature eggs also mix in more evenly.
- Don’t Overmix the Batter: Once you add the dry cake mix, mix only until the ingredients are just combined and no dry streaks remain. Overmixing develops gluten, which can lead to a dense, tough cake instead of a light, moist one.
- Shred Carrots to the Right Size: Aim for medium-fine shreds. If they’re too chunky, they won’t soften enough. If they’re pureed, they can make the cake too wet and dense. A box grater’s medium holes work perfectly.
- Cool Cake Completely Before Frosting: This cannot be stressed enough! A warm cake will melt your frosting, turning your beautiful creation into a gooey mess. Patience is a virtue here; allow at least 1-2 hours for cooling, or even bake the cake the day before.
- Customize Your Spices and Add-ins: While cinnamon and nutmeg are standard, feel free to add a pinch of ginger or allspice for extra warmth. If you’re not a fan of nuts or raisins, simply omit them or swap them for shredded coconut or even white chocolate chips!
- Parchment Paper is Your Friend: Lining your baking pan with parchment paper (in addition to greasing and flouring) makes it incredibly easy to remove the cooled cake without any sticking or breakage.
- Toasted Nuts for Extra Flavor: If you’re using nuts, lightly toast them in a dry pan on the stovetop for a few minutes before adding them to the batter. This enhances their flavor significantly.
Essential Baking Tools
Having the right tools makes baking a breeze! Here are a few essentials you’ll need for this recipe:
- Mixing Bowl
- Whisk (or electric mixer)
- 9×13 inch Baking Pan
- Measuring Cups & Measuring Spoons
- Rubber Spatula (for scraping bowls) & Offset Spatula (for frosting)
- Wire Cooling Rack
- Box Grater or Food Processor (for carrots)
Nutrition Information (Estimated per Serving)
Please note: This is an approximate nutritional breakdown based on common ingredient values for a box mix cake with added ingredients and frosting. Actual values may vary depending on specific brands and portion sizes.
| Nutrient | Amount |
|---|---|
| Calories | ~450-550 kcal |
| Carbohydrates | ~60-75g |
| Protein | ~5-7g |
| Fat | ~25-35g |
| Fiber | ~2-4g |
| Sugar | ~45-60g |
Frequently Asked Questions (FAQs)
Q1: Can I use a different type of cake mix, like spice cake mix?
Absolutely! A spice cake mix would enhance the carrot cake flavors even further. You might want to reduce the added cinnamon and nutmeg slightly, or omit them, depending on how spicy you like your cake. A yellow or white cake mix provides a neutral base, allowing the added spices to shine.
Q2: Do I have to use fresh carrots, or can I use pre-shredded ones from a bag?
While fresh carrots often provide the best moisture and flavor, pre-shredded carrots from a bag can be used for convenience. Just ensure they are not too dry or too thick. If they seem dry, you might add an extra tablespoon of water to the batter.
Q3: My cake sank in the middle! What went wrong?
This is a common issue for beginners! It usually happens if the oven door was opened too early during baking (causing a sudden temperature drop), if the cake was underbaked, or if the batter was overmixed. Make sure your oven temperature is accurate and resist opening the oven until at least 2/3 of the baking time has passed.
Q4: Can I make this carrot cake ahead of time?
Yes, you can! You can bake the cake layers a day in advance. Once completely cooled, wrap them tightly in plastic wrap and store at room temperature. The frosting can also be made a day ahead and stored in an airtight container in the refrigerator; just let it come to room temperature and re-whip it briefly before frosting. Assemble and frost the cake just before serving for the freshest taste.
Q5: My cream cheese frosting is too runny/too stiff. How can I fix it?
If your frosting is too runny, it’s likely due to warm butter/cream cheese or not enough powdered sugar. Try chilling it in the refrigerator for 15-30 minutes, then re-whipping. If still too thin, gradually add more powdered sugar. If it’s too stiff, add a tiny bit (1 teaspoon at a time) of milk or cream until it reaches your desired consistency, beating well after each addition.
Q6: Can I add other ingredients like pineapple or coconut?
Definitely! Many classic carrot cake recipes include crushed pineapple (drained well) or shredded coconut. You can add about 1/2 cup of well-drained crushed pineapple or 1/2 cup of shredded coconut along with the carrots. These additions will add extra moisture and flavor!
Conclusion: Your Deliciously Easy Carrot Cake Awaits!
There you have it! A truly easy, incredibly delicious Carrot Cake Recipe Using Box Mix that proves you don’t need to be a pastry chef to bake something amazing. We hope these detailed instructions and helpful tips empower you to confidently create this classic dessert. It’s the perfect balance of convenience and homemade goodness, making it ideal for busy weeknights, special occasions, or just a treat for yourself.
So, grab your ingredients, preheat your oven, and get ready to enjoy the delightful aromas and even more delightful taste of your very own carrot cake. Don’t be shy – dive in, have fun, and most importantly, enjoy every single moist, spiced bite. Happy baking!