Welcome, fellow food lovers and aspiring bakers! Have you ever dreamt of tearing into a warm, crusty, perfectly airy loaf of ciabatta bread, fresh from your own oven? Imagine crafting the foundation for incredible Ciabatta Bread Sandwich Recipes right in your kitchen. If the thought of baking bread from scratch seems daunting, fear not! This comprehensive guide is designed to make baking ciabatta not just accessible, but truly enjoyable for everyone, especially those looking for easy baking recipes and practical baking tips for beginners.
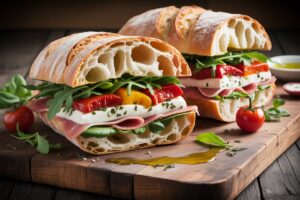
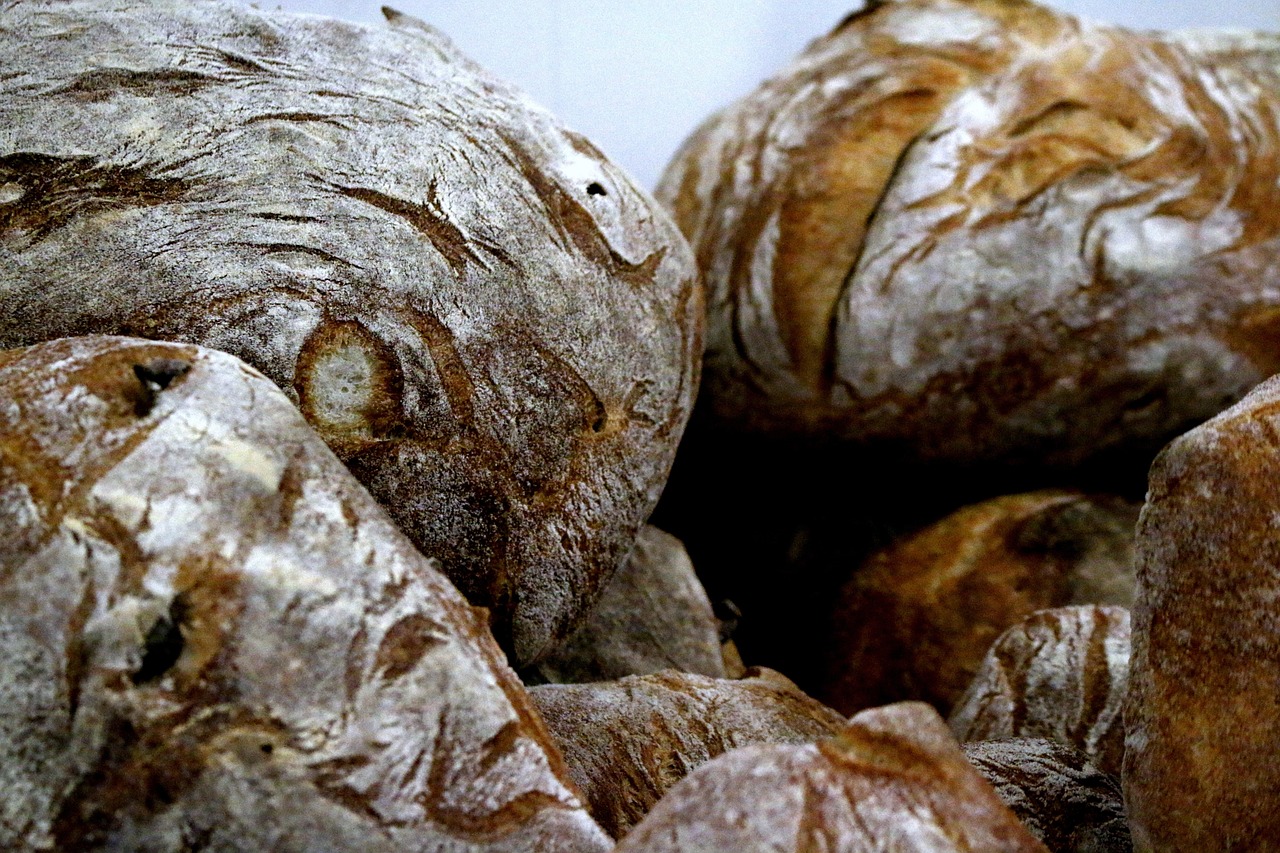
Ciabatta, meaning “slipper” in Italian, is renowned for its rustic appearance, chewy texture, and open, irregular crumb. It’s the ideal canvas for a myriad of sandwiches, from classic Italian deli meats to fresh caprese. We’re going to break down every step, from preparing the crucial “biga” (a pre-ferment that gives ciabatta its signature flavor and texture) to mastering the art of gentle shaping and achieving that irresistible crispy crust. Get ready to impress yourself and your loved ones with homemade ciabatta!
Ingredients List: What You’ll Need for Your Ciabatta
Gathering your ingredients is the first exciting step! Precision matters in baking, so make sure to measure carefully. For best results, use a kitchen scale for flour and water if possible, as it’s more accurate than volume measurements.
| Ingredient | Quantity | Unit |
|---|---|---|
| For the Biga (Pre-ferment – prepare 12-18 hours in advance) | ||
| All-Purpose Flour (or Bread Flour) | 1.5 | cups (180g) |
| Cool Water (65-70°F / 18-21°C) | 0.75 | cups (180g) |
| Active Dry Yeast | 1/8 | teaspoon |
| For the Final Dough | ||
| All-Purpose Flour (or Bread Flour) | 1.5 | cups (180g) |
| Warm Water (95-105°F / 35-40°C) | 0.75 | cups (180g) |
| Active Dry Yeast | 0.5 | teaspoon |
| Salt | 1.5 | teaspoons |
| Olive Oil (optional, for flavor) | 1 | tablespoon |
| Extra All-Purpose Flour | as needed | for dusting |
Step-by-Step Instructions: Baking Your Perfect Ciabatta
This recipe might seem like it has many steps, but each one is simple and crucial for that authentic ciabatta magic. Read through all the instructions before you begin!
1. Crafting Your Biga (The Flavor Foundation) – 12-18 Hours Ahead!
- Combine Biga Ingredients: In a medium mixing bowl, combine 1.5 cups (180g) of all-purpose flour, 0.75 cups (180g) of cool water, and 1/8 teaspoon of active dry yeast. Mix with a spoon or spatula until just combined. The mixture will be very stiff and shaggy – this is exactly what you want! Tip for Beginners: Don’t try to knead it smooth; just ensure all the flour is hydrated.
- Cover and Ferment: Cover the bowl tightly with plastic wrap or a damp kitchen towel. Let it sit at cool room temperature (65-70°F / 18-21°C) for 12 to 18 hours. During this time, the biga will slowly ferment, developing deep flavors and a bubbly, spongy texture. If your kitchen is warmer, you might want to reduce the fermentation time slightly or use cooler water.
2. Mixing the Final Ciabatta Dough (The Sticky Phase)
- Prepare Yeast Water: In a large mixing bowl (the one you’ll use for the final dough), combine 0.75 cups (180g) of warm water (95-105°F / 35-40°C) with 0.5 teaspoon of active dry yeast. Let it sit for 5-10 minutes until foamy. This “proofs” the yeast, ensuring it’s active.
- Add Biga and Remaining Ingredients: Break your fermented biga into smaller pieces and add them to the foamy yeast water. Add the remaining 1.5 cups (180g) of all-purpose flour, 1.5 teaspoons of salt, and the optional 1 tablespoon of olive oil.
- Mix Until Shaggy: Using a sturdy spoon, spatula, or your hands, mix everything together until no dry flour remains and you have a very wet, shaggy dough. It will be incredibly sticky – embrace the stickiness! Common Mistake: Don’t be tempted to add more flour at this stage, as ciabatta is meant to be a high-hydration dough.
- Initial Rest (Autolyse): Cover the bowl with plastic wrap and let the dough rest for 20 minutes. This allows the flour to fully hydrate, making the gluten easier to develop.
3. Developing the Gluten (The Stretch-and-Fold Method)
Ciabatta typically uses a “stretch-and-fold” method instead of traditional kneading, which is perfect for beginners and high-hydration doughs.
- First Stretch and Fold: Lightly wet your hands. Grab a portion of the dough from one side, gently stretch it upwards, and fold it over to the opposite side of the bowl. Rotate the bowl a quarter turn and repeat this process 3-4 more times, until you’ve worked your way around the dough. This builds strength.
- Repeat Rests and Folds: Cover the bowl again and let the dough rest for 20-30 minutes. Repeat the stretch-and-fold process (Step 7) three more times, with 20-30 minute rests in between each set. After the fourth fold, the dough should feel noticeably stronger, smoother, and more elastic, though still very sticky.
4. First Proofing (Bulk Fermentation)
- Long Proof: After the last stretch and fold, cover the bowl tightly with plastic wrap. Let the dough proof at room temperature (around 70-75°F / 21-24°C) for 1.5 to 2 hours, or until it has visibly doubled in size and is very bubbly. If your kitchen is cooler, it might take longer. Tip for Beginners: You can also place it in an oven (turned OFF) with the light on for a slightly warmer, consistent environment.
5. Shaping Your Ciabatta Loaves (The Gentle Art)
This is where ciabatta gets its “slipper” shape. Gentleness is key to maintaining those precious air bubbles!
- Prepare Your Surface: Generously flour your work surface with all-purpose flour. You’ll need a lot!
- Turn Out the Dough: Gently scrape the proofed dough out of the bowl onto the floured surface. Try not to deflate it. The dough will spread out into a large, irregular rectangle.
- Divide the Dough: Lightly flour the top of the dough. Using a bench scraper or a sharp knife, gently cut the large rectangle into 2 or 3 smaller, roughly rectangular pieces. Avoid sawing; make clean cuts. These will be your individual ciabatta loaves.
- Shape Gently: Take one piece of dough. With floured hands, gently pat and stretch it into a more defined rectangular shape, being careful not to press out the gas. Don’t worry about perfection; rustic is part of ciabatta’s charm.
- Prepare for Second Proof: Line a baking sheet with parchment paper and lightly dust it with flour or cornmeal. Carefully transfer your shaped ciabatta pieces onto the prepared baking sheet, leaving ample space between them. You can also create “couches” by folding floured kitchen towels to support the sides of the loaves and help them hold their shape during proofing.
6. Second Proofing (Final Rise)
- Final Rise: Lightly dust the tops of the shaped ciabatta loaves with flour. Cover the baking sheet loosely with plastic wrap or a clean kitchen towel. Let them proof at room temperature for 30-45 minutes, or until they look visibly puffy and airy. They won’t double again, but they should look lighter.
- Preheat Oven (Crucial!): While the loaves are proofing, preheat your oven to a blazing 475°F (245°C). If you have a baking stone or steel, place it in the oven during preheating. Also, place an empty, oven-safe pan (like a cast iron skillet) on the bottom rack of your oven. This will be for steam.
7. Baking Your Golden Ciabatta
- Prepare for Steam: Have 1 cup of very hot water ready.
- Bake with Steam: Carefully transfer the parchment paper with the ciabatta loaves onto the preheated baking stone/steel or directly onto the oven rack. Immediately and carefully pour the hot water into the empty pan on the bottom rack (be cautious of the steam!). Quickly close the oven door. Why Steam? Steam helps create a thin, crispy crust and allows the bread to expand fully before the crust sets.
- Bake Time: Bake for 10 minutes with steam. Then, carefully open the oven door, remove the pan of water (use oven mitts!), and reduce the oven temperature to 450°F (230°C).
- Continue Baking: Continue baking for another 15-20 minutes, or until the ciabatta loaves are deep golden brown and sound hollow when tapped on the bottom.
- Cooling: Once baked, transfer the ciabatta loaves to a wire rack to cool completely before slicing. This is crucial for the internal crumb structure to set. Slicing too early can result in a gummy texture.
And there you have it! Your very own, rustic, and delicious homemade ciabatta bread. Now, the only question is, what amazing sandwich will you create first?
Tips & Tricks for Ciabatta Baking Success
Baking ciabatta is a journey, and these tips will help you along the way, especially if you’re a beginner:
- Embrace the Stickiness: Ciabatta dough is notoriously wet and sticky. This high hydration is what gives it its characteristic open, airy crumb. Resist the urge to add too much extra flour during mixing or the first proof. Only use generous flour for shaping. Wetting your hands slightly during stretch-and-folds can also help manage the stickiness.
- Temperature Control: Yeast loves warmth! Ensure your water temperatures are correct and your proofing environment is consistent. If your kitchen is cold, consider using your oven with just the light on as a proofing box.
- Don’t Over-Handle: Once the dough has proofed, treat it with extreme gentleness. Every air bubble is precious and contributes to the final texture. Scrape, don’t press, and be delicate when shaping.
- Steam is Your Friend: The steam created at the beginning of the bake is vital for a thin, crisp crust and maximum oven spring. Don’t skip this step! Be careful when adding water to the hot pan.
- Cool Completely: As tempting as it is to cut into a warm loaf, patience is a virtue here. Cooling on a wire rack allows residual steam to escape and the internal structure to set, preventing a gummy interior.
- Practice Makes Perfect: Don’t be discouraged if your first loaf isn’t picture-perfect. Each bake teaches you more about how dough behaves. Enjoy the process!
Essential Baking Tools for Your Kitchen
Having the right tools makes all the difference, especially for a beginner. Here are some essentials that will help you master this ciabatta recipe and many more:
- Large Mixing Bowl: For mixing dough and proofing.
- Whisk: For dissolving yeast and mixing dry ingredients.
- Baking Sheet with Parchment Paper: For baking and easy cleanup.
- Measuring Cups and Spoons: For accurate ingredient measurement.
- Rubber Spatula: For scraping down bowls and gentle mixing.
- Digital Kitchen Scale (Highly Recommended): For precise ingredient measurements, especially flour and water.
- Bench Scraper: Invaluable for handling sticky dough and dividing loaves.
- Oven Thermometer: To ensure your oven’s temperature is accurate.
Nutrition Information (Estimated per serving – 1/8 of a loaf)
Please note that these are approximate values and can vary based on specific ingredient brands and preparation methods. This recipe yields about 2 medium loaves, and this estimate is for one serving, assuming 8 servings per loaf.
| Nutrient | Amount |
|---|---|
| Calories | 200-250 kcal |
| Carbohydrates | 40-50 g |
| Protein | 6-8 g |
| Fat | 1-3 g |
| Fiber | 1-2 g |
| Sugar | 0-1 g |
Frequently Asked Questions About Ciabatta Baking
Q1: What is a “biga” and why is it necessary for ciabatta?
A biga is a type of Italian pre-ferment (a starter dough) made from flour, water, and a tiny amount of yeast. It’s allowed to ferment slowly over many hours, typically overnight. It’s crucial for ciabatta because it develops complex flavors, improves the dough’s extensibility, and contributes to the bread’s characteristic open, irregular crumb and chewy texture. It’s like a flavor booster!
Q2: My ciabatta dough is extremely sticky. Did I do something wrong?
No, you’re likely doing everything right! Ciabatta dough is intentionally very high in hydration, making it incredibly sticky. This stickiness is what allows for the large, irregular air pockets (the “holes”) that ciabatta is famous for. Resist the urge to add more flour during the mixing and initial proofing stages. Only use generous flour on your work surface and hands during the shaping stage. Embrace the stickiness!
Q3: How do I get a really crispy crust on my ciabatta?
The secret to a crispy crust lies in two main factors: high oven temperature and steam. Ensure your oven is fully preheated to 475°F (245°C) before baking. The initial burst of steam (by adding hot water to a pan in the oven) helps keep the crust soft and pliable, allowing the bread to expand fully, before it dries out and becomes wonderfully crisp. Baking on a preheated baking stone or steel also helps transfer heat quickly for a better crust.
Q4: Can I prepare the ciabatta dough ahead of time?
Yes, you can! After the bulk fermentation (first proofing), you can place the covered dough in the refrigerator for 12-24 hours. The cold temperature will slow down the fermentation. When you’re ready to bake, take the dough out, let it come to room temperature for about 1-2 hours (it should look slightly puffy), then proceed with shaping, second proofing, and baking as per the instructions.
Q5: My ciabatta didn’t rise much and is dense. What went wrong?
Several factors could contribute to a dense ciabatta. It could be due to inactive yeast (make sure your yeast is fresh and water temperature is correct). Overworking the dough or being too rough during shaping can deflate the precious air bubbles. Insufficient proofing time (either the biga or the main dough) can also lead to poor rise. Lastly, make sure your oven temperature is accurate and that you’re getting good steam.
Q6: How should I store leftover ciabatta?
For best results, ciabatta is best enjoyed the day it’s baked. However, you can store it at room temperature in a paper bag (to maintain some crispness) or a loosely wrapped plastic bag for 1-2 days. For longer storage, slice the cooled ciabatta and freeze the slices in an airtight freezer bag for up to 2-3 months. You can then toast individual slices directly from frozen.
Conclusion: Your Ciabatta Journey Begins Now!
Congratulations, budding baker! You’ve just walked through the comprehensive steps to creating your very own, utterly delicious ciabatta bread. This journey, while requiring a bit of patience and attention to detail, is incredibly rewarding. There’s nothing quite like the aroma of fresh bread filling your home, or the satisfying tear of a perfectly baked loaf.
Now that you’ve mastered the art of ciabatta, the possibilities for incredible Ciabatta Bread Sandwich Recipes are endless! Load it up with fresh mozzarella, tomatoes, and basil; pile on some prosciutto and arugula; or simply enjoy it with a drizzle of olive oil and balsamic. Don’t be afraid to experiment, and most importantly, have fun with the process. Happy baking, and happy sandwich making!