Get ready to combine two of the most beloved sweet treats into one unforgettable dessert! This Cinnamon Roll King Cake Recipe is a delightful fusion of the festive Mardi Gras classic and the comforting, warm, and gooey cinnamon roll you know and love. If you’ve ever felt intimidated by baking with yeast or crafting a show-stopping dessert, fear not!
This recipe is designed with baking tips for beginners in mind, breaking down each step into simple, manageable tasks. You’ll be amazed at how accessible and fun easy baking recipes can be, especially when they result in something as spectacular as this. Perfect for Mardi Gras celebrations, weekend brunches, or just a cozy treat, this King Cake brings joy and deliciousness to any occasion. Let’s get baking and create some sweet memories!
Ingredients for Your Cinnamon Roll King Cake
Gathering your ingredients beforehand is one of the best **baking tips for beginners**. It makes the whole process smoother and ensures you don’t miss anything!
For the Dough:
| Quantity | Unit | Ingredient |
|---|---|---|
| 1 | cup | Whole Milk, warmed (105-115°F / 40-46°C) |
| 2 ¼ | teaspoons | Active Dry Yeast (one standard packet) |
| ¼ | cup | Granulated Sugar, plus 1 tsp for yeast |
| 1 | large | Egg, room temperature |
| ¼ | cup | Unsalted Butter, melted and cooled slightly |
| ½ | teaspoon | Salt |
| 3 to 3 ½ | cups | All-Purpose Flour, plus more for dusting |
For the Cinnamon Filling:
| Quantity | Unit | Ingredient |
|---|---|---|
| ½ | cup | Light Brown Sugar, packed |
| 1 | tablespoon | Ground Cinnamon |
| ¼ | cup | Unsalted Butter, softened |
For the Glaze:
| Quantity | Unit | Ingredient |
|---|---|---|
| 1 ½ | cups | Powdered Sugar (Confectioners’ Sugar) |
| 2-3 | tablespoons | Whole Milk or Heavy Cream |
| ½ | teaspoon | Vanilla Extract |
| Optional: | Food coloring (purple, green, gold) for traditional King Cake colors |
Step-by-Step Instructions: Crafting Your Cinnamon Roll King Cake
Follow these detailed steps carefully, and you’ll be a baking pro in no time! Remember, baking is an art and a science, so pay attention to the details.
Part 1: Preparing the Dough (The Foundation of Flavor)
- Activate the Yeast: In a large mixing bowl (or the bowl of a stand mixer), combine the warmed milk (ensure it’s between 105-115°F / 40-46°C – too hot will kill the yeast, too cold won’t activate it) with 1 teaspoon of granulated sugar and the active dry yeast. Give it a gentle stir. Let this mixture sit for 5-10 minutes. You should see it become foamy and bubbly, indicating your yeast is alive and ready to work! If it doesn’t foam, your yeast might be old, or the milk temperature was off – it’s best to start again with fresh yeast and properly warmed milk.
- Combine Wet Ingredients: Once the yeast is active, add the remaining ¼ cup of granulated sugar, the room temperature egg, and the slightly cooled melted butter to the yeast mixture. Whisk everything together until well combined. Using room temperature ingredients is a secret weapon for beginners, as it helps everything emulsify smoothly and allows for a more even rise.
- Add Dry Ingredients: Gradually add the salt and 3 cups of the all-purpose flour to the wet mixture. Mix with a wooden spoon or a dough hook on a stand mixer on low speed until a shaggy dough forms.
- Knead the Dough:
- By Hand: Turn the dough out onto a lightly floured surface. Knead for 8-10 minutes. At first, it might be sticky, but as you knead, it will become smooth and elastic. Add small amounts of the remaining ½ cup of flour if the dough is too sticky to handle, but be careful not to add too much, as this can make your cake tough. Your goal is a soft, pliable dough.
- With a Stand Mixer: Using the dough hook attachment, knead on medium-low speed for 6-8 minutes. The dough should pull away from the sides of the bowl and be smooth and elastic.
Beginner Tip: To check if your dough is kneaded enough, perform the windowpane test. Gently stretch a small piece of dough. If you can stretch it thin enough to see light through it without tearing, it’s ready! If it tears easily, keep kneading for a few more minutes.
- First Rise (Proofing): Lightly grease a clean large bowl with a little oil. Place the kneaded dough in the bowl, turning it once to coat all sides. Cover the bowl tightly with plastic wrap or a clean kitchen towel. Place it in a warm, draft-free spot for 1 to 1 ½ hours, or until the dough has doubled in size. A warm oven (turned off, with just the light on) or a sunny spot on your counter works wonders. Patience here is key for a light and fluffy cake!
Part 2: Assembling Your King Cake (The Swirls of Deliciousness)
- Prepare the Filling: While the dough is rising, in a small bowl, combine the light brown sugar and ground cinnamon. Set aside. In another small bowl, ensure your ¼ cup of unsalted butter is softened to room temperature it should be easily spreadable, not melted.
- Punch Down and Roll Out: Once the dough has doubled, gently punch it down to release the air. This step helps redistribute the yeast and creates a finer crumb. Turn the dough out onto a lightly floured surface. Using a rolling pin, roll the dough into a large rectangle, approximately 18×12 inches (45×30 cm)**. Aim for an even thickness across the entire rectangle.
- Spread the Filling: Evenly spread the softened butter over the entire surface of the rolled-out dough, leaving a small ½-inch border on one of the long edges (this will help seal the roll). Then, sprinkle the brown sugar and cinnamon mixture evenly over the butter, making sure to get it right to the edges, except for that ½-inch border.
- Roll it Up: Starting from the long edge *opposite* the unbuttered border, tightly roll the dough into a log. Try to keep it as tight as possible to ensure beautiful, defined swirls in your finished cake.
- Shape the King Cake: Gently bring the ends of the log together to form a large ring. Pinch the seams firmly to seal them completely. If you’re adding a traditional plastic baby (ensure it’s food-safe!), insert it into the dough from the bottom now, making sure it’s fully enclosed by the dough.
- Prepare for Second Rise: Carefully transfer the shaped dough ring to a parchment-lined baking sheet or a lightly greased 9-inch round cake pan (for a thicker cake, you can even use a springform pan). Make sure there’s a little space around the edges for it to expand.
Part 3: The Final Rise, Baking, and Glazing (The Grand Finale)
- Second Rise: Cover the King Cake loosely with plastic wrap or a clean kitchen towel. Let it rise in a warm, draft-free place for another 30-45 minutes, or until it looks visibly puffy. It won’t double in size quite as much as the first rise, but it should feel light and airy. This is a crucial step for a tender, soft texture.
- Preheat Oven: While the cake is on its second rise, preheat your oven to 375°F (190°C).
- Bake the King Cake: Bake for 20-25 minutes, or until the cake is golden brown on top and cooked through. If it starts to brown too quickly, you can loosely tent it with aluminum foil to prevent over-browning. To check for doneness, a good indicator is an internal temperature of 200°F (93°C) with an instant-read thermometer.
- Cool: Once baked, remove the King Cake from the oven and let it cool on the baking sheet or in the pan for about 10-15 minutes before carefully transferring it to a wire rack to cool completely. **Do not glaze a hot cake**, as the glaze will simply melt off and create a sticky mess!
- Prepare the Glaze: In a medium bowl, whisk together the powdered sugar, 2 tablespoons of milk/cream, and vanilla extract until smooth. If the glaze is too thick, add more milk/cream, a teaspoon at a time, until it reaches a thick, but still drizzly consistency. If it’s too thin, add more powdered sugar, a tablespoon at a time.
- Decorate (Optional King Cake Colors): For a traditional King Cake look, divide the glaze into three small bowls. Add a drop or two of **purple, green, and gold food coloring** to each bowl, respectively, and mix well.
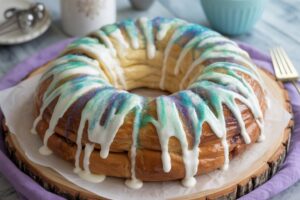
- Glaze and Serve: Once the King Cake is completely cool, generously drizzle the white glaze over the top. If using colored glazes, alternate drizzling the purple, green, and gold glazes over the cake for a festive, Mardi Gras-inspired look. Let the glaze set for a few minutes before slicing and serving. Enjoy your homemade **Cinnamon Roll King Cake Recipe**!
Tips & Tricks for Beginner Bakers
Baking is a journey, and these actionable baking tips for beginners will help you succeed and gain confidence with your Cinnamon Roll King Cake and future easy baking recipes!
- Measure Accurately: Especially with flour, spoon it into your measuring cup and level it off with a straight edge rather than scooping directly from the bag. Too much flour is a common pitfall that leads to dry, tough baked goods.
- Room Temperature Ingredients: This is crucial for yeast doughs and glazes. Room temperature butter, eggs, and milk emulsify better, create a smoother dough, and allow yeast to activate more efficiently.
- Don’t Rush the Rise: Yeast needs time and warmth to do its magic. If your kitchen is cool, try placing the dough in a warm spot like a turned-off oven with the light on, or near a sunny window. An under-proofed dough will result in a dense cake, while over-proofing can lead to a yeasty flavor.
- Use an Oven Thermometer: Oven temperatures can vary significantly from what the dial says. An inexpensive oven thermometer ensures your oven is truly at the correct temperature, preventing burnt or undercooked cakes.
- Pinch the Seams: When forming your dough log and then the ring, make sure to firmly pinch the seams closed. This prevents the filling from oozing out during baking and helps the cake maintain its beautiful shape.
- Cool Completely Before Glazing: As tempting as it is, glazing a warm cake will cause the glaze to melt and run off, leaving you with a sticky mess rather than a beautiful, set topping.
- Patience with Yeast: If your yeast doesn’t foam after 5-10 minutes, the water might have been too hot or too cold, or the yeast is expired. It’s best to start over with fresh yeast and check your water temperature to avoid wasting other ingredients.
Essential Baking Tools
Having the right tools makes a world of difference, especially when you’re just starting out. Here are a few essentials:
- Mixing Bowl
- Whisk
- Baking Pan (a round 9-inch cake pan or a large baking sheet)
- Measuring Cups & Spoons
- Spatula
- Rolling Pin
- Parchment Paper
- Optional: Stand Mixer with dough hook
Nutrition Information (Estimated per serving, 1/12th of cake)
Please note that these values are estimates and can vary based on specific ingredients and portion sizes. This is a treat, so enjoy it in moderation!
| Nutrient | Amount |
|---|---|
| Calories | 420 kcal |
| Carbohydrates | 68g |
| Protein | 7g |
| Fat | 16g |
| Fiber | 2g |
| Sugar | 40g |
Frequently Asked Questions (FAQs) for Your King Cake Journey
Q1: My dough isn’t rising. What went wrong?
A: The most common culprits are inactive yeast or incorrect milk temperature. Ensure your milk is between 105-115°F (40-46°C) – too hot kills the yeast, too cold doesn’t activate it. Also, check the expiration date on your yeast. If your yeast didn’t foam in the first step, it’s best to start over with fresh yeast and properly warmed milk to ensure success.
Q2: Can I make this King Cake ahead of time?
A: Absolutely! You can prepare the dough up to the end of the first rise. After the first rise, punch it down, shape it into the King Cake, and place it in your pan. Cover it tightly with plastic wrap and refrigerate overnight (up to 12-18 hours). The next morning, take it out of the fridge and let it come to room temperature and complete its second rise (this might take 1-2 hours) before baking as directed. This is a great tip for holiday mornings!
Q3: How do I know if my dough is kneaded enough?
A: The dough should be smooth, elastic, and no longer sticky. A great test is the **windowpane test**: pinch off a small piece of dough and gently stretch it between your fingers. If you can stretch it thin enough to see light through it without it tearing, it’s sufficiently kneaded. If it tears easily, keep kneading for a few more minutes.
Q4: Can I use a different filling for my King Cake?
A: Yes, you can! While cinnamon roll filling is deliciously classic, feel free to get creative. Popular alternatives include cream cheese filling (softened cream cheese, powdered sugar, vanilla), fruit fillings (like apple or cherry preserves), or even a pecan praline filling. Just ensure your chosen filling isn’t too wet, which could make the dough soggy during baking.
Q5: How do I store leftover Cinnamon Roll King Cake?
A: Store any leftovers in an airtight container at room temperature for up to 2-3 days. To keep it fresh longer, you can refrigerate it for up to 5 days, though the dough might dry out slightly. For best results, gently warm individual slices in the microwave for a few seconds before serving to restore some of that fresh-baked softness.
Q6: What’s the deal with the plastic baby in King Cakes?
A: The tiny plastic baby (representing baby Jesus) is a traditional part of King Cakes, symbolizing luck and prosperity to whoever finds it in their slice. That person is then traditionally responsible for hosting the next King Cake party or bringing the next King Cake. If you choose to include one, make sure it’s a food-safe plastic baby and inform your guests!
Conclusion
Congratulations, baker! You’ve just created a stunning and delicious Cinnamon Roll King Cake Recipe that will be the star of any gathering. This journey through easy baking recipes has hopefully shown you that making impressive treats from scratch is totally achievable, even for baking tips for beginners.
Don’t be afraid to experiment, learn from your baking adventures, and most importantly, enjoy the process. The aroma filling your kitchen and the smiles on the faces of those who taste your creation are the best rewards. So go ahead, share your masterpiece, and bask in the glory of your baking success. Happy baking, and Laissez les bons temps rouler!