Welcome, fellow aspiring bakers! Are you ready to fill your home with the irresistible aroma of warm spices and toasted nuts? This Cinnamon Walnut Cake Recipe is designed specifically for you whether you’re a complete novice or just looking for a straightforward, delicious bake. We’ve broken down every step to make it one of the easiest baking recipes you’ll ever try,
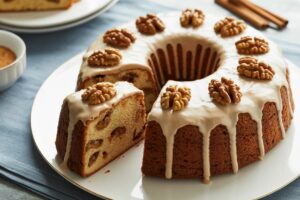
packed with useful baking tips for beginners to ensure your success. Forget complicated techniques; we’re all about simple ingredients, clear instructions, and a wonderfully moist, flavorful cake that tastes like a hug. Get ready to impress yourself (and everyone else!) with this cozy, comforting treat that’s perfect for any occasion, from a casual afternoon coffee to a delightful dessert centerpiece.
Gather Your Ingredients for This Delicious Cinnamon Walnut Cake
Before we dive into the baking magic, let’s make sure you have all your components ready. Using room temperature ingredients is key for a smooth batter, so plan ahead!
| Ingredient | Quantity | Unit |
|---|---|---|
| All-Purpose Flour | 2 ½ | cups |
| Granulated Sugar | 1 ½ | cups |
| Baking Powder | 2 | teaspoons |
| Baking Soda | 1 | teaspoon |
| Ground Cinnamon | 2 | teaspoons |
| Salt | ½ | teaspoon |
| Unsalted Butter (softened) | ½ | cup (1 stick) |
| Large Eggs | 2 | |
| Whole Milk | 1 | cup |
| Vanilla Extract | 1 | teaspoon |
| Chopped Walnuts | 1 | cup |
| For the Simple Glaze (Optional) | ||
| Powdered Sugar | 1 | cup |
| Whole Milk or Cream | 2-3 | tablespoons |
| Vanilla Extract | ¼ | teaspoon |
Step-by-Step Instructions: Baking Your Cinnamon Walnut Cake
Follow these detailed steps carefully, and you’ll have a perfect cake every time. Don’t rush, and enjoy the process!
Step 1: Prepare Your Oven and Pan
Preheat your oven to 350°F (175°C). This is crucial for even baking! Grease and flour a 9×13 inch baking pan, or spray it thoroughly with non-stick baking spray. Beginner Tip: To grease and flour, first spread a thin layer of butter or shortening all over the inside of the pan, then sprinkle a tablespoon or two of flour and tilt the pan, tapping it to coat all surfaces. Tap out any excess flour. This prevents your cake from sticking.
Step 2: Whisk the Dry Ingredients
In a large bowl, combine the all-purpose flour, granulated sugar, baking powder, baking soda, ground cinnamon, and salt. Use a whisk to thoroughly combine these ingredients. Why whisk? This ensures that the leavening agents (baking powder and soda) and spices are evenly distributed throughout the flour, leading to a consistent rise and flavor in your cake. It also helps to aerate the flour, making for a lighter texture.
Step 3: Cream the Butter and Eggs
In a separate, medium-sized bowl, use an electric mixer (or a whisk and some elbow grease!) to cream together the softened unsalted butter and large eggs. Beat until the mixture is light and fluffy, about 2-3 minutes. Beginner Tip: Softened butter means it’s pliable enough to make an indentation with your finger, but not melted. If your butter is too cold, it won’t cream properly. If it’s too warm/melted, your cake might be greasy and dense.
Step 4: Combine Wet and Dry Ingredients
Gradually add the wet mixture (butter and eggs) to the dry ingredients, alternating with the whole milk. Start and end with the dry ingredients. For example, add about one-third of the dry ingredients, mix briefly, then half the milk, mix briefly, then another third of the dry, the remaining milk, and finally the last third of the dry. Mix on low speed until just combined. Do not overmix! Overmixing develops the gluten in the flour too much, which can result in a tough, dense cake. Stop mixing as soon as you no longer see streaks of flour.
Step 5: Fold in the Walnuts
Gently fold in the chopped walnuts using a spatula. Folding means using a light, scooping motion to incorporate the nuts without deflating the batter. This ensures the walnuts are evenly distributed and adds a lovely crunch to every bite. If you’re not a fan of walnuts, you can substitute them with pecans, or omit them entirely for a pure cinnamon cake.
Step 6: Pour into Pan and Bake
Pour the batter evenly into your prepared baking pan. Place the pan in the preheated oven and bake for 30-35 minutes. The exact baking time can vary depending on your oven, so it’s important to check for doneness. How to check for doneness: Insert a wooden skewer or toothpick into the center of the cake. If it comes out clean or with a few moist crumbs attached, your cake is ready! If it comes out with wet batter, continue baking for a few more minutes and check again.
Step 7: Cool the Cake
Once baked, remove the cake from the oven and let it cool in the pan on a wire rack for about 10-15 minutes. This allows the cake to set and prevents it from crumbling. After this initial cooling, you can carefully invert the cake onto the wire rack to cool completely. A fully cooled cake is easier to slice and glaze. Patience is key! Trying to glaze or cut a warm cake can result in a messy situation.
Step 8: Prepare and Apply the Simple Glaze (Optional)
While the cake cools, you can prepare the simple glaze. In a small bowl, whisk together the powdered sugar, 2 tablespoons of milk (or cream), and vanilla extract until smooth. If the glaze is too thick, add more milk, a tiny bit at a time, until it reaches a pourable but not watery consistency. Drizzle the glaze evenly over the cooled cake. Allow the glaze to set for about 15-20 minutes before slicing and serving.
Pro Tips & Tricks for Beginner Bakers
Baking can seem daunting, but with these simple tips, you’ll be baking like a pro in no time!
- Room Temperature Ingredients are Your Best Friend: Ensure your butter and eggs are at room temperature. This allows them to emulsify better, creating a smoother, more uniform batter and a lighter cake.
- Measure Accurately: Baking is a science! Use proper measuring cups and spoons. For flour, spoon it into your measuring cup and then level it off with a straight edge (like the back of a knife). Don’t scoop directly from the bag, as this can compact the flour and lead to too much being used.
- Don’t Overmix: This is a common beginner mistake. Mix just until ingredients are combined. Overmixing develops gluten, leading to a tough, dry cake.
- Preheat Your Oven Properly: Always give your oven enough time to reach the correct temperature before putting your cake in. An oven thermometer can help you verify your oven’s accuracy.
- Resist the Urge to Peek: Opening the oven door too early, especially during the first two-thirds of the baking time, can cause your cake to sink in the middle.
- Cool Completely: Unless otherwise specified, always cool your cake completely on a wire rack. This allows the cake’s structure to set, preventing it from crumbling when sliced and ensuring any frosting or glaze doesn’t melt.
- Read the Entire Recipe First: Before you even start, read through the entire recipe. This helps you understand the flow, gather all ingredients, and avoid surprises mid-bake.
Essential Baking Tools for Your Kitchen
Having the right tools makes all the difference! Here are some basics you’ll need, with links to help you find them:
- Mixing Bowl
- Whisk
- Baking Pan (9×13 inch is ideal for this recipe)
- Measuring Cups
- Measuring Spoons
- Spatula
- Electric Mixer (handheld or stand mixer)
- Wire Rack
Nutrition Information (Estimated Per Serving)
This information is an estimate based on approximately 12 servings for the cake with glaze. Actual values may vary.
| Nutrient | Per Serving |
|---|---|
| Calories | 350-400 kcal |
| Carbohydrates | 50-60 g |
| Protein | 4-6 g |
| Fat | 15-20 g |
| Fiber | 2-3 g |
| Sugar | 30-40 g |
Frequently Asked Questions for Beginner Bakers
Q1: Why did my cake sink in the middle?
A common culprit! This usually happens if you open the oven door too early (before the cake is set), if the oven temperature is too low, or if you used old or inactive baking powder/soda. Make sure your leavening agents are fresh, and resist opening that oven door during the first 20-25 minutes of baking!
Q2: Can I use different nuts or omit them entirely?
Absolutely! Pecans are a fantastic substitute for walnuts, offering a similar texture and flavor profile. You can also use almonds or even a mix of nuts. If you prefer a nut-free cake, simply leave them out. The cake will still be wonderfully flavorful due to the cinnamon.
Q3: How do I store leftover Cinnamon Walnut Cake?
Once cooled, store your cake in an airtight container at room temperature for up to 3-4 days. If your kitchen is very warm, or if you’ve added a cream cheese frosting (which would contain dairy), it’s best to refrigerate it. For longer storage, you can freeze individual slices, wrapped tightly in plastic wrap, for up to 2-3 months.
Q4: My cake turned out dry. What went wrong?
A dry cake is often due to overbaking or using too much flour. Always check for doneness using the toothpick method and remove the cake as soon as it’s ready. Also, ensure you’re measuring your flour correctly (spoon into the cup and level, don’t scoop directly).
Q5: Can I make this into cupcakes?
Yes, you can! Prepare the batter as directed, then line a muffin tin with paper liners. Fill each liner about two-thirds full. Bake at 350°F (175°C) for approximately 18-22 minutes, or until a toothpick inserted into the center comes out clean. This recipe should yield about 24 standard cupcakes.
Your Delicious Journey Begins Now!
Congratulations, you’ve made it! We hope this Cinnamon Walnut Cake Recipe has demystified baking for you and brought a little bit of comfort and joy into your kitchen. Remember, every baker starts somewhere, and practice makes perfect. Don’t be afraid to experiment and make this recipe your own. Share your creations, enjoy the process, and most importantly, savor every single crumb of your homemade masterpiece. Happy baking!