
Are you ready to dive into the wonderful world of baking with a recipe that’s as delightful to make as it is to eat? Look no further! This comprehensive guide to Coconut Cakes Recipes is designed specifically for you, the aspiring baker. We understand that starting out can feel a little intimidating, but we promise that with our Coconut Cakes Recipes approach and plenty of Coconut Cakes Recipes, you’ll be whipping up moist, fluffy coconut cakes in no time. Imagine the heavenly aroma filling your kitchen and the pure joy of biting into a homemade treat bursting with tropical flavor. Get ready to impress yourself and everyone you share these irresistible cakes with!
Ingredients List: What You’ll Need
Gathering your ingredients is the first step to baking success. Make sure everything is measured accurately before you begin!
| Ingredient | Quantity | Unit |
|---|---|---|
| All-Purpose Flour | 2 | cups |
| Granulated Sugar | 1 ½ | cups |
| Baking Powder | 2 | teaspoons |
| Salt | ½ | teaspoon |
| Unsalted Butter, softened | ½ | cup (1 stick) |
| Large Eggs, room temperature | 2 | |
| Vanilla Extract | 1 | teaspoon |
| Full-Fat Canned Coconut Milk | 1 | cup |
| Sweetened Shredded Coconut | 1 | cup |
| For the Coconut Glaze (Optional, but highly recommended!) | ||
| Powdered Sugar | 1 ½ | cups |
| Full-Fat Canned Coconut Milk | 3-4 | tablespoons |
| Vanilla Extract | ¼ | teaspoon |
| Extra Sweetened Shredded Coconut (for topping) | ½ | cup |
Step-by-Step Instructions: Bake Your Perfect Coconut Cakes

Prep Time: 20 minutes
Cook Time: 25-30 minutes
Servings: 12 cupcakes or 1 (8×8 inch) square cake
- Preheat Your Oven & Prep Your Pan: Start by preheating your oven to 350°F (175°C). This is a crucial first step, as a properly preheated oven ensures even baking from the moment your batter goes in. If you’re making cupcakes, line a 12-cup muffin tin with paper liners. If you’re making a square cake, lightly grease and flour an 8×8 inch (20×20 cm) baking pan, or line it with parchment paper leaving an overhang on two sides for easy removal.
- Whisk Dry Ingredients: In a medium-sized bowl, combine your 2 cups of all-purpose flour, 2 teaspoons of baking powder, and ½ teaspoon of salt. Use a whisk to gently mix them together for about 30 seconds. This step isn’t just about combining; it also helps to aerate the flour and distribute the leavening agents evenly, preventing pockets of baking powder in your final cake. Beginner Tip: Don’t skip sifting if your flour is lumpy, but for most modern flours, a good whisking is sufficient.
- Cream Butter and Sugar: In a large mixing bowl, add your ½ cup (1 stick) of softened unsalted butter and 1 ½ cups of granulated sugar. Using an electric mixer (handheld or stand mixer with paddle attachment) on medium speed, beat them together until the mixture is light, fluffy, and pale yellow. This usually takes about 3-5 minutes. This process, called “creaming,” incorporates air into the butter and sugar, which is essential for a light and tender cake texture. Common Mistake: Not creaming long enough! Don’t rush this step.
- Add Eggs One at a Time: Crack your first large egg into the butter-sugar mixture and beat on medium speed until it’s just combined. Then, add the second egg and repeat. Scrape down the sides of the bowl with a spatula after each addition to ensure everything is fully incorporated. Adding eggs one at a time helps them emulsify better into the mixture, creating a smoother batter. Beginner Tip: Make sure your eggs are at room temperature! Cold eggs can curdle the batter. If you forgot, place them in a bowl of warm (not hot!) water for 5-10 minutes.
- Stir in Vanilla Extract: Once the eggs are fully mixed in, add 1 teaspoon of vanilla extract. Beat for another 15-30 seconds until fragrant. Vanilla adds a wonderful depth of flavor that complements the coconut beautifully.
- Alternate Dry and Wet Ingredients: Now, we’ll add the dry ingredients and coconut milk in stages.
- Add about one-third of your dry ingredient mixture to the wet mixture. Beat on low speed until just combined – stop as soon as you no longer see streaks of flour.
- Next, pour in half of your 1 cup of full-fat canned coconut milk. Beat on low speed until just combined.
- Repeat: Add another one-third of the dry ingredients, beat until just combined.
- Add the remaining half of the coconut milk, beat until just combined.
- Finish with the last one-third of the dry ingredients, beating only until just combined.
Crucial Tip: The key here is to not overmix once the flour is added. Overmixing develops the gluten in the flour, leading to a tough, dense cake. Mix until just combined, a few lumps are okay!
- Fold in Shredded Coconut: Gently fold in your 1 cup of sweetened shredded coconut using a spatula. Do this by hand to avoid overmixing. The shredded coconut adds texture and an extra burst of coconut flavor.
- Fill Your Baking Pan(s):
- For Cupcakes: Divide the batter evenly among the 12 prepared muffin cups, filling each about two-thirds full.
- For Square Cake: Pour the batter into your prepared 8×8 inch baking pan and spread it evenly with a spatula.
Beginner Tip: For cupcakes, an ice cream scoop can help you distribute batter evenly and keep your liners clean.
- Bake Until Golden:
- For Cupcakes: Bake for 20-25 minutes, or until a wooden skewer or toothpick inserted into the center of a cupcake comes out clean.
- For Square Cake: Bake for 25-30 minutes, or until a wooden skewer or toothpick inserted into the center comes out clean.
The cakes should be lightly golden on top and spring back when gently pressed.
- Cool Completely: Once baked, remove the cakes from the oven.
- For Cupcakes: Let them cool in the muffin tin for 5-10 minutes before carefully transferring them to a wire rack to cool completely.
- For Square Cake: Let it cool in the pan for about 15-20 minutes before using the parchment paper overhang to lift it out and transfer it to a wire rack to cool completely.
Important: Do not try to glaze or frost warm cakes! The glaze will melt and slide right off. Patience is a virtue here!
- Prepare the Coconut Glaze (Optional): While the cakes are cooling, whisk together 1 ½ cups of powdered sugar, 3-4 tablespoons of full-fat canned coconut milk (start with 3 and add more a tiny bit at a time if needed), and ¼ teaspoon of vanilla extract in a small bowl until smooth and pourable, but not too thin. If it’s too thick, add a tiny bit more coconut milk. If too thin, add a tiny bit more powdered sugar.
- Glaze and Garnish: Once the cakes are completely cool, drizzle or spread the coconut glaze over the top. Immediately sprinkle with the extra ½ cup of sweetened shredded coconut for that beautiful finish and added texture. Enjoy your homemade coconut cakes!
Tips & Tricks for Baking Success
Even with an easy recipe, a few extra pointers can make all the difference, especially for **baking tips for beginners**:
- Room Temperature Ingredients are Key: This is probably the most important tip! Softened butter, room temperature eggs, and even coconut milk blend together much more smoothly, creating a homogeneous batter that holds air better, resulting in a lighter, fluffier cake. Plan ahead by taking them out 30-60 minutes before you start.
- Measure Accurately: Baking is a science. Use proper measuring cups and spoons, and for dry ingredients like flour, spoon it into the measuring cup and level it off with a straight edge (like the back of a knife) rather than scooping directly, which can compact the flour and lead to too much.
- Don’t Overmix: We mentioned it in the instructions, but it bears repeating! Once you add flour to your wet ingredients, mix only until just combined. Overmixing develops gluten, which makes cakes tough and chewy instead of tender and soft.
- Invest in an Oven Thermometer: Oven temperatures can vary significantly from what the dial says. An inexpensive oven thermometer placed inside your oven will give you an accurate reading and prevent under or over-baking.
- Cool Completely Before Glazing: Patience is your friend! Glazing warm cakes will result in a messy, melted glaze. Allow your cakes to cool completely on a wire rack to ensure the glaze sets beautifully.
- Storage: Store your coconut cakes in an airtight container at room temperature for up to 3 days, or in the refrigerator for up to 5 days. They are delightful slightly chilled too!
Essential Baking Tools
Having the right tools makes baking easier and more enjoyable. Here are a few essentials:
- Mixing Bowl
- Whisk
- Baking Pan (muffin tin or 8×8 square pan)
- Measuring Cups & Spoons
- Spatula (rubber spatula for scraping, offset spatula for spreading)
- Electric Hand Mixer (highly recommended for creaming butter and sugar)
- Wire Cooling Rack
Nutrition Info (Estimated per serving)
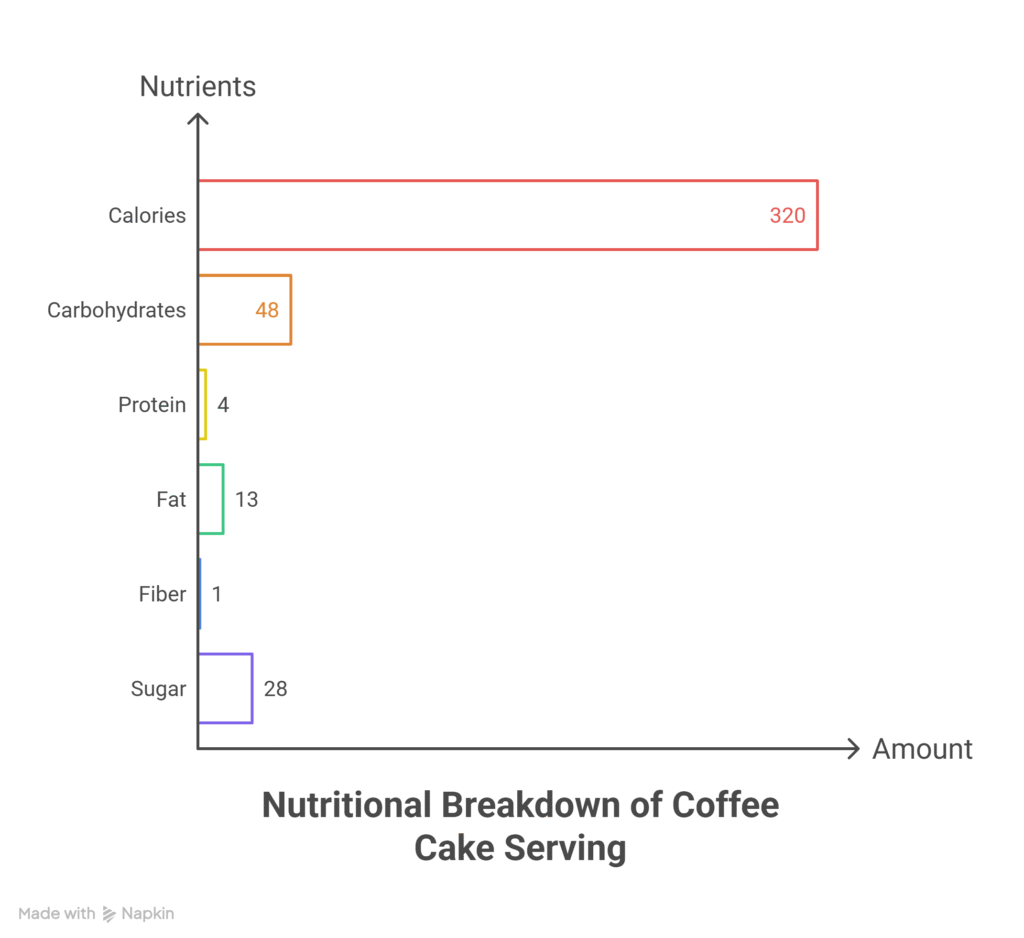
Please note: These are estimated nutritional values and can vary based on specific ingredients and portion sizes.
| Nutrient | Amount (per serving) |
|---|---|
| Calories | 320 kcal |
| Carbohydrates | 45 g |
| Protein | 4 g |
| Fat | 15 g |
| Fiber | 1 g |
| Sugar | 30 g |
Frequently Asked Questions (FAQs)
Q: Can I use light coconut milk instead of full-fat?
A: Coconut Cakes Recipes While you technically can, we highly recommend using full-fat canned coconut milk for this recipe. The higher fat content contributes significantly to the moistness and rich coconut flavor of the cakes. Light coconut milk might result in a slightly drier cake and less intense flavor.
Q: My cakes came out dry. What went wrong?
A: Dry cakes are usually a result of one of two common issues: overbaking or overmixing the batter. Ensure you’re baking only until a toothpick comes out clean, and remove them promptly. Also, remember to mix the flour into the wet ingredients only until just combined to avoid developing too much gluten, which makes cakes tough and dry.
Q: Can I make these dairy-free?
A: Yes, this recipe is almost entirely dairy-free! The only dairy ingredient is butter. You can easily substitute it with a good quality plant-based butter (like a vegan butter stick) in a 1:1 ratio. Ensure your coconut milk is full-fat and from a can, not a carton, as carton coconut milk often has added dairy or thickeners.
Q: How should I store leftover coconut cakes?
A: Store your coconut cakes in an airtight container at room temperature for up to 3 days to maintain their freshness and moisture. If you prefer them chilled or need to store them longer, they can be kept in the refrigerator for up to 5 days. Bring them to room temperature before serving for the best texture and flavor.
Q: Can I turn this into a layer cake?
A: Absolutely! To make a small two-layer cake (e.g., two 6-inch rounds), you would need to adjust baking time (likely around 25-30 minutes, but check for doneness) and potentially increase the glaze ingredients. For a larger 8-inch two-layer cake, you might need to double the recipe. Always ensure your pans are properly greased and floured, or lined with parchment.
Conclusion: Happy Baking!
Congratulations, you’ve now got all the knowledge and detailed steps to create your very own delicious coconut cakes! We hope these **Coconut Cakes Recipes** become a staple in your kitchen and that these **baking tips for beginners** empower you to explore more culinary adventures. Don’t be afraid to experiment, and remember that every baker, even the most experienced, has had a few mishaps along the way. The most important ingredient is always a dash of enthusiasm and a sprinkle of joy. Happy baking, and we can’t wait to hear about your delightful creations!