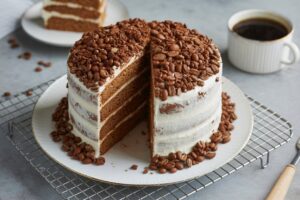
Are you ready to bake something truly spectacular that will impress everyone, including yourself? This Coffee Crunch Cake Recipe is your ticket to creating a dessert that’s not just delicious, but also a feast for the senses. Imagine moist, tender coffee-infused cake layers, generously slathered with a luscious coffee buttercream, and crowned with an addictive, crunchy coffee brittle. It’s a symphony of textures and flavors that will have everyone asking for a second slice!
Don’t let its elegant appearance fool you this recipe is designed to be one of those truly easy baking recipes that even novices can master. We’ve broken down every step, providing comprehensive baking tips for beginners to ensure your success. From perfectly measured ingredients to foolproof assembly, we’re here to guide you through the process, making baking a joyful and rewarding experience. Get ready to elevate your dessert game and discover the pure bliss of homemade Coffee Crunch Cake!
Gather Your Ingredients: What You’ll Need
Success in baking starts with accurately measured ingredients. Please ensure all cold ingredients, especially butter and eggs, are at room temperature unless otherwise specified. This helps them emulsify better, creating a smoother batter and buttercream.
For the Coffee Cake Layers (Yields two 8-inch rounds)
| Quantity | Unit | Ingredient |
|---|---|---|
| 2 ½ | cups | All-Purpose Flour |
| 1 ½ | cups | Granulated Sugar |
| 2 ½ | teaspoons | Baking Powder |
| ½ | teaspoon | Salt |
| 1 | cup (2 sticks) | Unsalted Butter, softened |
| 3 | large | Eggs, room temperature |
| 1 | teaspoon | Vanilla Extract |
| 1 | cup | Whole Milk, room temperature |
| ½ | cup | Strong Brewed Coffee, cooled |
For the Coffee Buttercream Frosting
| Quantity | Unit | Ingredient |
|---|---|---|
| 1 ½ | cups (3 sticks) | Unsalted Butter, softened |
| 6 | cups | Powdered Sugar (Confectioners’ Sugar), sifted |
| ¼ | cup | Heavy Cream or Whole Milk |
| 1 | teaspoon | Vanilla Extract |
| 2 | tablespoons | Instant Espresso Powder or strong Instant Coffee Granules |
| 2 | tablespoons | Hot Water |
For the Coffee Crunch Topping
| Quantity | Unit | Ingredient |
|---|---|---|
| 1 ½ | cups | Granulated Sugar |
| ½ | cup | Water |
| 2 | tablespoons | Instant Espresso Powder or strong Instant Coffee Granules |
| 1 | teaspoon | Baking Soda |
| 2 | tablespoons | Unsalted Butter (optional, for richness) |
Your Guide to Baking Perfection: Detailed Instructions
Take your time with each step, especially if you’re new to baking. Precision and patience are your best tools!
Step 1: Getting Started – Prep is Key!
- Preheat Oven & Prepare Pans: Preheat your oven to 350°F (175°C). Grease two 8-inch round baking pans with butter or non-stick spray, then dust with flour. For extra assurance, line the bottoms with parchment paper circles. This prevents sticking and makes removal much easier for beginners.
- Measure Everything: Measure all your ingredients precisely before you begin mixing. This is called “mise en place” and it prevents frantic searching during a critical step.
Step 2: Making the Moist Coffee Cake Layers
- Combine Dry Ingredients: In a medium bowl, whisk together the 2 ½ cups all-purpose flour, 1 ½ cups granulated sugar, 2 ½ teaspoons baking powder, and ½ teaspoon salt. Whisking ensures everything is evenly distributed and aerated.
- Cream Butter and Sugar: In a large mixing bowl, using an electric mixer (stand mixer with paddle attachment or a hand mixer), beat the 1 cup softened unsalted butter on medium speed for about 1-2 minutes until creamy. Gradually add the 1 ½ cups granulated sugar and beat for another 3-5 minutes until the mixture is light, fluffy, and pale in color. This process incorporates air, which is crucial for a light cake.
- Add Eggs and Vanilla: Add the 3 large eggs, one at a time, beating well after each addition until fully incorporated. Scrape down the sides of the bowl as needed. Stir in the 1 teaspoon vanilla extract.
- Alternate Wet and Dry: In a separate small bowl or measuring cup, whisk together the 1 cup whole milk and ½ cup cooled strong brewed coffee. Now, with your mixer on low speed, gradually add the dry ingredients to the wet ingredients in three additions, alternating with the milk-coffee mixture in two additions. Begin and end with the dry ingredients. Do not overmix! Mix only until just combined; a few small lumps are better than a tough cake from over-developed gluten.
- Fill Pans and Bake: Divide the batter evenly between your two prepared 8-inch cake pans. Smooth the tops with a spatula. Bake for 28-32 minutes, or until a wooden skewer or toothpick inserted into the center comes out clean.
- Cooling the Cakes: Let the cakes cool in their pans on a wire rack for 10-15 minutes. This allows them to firm up slightly. Then, carefully invert them onto the wire rack to cool completely. It’s essential that the cakes are completely cool before frosting, otherwise, your buttercream will melt!
Step 3: Crafting the Silky Coffee Buttercream
- Prepare Coffee Concentrate: In a small bowl, dissolve the 2 tablespoons instant espresso powder (or coffee granules) in 2 tablespoons hot water. Stir until completely dissolved and set aside to cool.
- Whip the Butter: In a large mixing bowl, beat the 1 ½ cups softened unsalted butter with an electric mixer on medium-high speed for 5-7 minutes until it becomes very light, pale, and fluffy. This is a crucial step for light, airy buttercream!
- Add Powdered Sugar: Gradually add the 6 cups sifted powdered sugar to the whipped butter, about 1 cup at a time, beating on low speed until combined, then increasing to medium speed. Scrape down the sides of the bowl frequently. If you add it too quickly, you’ll have a sugar cloud in your kitchen!
- Add Liquids and Flavor: Once all the sugar is incorporated, add the ¼ cup heavy cream (or milk), 1 teaspoon vanilla extract, and the cooled dissolved coffee concentrate. Beat on medium-high speed for another 3-5 minutes until the buttercream is incredibly light, fluffy, and smooth. If it’s too thick, add more cream a teaspoon at a time. If it’s too thin, add more sifted powdered sugar.
Step 4: Creating the Irresistible Coffee Crunch Topping
- Prepare Baking Surface: Line a large baking sheet with parchment paper or a silicone baking mat. Have it ready, as the next steps move quickly.
- Cook Sugar Mixture: In a heavy-bottomed saucepan (at least 3-quart size, as it will foam), combine 1 ½ cups granulated sugar, ½ cup water, and 2 tablespoons instant espresso powder (or coffee granules). Stir gently over medium heat just until the sugar dissolves. Once dissolved, stop stirring.
- Boil to Hard Crack Stage: Bring the mixture to a boil. Continue to boil without stirring until the mixture reaches a deep amber color, or 300°F (150°C) on a candy thermometer (hard crack stage). This usually takes 10-15 minutes. Be very careful, as boiling sugar is extremely hot!
- Add Butter and Baking Soda: Remove the pan from the heat. Carefully stir in the 2 tablespoons unsalted butter (if using) until melted. Immediately sprinkle in the 1 teaspoon baking soda and stir vigorously. The mixture will foam up dramatically and lighten in color – this is normal!
- Cool the Crunch: Quickly pour the foamed mixture onto your prepared baking sheet. Do not spread it too thin. Let it cool completely and harden, which will take about 30-60 minutes.
- Crush the Crunch: Once completely hard, break the coffee crunch into smaller pieces. You can then place them in a zip-top bag and gently crush them with a rolling pin, or pulse them in a food processor until you have a mix of small and medium-sized pieces. Set aside.
Step 5: Assembling Your Coffee Crunch Masterpiece
- Level Your Cakes: If your cake layers have domed tops, use a serrated knife to carefully level them. This creates flat surfaces for easier stacking and a professional look.
- First Layer & Filling: Place one cooled cake layer on your serving plate or cake stand. Spread about 1 cup of coffee buttercream evenly over the top.
- Second Layer & Crumb Coat: Carefully place the second cake layer on top. Apply a thin layer of buttercream all over the entire cake (top and sides). This is called a “crumb coat” and it traps any loose crumbs, ensuring your final layer of frosting is smooth and crumb-free.
- Chill the Crumb Coat: Place the cake in the refrigerator for 15-20 minutes, or until the crumb coat is firm to the touch. This step makes frosting much easier for beginners!
- Final Frosting: Apply the remaining buttercream generously to the top and sides of the cake, smoothing it out with an offset spatula or bench scraper. Aim for an even, beautiful finish.
- Decorate with Crunch: Gently press the crushed coffee crunch topping onto the sides and/or top of the cake. You can cover the entire cake or just the edges, depending on your preference.
- Serve and Enjoy: Slice your beautiful **Coffee Crunch Cake** and serve! Store any leftovers in an airtight container at room temperature for up to 2 days, or in the refrigerator for up to 5 days.
Pro Tips & Tricks for Beginner Bakers
Baking is a science, but also an art! Here are some pointers to help you achieve perfection with your Coffee Crunch Cake:
- Room Temperature Matters: For cake batter and buttercream, ensure your butter and eggs are truly at room temperature. This means they are soft enough to indent with a finger, but not melted. Cold ingredients don’t emulsify properly, leading to a lumpy batter or curdled buttercream.
- Measure Flour Correctly: Don’t scoop flour directly from the bag with your measuring cup! This compacts it and you’ll end up with too much. Instead, spoon the flour into your measuring cup and then level it off with the back of a knife.
- Don’t Overmix: Once you add the dry ingredients to the wet, mix only until just combined. Overmixing develops the gluten in the flour, resulting in a tough, dense cake. A few small lumps are perfectly fine!
- Cool Cakes Completely: This cannot be stressed enough! Warm cakes will melt your beautiful buttercream, causing it to slide off. Patience is a virtue here.
- The Crumb Coat is Your Best Friend: For a professional-looking finish, never skip the crumb coat. It locks in crumbs and creates a smooth canvas for your final layer of frosting. A quick chill firms it up perfectly.
- Patience with the Coffee Crunch: Making the brittle requires attention. Don’t stir the sugar mixture once it’s boiling, and be mindful of the color. It can go from perfect to burned very quickly. Use a candy thermometer if you’re nervous – it’s a great investment!
- Leveling Cakes: For perfectly flat layers, after cooling, use a long serrated knife (like a bread knife) to carefully slice off any domed tops. You can also buy a cake leveling tool.
Essential Baking Tools for Success
Having the right tools makes all the difference, especially for beginners. Here are some must-haves for this recipe:
- Mixing Bowl Set: For combining ingredients.
- Whisk: For dry ingredients and light mixing.
- 8-inch Round Baking Pans (2): The stars of your cake layers.
- Measuring Cups and Spoons: For accurate ingredient measurement.
- Rubber Spatula: For scraping bowls and folding ingredients.
- Electric Mixer (Stand or Handheld): Essential for creaming butter and making fluffy buttercream.
- Wire Cooling Rack: For cooling your cake layers evenly.
- Parchment Paper: For lining cake pans and the brittle baking sheet.
- Offset Spatula: Great for spreading frosting smoothly.
- Candy Thermometer (Optional but Recommended): For perfect coffee crunch every time.
Nutrition Information (Estimated per Serving)
Please note that these are approximate values based on standard ingredients and a cake divided into 12 servings. Actual nutrition will vary depending on specific brands and portion sizes.
| Nutrient | Amount |
|---|---|
| Calories | 480 kcal |
| Carbohydrates | 68 g |
| Protein | 5 g |
| Fat | 22 g |
| Fiber | 1 g |
| Sugar | 48 g |
Frequently Asked Questions for Beginner Bakers
Q1: Can I make this cake gluten-free?
A: Yes, you can! Substitute the all-purpose flour with an equal amount of a good quality 1:1 gluten-free baking flour blend that contains xanthan gum. Make sure to follow the package instructions for any additional liquid adjustments, though typically for a 1:1 blend, no changes are needed.
Q2: How should I store the Coffee Crunch Cake?
A: Store any leftover cake in an airtight container at room temperature for up to 2 days. For longer storage, you can refrigerate it for up to 5 days. If refrigerating, let it come to room temperature for about 30 minutes before serving for the best texture and flavor.
Q3: Can I make the cake layers ahead of time?
A: Absolutely! Baked and cooled cake layers can be individually wrapped tightly in plastic wrap (and then foil for extra protection) and stored at room temperature for up to 2 days, or frozen for up to 1-2 months. Thaw frozen layers in the refrigerator overnight or at room temperature for a few hours before frosting.
Q4: My buttercream seems grainy, what went wrong?
A: Grainy buttercream is usually caused by powdered sugar that wasn’t sifted, or butter that wasn’t softened enough or whipped long enough. Always sift your powdered sugar, and ensure your butter is truly at room temperature and whipped until very light and fluffy before adding sugar.
Q5: My coffee crunch didn’t harden, or it burned! What happened?
A: If your crunch didn’t harden, it likely didn’t cook long enough to reach the hard crack stage (300°F/150°C). If it burned, the heat was too high, or it cooked too long. Using a candy thermometer is highly recommended for brittle to ensure accuracy. Don’t stir once it’s boiling, just let it cook.
Q6: What if I don’t like coffee very much? Can I still make this cake?
A: You can certainly adapt it! For a milder coffee flavor, reduce the amount of instant coffee in the cake layers and buttercream. For no coffee at all, you can replace the brewed coffee in the cake with more milk, and use a plain vanilla buttercream. For the crunch, you could make a simple caramel brittle or a nut brittle instead.
Your Coffee Crunch Cake Awaits!
Congratulations, aspiring baker! You’ve just navigated the wonderful world of baking and are now ready to create a stunning Coffee Crunch Cake Recipe that will be the talk of the town. We know that baking, especially for beginners, can sometimes feel daunting, but with this detailed guide, you have all the tools and knowledge to succeed.
The combination of soft cake, creamy frosting, and delightful crunch is truly something special. Don’t be afraid to experiment, and most importantly, have fun with the process! Each cake you bake is a step in your baking journey, and every “mistake” is a valuable lesson. So, preheat that oven, gather your ingredients, and get ready to enjoy the incredible aroma and taste of your homemade masterpiece. We can’t wait to hear about your baking adventures! Happy baking!