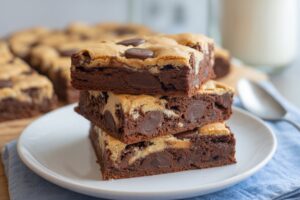
Are you ready to create a dessert that’s truly out of this world? This Cookie Cake Brownie Recipe is the answer! Imagine the fudgy, rich goodness of a homemade brownie perfectly topped with a chewy, soft chocolate chip cookie. It’s the best of both worlds, baked into one incredible treat.
Whether you’re a seasoned baker or just starting your journey with easy baking recipes, this guide is designed with you in mind. We’ll walk you through every step, providing all the essential baking tips for beginners to ensure your success. Get ready to impress everyone (and yourself!) with this delightful, crowd-pleasing dessert!
Why You’ll Love This Cookie Cake Brownie Recipe
- It’s incredibly delicious – a perfect fusion of two classic desserts.
- Surprisingly simple to make, even for novice bakers.
- Perfect for parties, potlucks, or just a cozy night in.
- Customizable with your favorite mix-ins.
Ingredients You’ll Need
Gathering all your ingredients before you start is one of the best baking tips for beginners. This is called “mise en place” (meaning “everything in its place”) and it makes the whole process smoother and more enjoyable!
For the Fudgy Brownie Layer:
| Ingredient | Quantity | Unit |
|---|---|---|
| Unsalted Butter | 1/2 cup | (113g) |
| Granulated Sugar | 1 cup | (200g) |
| Large Eggs | 2 | |
| Vanilla Extract | 1 teaspoon | |
| Unsweetened Cocoa Powder | 1/2 cup | (45g) |
| All-Purpose Flour | 1/2 cup | (60g) |
| Salt | 1/4 teaspoon |
For the Chewy Cookie Layer:
| Ingredient | Quantity | Unit |
|---|---|---|
| Unsalted Butter, softened | 1/2 cup | (113g) |
| Granulated Sugar | 1/2 cup | (100g) |
| Light Brown Sugar, packed | 1/4 cup | (50g) |
| Large Egg | 1 | |
| Vanilla Extract | 1 teaspoon | |
| All-Purpose Flour | 1 1/4 cups | (150g) |
| Baking Soda | 1/2 teaspoon | |
| Salt | 1/4 teaspoon | |
| Chocolate Chips (semi-sweet recommended) | 1 cup | (170g) |
Step-by-Step Instructions: How to Make Cookie Cake Brownies
Follow these detailed steps carefully, and you’ll have perfect Cookie Cake Brownies every time!
Step 1: Prepare Your Pan and Preheat Oven
- Preheat your oven to 350°F (175°C). It’s crucial for even baking, so make sure your oven is fully preheated before putting anything inside!
- Lightly grease a 9×13 inch baking pan with butter or cooking spray. For even easier removal and cleanup, line the pan with parchment paper, leaving an overhang on the two longer sides. This creates convenient “handles” you can use to lift the cooled brownies out later.
Step 2: Make the Fudgy Brownie Layer
- In a medium microwave-safe bowl or a saucepan over low heat, melt the 1/2 cup unsalted butter. Once completely melted, remove it from the heat.
- Stir in the 1 cup granulated sugar until well combined. The mixture might look a little grainy, which is totally normal at this stage.
- Add the 2 large eggs, one at a time, mixing well after each addition with a whisk. After adding the last egg, beat vigorously for about 1 minute. This step incorporates air and helps create that desirable shiny, crinkly top on your brownies.
- Stir in the 1 teaspoon vanilla extract.
- In a separate small bowl, whisk together the 1/2 cup unsweetened cocoa powder, 1/2 cup all-purpose flour, and 1/4 teaspoon salt. Whisking dry ingredients together ensures they are evenly distributed before combining with the wet ingredients, preventing lumps.
- Gradually add the dry ingredient mixture to the wet mixture, stirring with a rubber spatula until *just combined*. Do not overmix! Overmixing develops the gluten in the flour, which can lead to tough, cakey brownies instead of fudgy ones. A few small streaks of flour are perfectly okay; they will disappear during baking.
- Pour the brownie batter into your prepared 9×13 inch baking pan and spread it evenly with your spatula. Set this aside while you prepare the cookie layer.
Beginner Tip: Make sure your melted butter isn’t too hot when you add the sugar and especially the eggs, or you might accidentally cook (scramble) the eggs! Let it cool for a minute or two after melting before proceeding.
Step 3: Prepare the Chewy Cookie Layer
- In a large mixing bowl, using an electric mixer (or a sturdy whisk and some elbow grease if you’re feeling strong!), cream together the 1/2 cup softened unsalted butter, 1/2 cup granulated sugar, and 1/4 cup packed light brown sugar until the mixture is light, fluffy, and pale in color. This usually takes about 2-3 minutes with an electric mixer. Remember to scrape down the sides of the bowl frequently to ensure everything is evenly mixed.
- Beat in the 1 large egg and 1 teaspoon vanilla extract until they are fully incorporated and the mixture is smooth.
- In a separate medium bowl, whisk together the 1 1/4 cups all-purpose flour, 1/2 teaspoon baking soda, and 1/4 teaspoon salt.
- Gradually add the dry ingredients to the wet ingredients, mixing on low speed (or by hand with a spatula) until just combined. Just like with the brownie batter, avoid overmixing to keep your cookie layer tender and chewy.
- Fold in the 1 cup chocolate chips until they are evenly distributed throughout the cookie dough.
Beginner Tip: Ensure your butter for the cookie layer is genuinely softened, not melted. It should be pliable enough to easily make an indent with your finger but still hold its shape. Cold butter won’t cream properly, and melted butter will result in a greasy, flat cookie with a less desirable texture.
Step 4: Combine and Bake!
- Carefully drop spoonfuls of the cookie dough over the top of the brownie batter in the pan. Don’t worry about spreading it out perfectly or covering every inch; the cookie dough will naturally spread as it bakes. You can gently spread it out with a spatula or your hands if you prefer a more even layer, but leaving some gaps can give a nice marbled or “cobblestone” effect.
- Place the pan in your preheated oven and bake for 30-35 minutes.
- How to tell when it’s done: The edges of the cookie layer should be golden brown, and a wooden skewer or toothpick inserted into the *center of the cookie layer* (not all the way into the brownie layer) should come out with moist crumbs attached, but no wet batter. Remember, brownies continue to cook slightly after they’re removed from the oven, so slightly underbaking is often better for a fudgier result. If the toothpick comes out completely clean, you might have overbaked them.
Common Mistake & Alternative: If your cookie layer seems to be browning too quickly on top, but the center isn’t quite done, you can loosely tent the pan with aluminum foil for the last 10-15 minutes of baking. This prevents further browning without trapping too much steam. If you prefer a less “cakey” cookie top, ensure you don’t overbake. A slightly gooey center in the cookie layer is usually preferred for this type of dessert!
Step 5: Cool and Serve
- Remove the pan from the oven and place it on a wire rack to cool completely. This is the hardest part – waiting! Cooling allows the brownies and cookie to set properly, ensuring clean cuts and the best possible fudgy, chewy texture. Cutting them warm often results in a crumbly mess.
- Once completely cool (this can take 2-3 hours, or even longer at room temperature), use the parchment paper overhangs to carefully lift the entire slab out of the pan.
- Place it on a cutting board and cut into squares. We recommend 16 squares for a generous serving.
- Serve plain, with a scoop of creamy vanilla ice cream, a drizzle of warm chocolate fudge sauce, or even a dollop of whipped cream. Enjoy your amazing Cookie Cake Brownie Recipe!
Tips & Tricks for Baking Success
Even though this is an easy baking recipe, these tips will help you achieve perfection every time and elevate your baking game:
- Accuracy is Key: Baking is a science! Use proper measuring cups and spoons, leveling off dry ingredients. For best results (especially with flour and sugar), a kitchen scale provides the most accurate measurements.
- Room Temperature Ingredients: For the cookie layer, ensure your butter and egg are at room temperature. This helps them emulsify better with the sugars, creating a smoother, more uniform dough and a better texture in the final product.
- Don’t Overmix: This is probably the most common mistake for beginners. Once you add flour to any batter or dough, mix just until the ingredients are combined. Overmixing develops gluten, leading to tough, dense, or chewy (in a bad way) baked goods.
- Quality Ingredients Matter: While not always necessary, using good quality cocoa powder and chocolate chips can make a significant difference in the depth of flavor of your brownies and cookies.
- Patience with Cooling: Resist the urge to cut into your brownies while they’re still warm. They need time to set, firm up, and become perfectly fudgy and chewy. Warm brownies will be gooey and fall apart.
- Customize It! Feel free to add nuts (walnuts, pecans), other types of chocolate chips (white chocolate, milk chocolate, dark chocolate), or even a swirl of caramel or peanut butter into the brownie layer before adding the cookie dough.
Essential Baking Tools
Having the right tools makes baking much easier and more enjoyable. Here are some basics you’ll want on hand for this Cookie Cake Brownie Recipe:
- Mixing Bowls (various sizes)
- Whisk
- 9×13 Inch Baking Pan
- Measuring Cups and Spoons
- Rubber Spatula (for mixing and spreading)
- Parchment Paper
- Wire Cooling Rack
- Electric Hand Mixer (optional, but very helpful for the cookie dough)
Nutrition Information (Estimated per serving, 16 servings)
Please note that these values are estimates and can vary based on specific ingredients, brands used, and portion sizes. They are provided for general informational purposes.
| Nutrient | Amount |
|---|---|
| Calories | 380 kcal |
| Total Carbohydrates | 50g |
| Protein | 5g |
| Total Fat | 20g |
| Dietary Fiber | 2g |
| Total Sugar | 35g |
Frequently Asked Questions (FAQs)
Q1: Can I make this recipe ahead of time?
Absolutely! Cookie Cake Brownies are excellent for making ahead. Once completely cooled, store them in an airtight container at room temperature for up to 3-4 days, or in the refrigerator for up to a week. They can also be frozen for longer storage (up to 2-3 months). Just thaw at room temperature before serving.
Q2: My brownies turned out dry/cakey. What went wrong?
The most common culprit for dry or cakey brownies is overbaking. Keep a close eye on them towards the end of the baking time. Remember, a skewer inserted into the cookie layer should come out with moist crumbs, not completely clean. Another factor could be overmixing the batter once flour is added, which develops too much gluten. Your oven temperature might also run hot, so consider investing in an oven thermometer for accuracy.
Q3: Do I have to use parchment paper?
While not strictly mandatory if you grease your pan very well, parchment paper makes removing the brownies incredibly easy and ensures they don’t stick to the pan. It also helps create cleaner, more professional-looking cuts. We highly recommend it, especially for beginners, as it greatly simplifies the process!
Q4: Can I use oil instead of butter for the brownies?
You can substitute a neutral-flavored oil (like vegetable or canola oil) for butter in the brownie layer for an even chewier, denser brownie. The oil doesn’t add moisture in the same way, but it contributes to a very fudgy texture. However, for the cookie layer, softened butter is essential for the proper creaming process and the chewy, soft texture.
Q5: What if I don’t have an electric mixer for the cookie dough?
No problem at all! You can definitely make the cookie dough by hand. Just use a sturdy whisk or a wooden spoon and a bit of arm power to cream the softened butter and sugars together until light and fluffy. It might take a little longer and more effort, but it’s totally achievable and will still result in delicious cookies!
Q6: Can I add different mix-ins to the cookie or brownie layer?
Yes, absolutely! Get creative. You can add chopped nuts (like walnuts, pecans, or almonds) to either layer, different kinds of chocolate chips (milk, white, dark, peanut butter, butterscotch), M&M’s, sprinkles, or even a swirl of caramel or peanut butter to the brownie layer before adding the cookie dough. Just be mindful not to add too much, as it can affect the overall texture and baking time.
Enjoy Your Delicious Cookie Cake Brownies!
You’ve just created an absolutely irresistible dessert with this Cookie Cake Brownie Recipe! Whether you’re sharing it with loved ones or savoring a piece all to yourself, we hope you feel proud of your baking accomplishment. Remember, every baking journey starts with a single step, and mastering easy baking recipes like this one is a fantastic way to build confidence in the kitchen. Don’t be afraid to experiment, tweak, and make it your own. Happy baking, and enjoy every single fudgy, chewy bite!