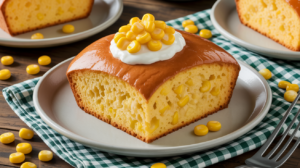
We’ll walk you through simple steps, share valuable baking tips for beginners, and transform you into a cornbread connoisseur. Say goodbye to dry, crumbly cornbread and hello to a moist, flavorful, and slightly sweet treat that’s perfect alongside chili, BBQ, or just a pat of butter. This is one of those easy baking recipes that you’ll keep coming back to!
Ingredients You’ll Need
Gathering your ingredients before you start is a key baking tip for beginners. This ensures a smooth and stress-free baking experience. Here’s what you’ll need for your delicious creamed corn cornbread:
| Ingredient | Quantity | Unit |
|---|---|---|
| Jiffy Corn Muffin Mix | 1 (8.5 oz) | box |
| Canned Creamed Corn | 1 (14.75 oz) | can |
| Large Eggs | 2 | |
| Milk (or Buttermilk for extra tang) | 1/2 | cup |
| Vegetable Oil (or melted unsalted butter for richer flavor) | 1/4 | cup |
| Granulated Sugar (optional, for sweeter cornbread) | 1-2 | tablespoons |
Step-by-Step Instructions: Your Guide to Perfect Cornbread
Follow these detailed steps, and you’ll have a golden, tender cornbread that everyone will rave about. We’ve included extra baking tips for beginners along the way!
Step 1: Preheat and Prepare Your Pan
Before you even think about mixing, let’s get the oven ready! This is crucial for even baking.
- Preheat your oven to 375°F (190°C).
- Grease an 8×8 inch (20×20 cm) baking pan or a 9-inch (23 cm) cast iron skillet. You can use butter, vegetable oil, or a non-stick baking spray. Make sure to get into all the corners and up the sides. A well-greased pan prevents sticking and helps create a beautiful crust.
- Beginner Tip: If using a cast iron skillet, you can place it in the oven while it preheats. This helps create an incredibly crispy bottom crust, which is a hallmark of great cornbread! Just be very careful when you take it out to pour the batter in – it will be extremely hot.
Step 2: Whisk the Wet Ingredients
Combining the wet ingredients first ensures everything is evenly distributed before you add the dry mix.
- In a large mixing bowl, crack the 2 large eggs.
- Add the 1/2 cup of milk (or buttermilk) and the 1/4 cup of vegetable oil (or melted butter).
- If you’re using the optional granulated sugar for a sweeter cornbread, add it now.
- Using a Whisk, whisk these ingredients together until they are well combined and the egg yolks are fully broken up.
- Beginner Tip: Using room temperature eggs and milk can help them incorporate more smoothly into the batter, leading to a more consistent texture. If your eggs are cold, you can place them in a bowl of warm water for a few minutes.
Step 3: Add the Jiffy Mix and Creamed Corn
Now for the stars of the show! The Jiffy mix provides the base, and the creamed corn adds incredible moisture and flavor.
- Pour the entire box of Jiffy Corn Muffin Mix into the bowl with the wet ingredients.
- Open the can of creamed corn and add it directly to the bowl. No need to drain it – the liquid is part of the magic!
Step 4: Mix Until Just Combined
This is arguably the most crucial step for tender cornbread. Overmixing is a common mistake that leads to tough cornbread.
- Using your Spatula or a spoon, gently fold the ingredients together.
- Mix only until the dry ingredients are just moistened and no streaks of dry mix remain. It’s okay if there are still a few small lumps – that’s perfectly normal and preferred!
- Common Mistake & Alternative: If you overmix, you develop the gluten in the flour, making your cornbread tough and chewy instead of light and tender. Resist the urge to keep stirring! A few lumps are a sign of a perfectly mixed batter.
Step 5: Pour into the Prepared Pan and Bake
Almost there! Your kitchen should be smelling amazing soon.
- Carefully pour the cornbread batter into your greased (and possibly preheated, if using cast iron) baking pan.
- Spread the batter evenly with your Spatula if needed.
- Place the pan in your preheated oven.
- Bake for 20-25 minutes. Baking times can vary slightly depending on your oven and the material of your baking pan.
- Beginner Tip: Avoid opening the oven door frequently, especially in the first 15 minutes, as this can cause the cornbread to sink.
Step 6: Check for Doneness and Cool
How do you know when it’s perfectly baked?
- The cornbread is done when the top is golden brown and a wooden toothpick inserted into the center comes out clean or with just a few moist crumbs attached. If it comes out with wet batter, bake for a few more minutes.
- Once baked, carefully remove the pan from the oven.
- Let the cornbread cool in the pan for at least 10-15 minutes before slicing and serving. This allows it to set properly and makes it easier to cut.
- Alternative Serving: For an extra rich treat, serve warm with a drizzle of honey, a pat of butter, or even a dollop of jam!
Tips & Tricks for Cornbread Perfection
Mastering cornbread is simple with these additional **baking tips for beginners**:
- Do Not Overmix! We can’t stress this enough. A few lumps are your friends; they indicate a tender crumb. Overmixing develops gluten, leading to a tough, dry cornbread. Mix just until combined.
- Room Temperature Ingredients: Eggs and milk blend more smoothly and evenly into the batter when they aren’t cold. This helps create a more uniform texture in your final product.
- Preheat Your Pan (Especially Cast Iron): For an incredibly crispy bottom and edges, place your greased baking pan or cast iron skillet in the oven while it preheats. The hot pan will immediately start cooking the batter, creating that desirable crunchy crust.
- Grease Generously: Don’t be shy with the butter, oil, or non-stick spray. A well-greased pan ensures your cornbread doesn’t stick and releases beautifully, preventing frustrating tears.
- Customize Your Cornbread: Feel free to add 1/2 cup of shredded cheddar cheese, a finely diced jalapeño (seeds removed for less heat), or even some cooked bacon bits to the batter for extra flavor.
- Storage: Store leftover cornbread in an airtight container at room temperature for up to 2-3 days, or in the refrigerator for up to 5 days. It also freezes well for up to 3 months.
- Serving Suggestions: This cornbread is fantastic on its own, but truly shines alongside chili, stews, pulled pork, grilled chicken, or any hearty meal.
Essential Baking Tools
Having the right tools makes all the difference, especially for **easy baking recipes**. Here are some essentials:
- Mixing Bowl: A large bowl is essential for combining your ingredients without making a mess.
- Whisk: Perfect for getting those wet ingredients smooth and lump-free.
- Baking Pan: An 8×8 inch square pan or a 9-inch cast iron skillet is ideal for this recipe.
- Measuring Cups: Accurate measurements are key in baking.
- Spatula: Great for folding ingredients and spreading batter evenly.
Nutrition Information (Estimated)
Here’s an estimated nutritional breakdown per serving of this delicious cornbread. Please note that these are approximate values and can vary based on specific brands and exact quantities used.
| Nutrient | Per Serving (approx. 1/12th of an 8×8 pan) |
|---|---|
| Calories | 230 kcal |
| Carbohydrates | 35 g |
| Protein | 5 g |
| Fat | 9 g |
| Fiber | 2 g |
| Sugar | 7 g |
Frequently Asked Questions (FAQs)
Q: Can I use regular canned corn instead of creamed corn?
A: While you technically can, the creamed corn is what gives this cornbread its unique moisture and slight sweetness. If you use regular canned corn, make sure to drain it well, and your cornbread might be a bit drier and less sweet. You might want to add an extra tablespoon of sugar and a splash more milk.
Q: What if I don’t have milk? Can I use water?
A: Milk (or buttermilk) adds richness and moisture. While water can be used in a pinch, your cornbread won’t be as tender or flavorful. For best results, stick to milk or a milk substitute like almond milk.
Q: How do I know if my cornbread is done?
A: The best way to check is to insert a wooden toothpick into the center of the cornbread. If it comes out clean or with just a few moist crumbs attached, it’s done. If there’s wet batter, continue baking for a few more minutes and re-test.
Q: Why is my cornbread dry or crumbly?
A: The most common reasons for dry or crumbly cornbread are overmixing the batter (which develops the gluten too much) or overbaking it. Make sure you mix only until just combined, and always check for doneness with a toothpick to avoid baking longer than necessary.
Q: Can I make this cornbread ahead of time?
A: Absolutely! Cornbread is excellent the next day. Store it in an airtight container at room temperature. You can gently reheat slices in the microwave or oven before serving.
Q: Can I add cheese or jalapeños to this recipe?
A: Yes, this recipe is very forgiving and delicious with additions! Feel free to fold in 1/2 cup of shredded cheddar cheese, a finely diced jalapeño (or two, if you like heat!), or even some cooked and crumbled bacon bits into the batter before baking. These additions add fantastic flavor and texture.
Conclusion: Your Cornbread Journey Begins Now!
There you have it! A truly easy, delightfully moist, and incredibly flavorful Corn Bread Recipe With Jiffy And Creamed Corn that’s perfect for anyone, especially baking tips for beginners. This recipe proves that you don’t need fancy ingredients or complex techniques to create something truly delicious. So go ahead, gather your ingredients, follow these simple steps, and prepare to impress your taste buds and your loved ones.
We hope you enjoy baking and eating this fantastic cornbread as much as we do. Don’t forget to share your creations and tell us how it turned out in the comments below! Happy baking!