Are you ready to fill your home with the irresistible aroma of freshly baked bread? If you’re new to the kitchen or simply looking for a delightful and straightforward project, then this Cranberry Walnut Bread Recipe is absolutely perfect for you! We believe that baking should be a joyous and accessible experience, and this recipe is designed with baking tips for beginners in mind, ensuring success every step of the way.
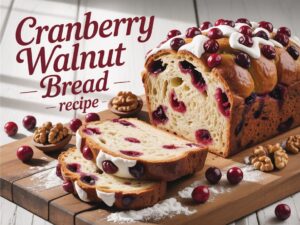
This isn’t just any bread; it’s a moist, tender, quick bread bursting with the tart sweetness of cranberries and the delightful crunch of walnuts. It’s one of those easy baking recipes that looks impressive but requires minimal effort, making it ideal for breakfast, a snack, or even a thoughtful homemade gift. Get ready to embark on a delicious adventure – you’re going to love what you create!
Ingredients You’ll Need
Gathering your ingredients before you start is a crucial step in making baking easy. This is called “mise en place” (everything in its place) and it will make your baking process smooth and enjoyable!
| Quantity | Unit | Ingredient |
|---|---|---|
| 2 | cups | All-Purpose Flour |
| 1 | cup | Granulated Sugar |
| 1 | tablespoon | Baking Powder |
| 1/2 | teaspoon | Salt |
| 1 | cup | Milk (whole or 2%) |
| 1/2 | cup | Vegetable Oil (or melted unsalted butter) |
| 1 | large | Egg |
| 1 | teaspoon | Vanilla Extract |
| 1 | cup | Dried Cranberries |
| 1/2 | cup | Chopped Walnuts |
Step-by-Step Instructions for Beginners
Follow these detailed steps carefully, and you’ll have a gorgeous loaf of Cranberry Walnut Bread in no time. Remember, baking is a science, so precision helps, but don’t be afraid to have fun!
Step 1: Preheat Your Oven & Prep Your Pan
Before you mix anything, let’s get the oven ready. Preheat your oven to 350°F (175°C). This ensures a consistent baking temperature from the moment your bread goes in. Next, prepare a 9×5 inch loaf pan. You can do this by either:
- Greasing and Flourishing: Lightly coat the inside of the pan with butter or cooking spray, then dust with a tablespoon of flour, tilting the pan to coat all surfaces. Tap out any excess flour.
- Parchment Paper: Line the pan with a strip of parchment paper, leaving an overhang on the two long sides. This creates “handles” that make it super easy to lift the baked bread out of the pan. Still lightly grease the exposed ends of the pan.
Beginner Tip: An oven thermometer can be a great investment to ensure your oven is actually at the temperature you set it to. Oven temperatures can vary!
Step 2: Combine the Dry Ingredients
In a large mixing bowl, whisk together the all-purpose flour, granulated sugar, baking powder, and salt. Whisking dry ingredients together helps to evenly distribute the baking powder and salt, preventing clumps and ensuring your bread rises uniformly. Make sure there are no lumps of flour.
Step 3: Mix the Wet Ingredients
In a separate, medium-sized bowl, whisk together the milk, vegetable oil (or melted butter), large egg, and vanilla extract until well combined. Ensure the egg is fully incorporated and the mixture looks smooth.
Beginner Tip: Using room temperature ingredients (especially the egg and milk) helps them combine more easily and creates a smoother batter, leading to a more consistent texture in your finished bread.
Step 4: Combine Wet and Dry Mixtures
Pour the wet ingredients mixture into the bowl with the dry ingredients. Using a spatula or a large spoon, stir gently until just combined. This is a critical step for beginners: DO NOT OVERMIX! Overmixing develops the gluten in the flour too much, which can lead to a tough, dense, and chewy bread instead of a tender, moist one. It’s okay if there are a few small lumps of flour remaining; they will disappear during baking.
Step 5: Fold in Cranberries and Walnuts
Add the dried cranberries and chopped walnuts to the batter. Gently fold them in with your spatula until they are evenly distributed. Again, be gentle and avoid overmixing. You want the fruits and nuts to be spread throughout the loaf so every slice gets a delicious bite!
Common Mistake & Alternative: If your cranberries tend to sink to the bottom, try tossing them with a tablespoon of flour before adding them to the batter. The flour coating helps them suspend more evenly. You can also use fresh cranberries, but you might want to increase the sugar by 1/4 cup as fresh cranberries are much tarter.
Step 6: Transfer to Pan and Bake
Pour the batter into your prepared 9×5 inch loaf pan, spreading it evenly with your spatula. Place the pan in the preheated oven. Bake for approximately 50-60 minutes. The exact baking time can vary depending on your oven.
How to Check for Doneness: The bread is done when a wooden toothpick inserted into the center comes out clean or with just a few moist crumbs attached (no wet batter). The top should be golden brown and the edges should be pulling slightly away from the pan.
Step 7: Cool Your Bread
Once baked, remove the loaf pan from the oven and let it cool in the pan on a wire rack for about 10-15 minutes. This allows the bread to set and makes it easier to remove from the pan without breaking. After 10-15 minutes, carefully lift the bread out of the pan (using those parchment paper handles, if you have them!) and transfer it directly to the wire rack to cool completely. Slicing warm bread can sometimes make it crumble, so patience is key for clean slices!
Why a Wire Rack? Cooling on a wire rack allows air to circulate around all sides of the bread, preventing the bottom from becoming soggy due to trapped steam.
Tips & Tricks for a Perfect Cranberry Walnut Bread
- Don’t Overmix: We can’t stress this enough! Overmixing is the number one cause of tough quick breads. Mix until just combined.
- Accurate Measuring: For flour, spoon it into your measuring cup and then level it off with the back of a knife. Don’t scoop directly from the bag, as this can compact the flour and lead to using too much.
- Toasted Walnuts for Extra Flavor: For an even deeper, nuttier flavor, lightly toast your chopped walnuts in a dry skillet over medium-low heat for 5-7 minutes, stirring frequently, until fragrant. Let them cool completely before adding to the batter.
- Ingredient Variations: Feel free to experiment! Add a teaspoon of orange zest for a bright citrus note, or swap out half the cranberries for golden raisins. You could even add a sprinkle of cinnamon or nutmeg for a warmer spice profile.
- Storage: Once completely cooled, store your Cranberry Walnut Bread in an airtight container at room temperature for up to 3-4 days. For longer storage, wrap slices individually or the whole loaf tightly in plastic wrap, then foil, and freeze for up to 3 months. Thaw at room temperature.
- Serving Suggestions: This bread is delicious on its own, with a smear of butter, cream cheese, or a drizzle of honey. It also makes a fantastic addition to a brunch spread.
Essential Baking Tools
Having the right tools makes baking much easier and more enjoyable. Here are a few essentials:
- Mixing Bowl Set: For combining ingredients.
- Whisk: To aerate dry ingredients and combine wet ones.
- Loaf Baking Pan: A 9×5 inch pan is standard for this recipe.
- Measuring Cups and Spoons Set: Accuracy is key in baking!
- Rubber Spatula: For scraping bowls and gentle folding.
- Wire Rack: For cooling your bread evenly.
- Parchment Paper: For easy removal and cleanup.
Nutrition Information (Estimate per slice)
Please note: This is an estimated nutritional breakdown for a typical slice (assuming 12 slices per loaf) and can vary based on specific ingredients and portion sizes.
| Nutrient | Amount |
|---|---|
| Calories | ~300 kcal |
| Carbohydrates | ~45g |
| Protein | ~5g |
| Fat | ~12g |
| Fiber | ~2g |
| Sugar | ~25g |
Frequently Asked Questions (FAQs)
Q1: Can I use fresh cranberries instead of dried?
Yes, you can! Fresh cranberries will add a more tart burst of flavor. If using fresh, you might want to increase the sugar by about 1/4 cup to balance the tartness. No need to rehydrate them. Just wash and pat them dry before adding.
Q2: My bread turned out tough and dense. What went wrong?
This is a common issue for beginners and almost always due to overmixing the batter. When you overmix, you develop the gluten in the flour too much, leading to a tough texture. Remember to mix only until the wet and dry ingredients are just combined, and a few lumps are perfectly fine!
Q3: How do I store leftover Cranberry Walnut Bread?
Once the bread has completely cooled, wrap it tightly in plastic wrap or store it in an airtight container at room temperature for up to 3-4 days. For longer storage, it freezes beautifully! Wrap the whole loaf or individual slices tightly in plastic wrap, then aluminum foil, and freeze for up to 3 months. Thaw at room temperature.
Q4: Can I substitute the walnuts with other nuts?
Absolutely! Pecans are a fantastic substitute and will offer a similar texture and rich flavor. Almonds or even a mix of different nuts would also work well. Just ensure they are chopped to a similar size.
Q5: My bread is browning too quickly on top, but the inside isn’t cooked. What should I do?
If you notice the top browning too fast, you can loosely tent the loaf pan with aluminum foil for the remaining baking time. This protects the top from direct heat while allowing the inside to cook through. Make sure your oven rack is also in the middle position.
Q6: Can I make this recipe gluten-free?
While this recipe isn’t specifically formulated for gluten-free baking, you can try substituting the all-purpose flour with a 1:1 gluten-free baking flour blend that contains xanthan gum. Results may vary slightly in texture and rise, but it’s often a successful swap for quick bread recipes like this one.
Time to Enjoy Your Homemade Masterpiece!
Congratulations, baker! You’ve successfully made a delicious loaf of Cranberry Walnut Bread. There’s truly nothing quite like the satisfaction of pulling a warm, fragrant loaf from your own oven. Whether you’re sharing it with loved ones or savoring a slice all to yourself, this recipe proves that even as a beginner, you can create something truly special.
Don’t stop here! This is just the beginning of your baking journey. Keep experimenting, keep learning, and most importantly, keep enjoying the process. We’d love to hear about your baking success – feel free to share your thoughts and photos in the comments below!