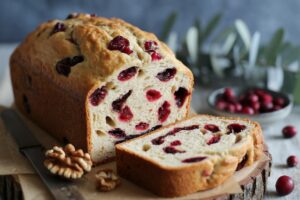
There’s nothing quite like the aroma of freshly baked bread filling your home, especially on a chilly morning. If you’ve always dreamed of baking your own delicious loaves but felt intimidated by the process, you’re in for a treat! This Cranberry Walnut Bread Recipe For Bread Machine is designed specifically for you, the aspiring home baker.
Forget complex kneading and multiple proofing stages. With a bread machine, baking becomes one of the most easy baking recipes you can master. Our detailed guide offers all the baking tips for beginners you’ll need to create a perfectly golden, sweet, and nutty loaf every single time. Get ready to impress yourself and your loved ones with this incredibly simple yet utterly satisfying bread!
Ingredients List
Gathering your ingredients correctly is the first step to a successful loaf. Always use fresh ingredients for the best results!
| Ingredient | Quantity | Unit |
|---|---|---|
| Warm Water (105-115°F) | 1 | cup |
| Olive Oil (or vegetable oil) | 2 | tablespoons |
| All-Purpose Flour | 3 | cups |
| Granulated Sugar | 1/4 | cup |
| Salt | 1 | teaspoon |
| Active Dry Yeast | 2 | teaspoons |
| Dried Cranberries | 1/2 | cup |
| Chopped Walnuts | 1/2 | cup |
Step-by-Step Instructions: Baking Perfection Made Easy
Follow these steps carefully, and your bread machine will do most of the hard work for you!
Step 1: Prepare Your Ingredients
- Ensure all your ingredients are at room temperature. This helps with proper dough development.
- Measure each ingredient precisely. Baking is a science, and exact measurements are key to consistent results. Use proper measuring cups and spoons, leveling off dry ingredients.
- Make sure your water is warm, not hot. Too hot water will kill the yeast, and too cold water won’t activate it properly. A quick check with a thermometer (105-115°F) is ideal. If you don’t have one, it should feel comfortably warm to the touch, like a baby’s bath.
Step 2: Load Your Bread Machine Pan
The order in which you add ingredients to your bread machine pan is crucial for proper mixing and yeast activation. Always check your specific bread machine manual, but generally, the order is liquids first, then dry ingredients, and finally, the yeast.
- Add Liquids: Pour the warm water and olive oil into the bread machine pan.
- Add Dry Ingredients: Carefully add the all-purpose flour, making sure it covers the liquids.
- Add Sugar and Salt: Place the granulated sugar in one corner of the pan, and the salt in the opposite corner. It’s important to keep the salt away from the yeast at this stage, as salt can inhibit yeast activity if they come into direct contact before mixing.
- Add Yeast: Create a small well or indentation in the center of the flour, avoiding the water below, and add the active dry yeast into this well. This keeps the yeast dry until the mixing cycle begins.
- Add Cranberries and Walnuts: This is where your bread machine model might offer options:
- Option A (Recommended for machines with an “add-in” beep): Do not add the cranberries and walnuts yet. Your bread machine will signal with a “beep” during the kneading cycle when it’s the perfect time to add these mix-ins. This ensures they are evenly distributed and don’t get overly chopped or crushed during the initial kneading.
- Option B (For machines without an “add-in” beep or dispenser): You can carefully add the dried cranberries and chopped walnuts on top of the dry ingredients, around the yeast. They will mix in during the kneading process.
Step 3: Select Your Bread Machine Cycle
Close the lid of your bread machine securely and plug it in.
- Choose the Cycle: For this recipe, select the “Basic,” “White Bread,” or “Sweet Bread” cycle. The “Sweet Bread” cycle is often ideal as it’s designed for recipes with higher sugar content and typically has a slightly longer rise time.
- Select Loaf Size: Most bread machines allow you to choose a loaf size (e.g., 1.5 lb or 2 lb). This recipe is typically for a 1.5 lb loaf. Ensure your machine is set to the correct size.
- Choose Crust Color: Select your desired crust color – Light, Medium, or Dark. For a golden-brown crust that complements the sweet cranberries, “Medium” is usually a great choice.
- Start the Machine: Press the “Start” button. Your bread machine will now begin its magical process of kneading, rising, and baking!
Step 4: The Waiting Game & Add-Ins
Resist the urge to open the lid during the cycle! Opening the lid can cause temperature fluctuations that interfere with the rising process.
- If your machine has an “add-in” beep and you didn’t add the cranberries and walnuts earlier, listen for the beep. When you hear it, open the lid briefly and carefully add the dried cranberries and chopped walnuts to the dough. Close the lid immediately.
- The machine will continue to knead, then enter its rising and baking phases.
Step 5: Cooling Your Perfect Loaf
Once the bread machine beeps to signal the end of the cycle, your beautiful Cranberry Walnut Bread is ready!
- Remove Promptly: Carefully remove the bread pan from the machine using oven mitts. The pan will be very hot.
- Invert and Release: Invert the pan onto a wire cooling rack and gently shake to release the bread. If the kneading paddle is stuck in the loaf, carefully remove it with a utensil.
- Cool Completely: This is a crucial step! Allow the bread to cool on the wire rack for at least 1-2 hours, or until it’s completely cool to the touch. Slicing hot bread can result in a gummy texture. Cooling allows the internal structure of the bread to set properly, giving you a perfect slice every time.
Tips & Tricks for Bread Machine Success
Mastering your bread machine is simple with a few key pointers:
- Ingredient Temperature is Key: Ensure liquids are warm and other ingredients are at room temperature. Cold ingredients can slow down yeast activity, leading to a dense loaf.
- Measure Accurately: Always use proper measuring cups and spoons. For flour, spoon it into your measuring cup and then level it off with a straight edge; don’t scoop directly from the bag, as this can compact the flour and lead to too much being used.
- Check Your Yeast: Yeast is a living organism. If your yeast is old, your bread won’t rise. To test, dissolve 1 teaspoon of sugar in 1/2 cup warm water (105-115°F), then sprinkle 2 1/4 teaspoons of yeast on top. Let it sit for 5-10 minutes. If it becomes foamy, your yeast is active and ready to use.
- Customize Your Loaf: Feel free to add a pinch of cinnamon or nutmeg for extra warmth. You could also try different nuts like pecans, or even a mix of dried fruits.
- Proper Storage: Once completely cooled, store your Cranberry Walnut Bread in an airtight container or a bread bag at room temperature for up to 3-4 days. For longer storage, slice and freeze.
- Don’t Overlook the Manual: Every bread machine is slightly different. Refer to your machine’s manual for specific instructions on ingredient order, cycle names, and troubleshooting tips.
- Cleanliness Matters: Keep your bread machine pan and paddle clean to prevent sticking and ensure longevity of your appliance.
Essential Baking Tools
While your bread machine does most of the work, a few basic tools will make the process even smoother:
- Mixing Bowl (for prep or if you need to adjust dough)
- Whisk (for combining dry ingredients if preferred, though not strictly necessary with a bread machine)
- Baking Pan (not needed for bread machine baking, but good to have if you venture into oven baking later!)
- Measuring Cups (essential for accurate ingredient quantities)
- Spatula (useful for scraping ingredients or removing the paddle)
- Wire Cooling Rack (crucial for proper bread cooling)
Nutrition Information (Estimated per slice, 16 slices per loaf)
Please note that these values are estimates and can vary based on exact ingredient brands and measurements.
| Nutrient | Amount |
|---|---|
| Calories | ~180 kcal |
| Carbohydrates | ~30 g |
| Protein | ~5 g |
| Fat | ~6 g |
| Fiber | ~2 g |
| Sugar | ~8 g |
Frequently Asked Questions (FAQs)
Q1: Can I use fresh cranberries instead of dried?
A: It’s generally not recommended for bread machine recipes. Fresh cranberries release a lot of moisture during baking, which can throw off the liquid balance in the dough and result in a denser, wetter loaf. Stick to dried cranberries for this recipe.
Q2: What if my dough is too sticky or too dry during the kneading cycle?
A: Don’t panic! This is a common issue and easily fixable. If the dough looks too sticky and isn’t forming a ball, add 1 tablespoon of flour at a time until it reaches a good consistency. If it’s too dry and crumbly, add 1 tablespoon of warm water at a time. Make these adjustments during the first kneading cycle.
Q3: How do I know if my yeast is still good?
A: As mentioned in our tips, you can proof your yeast. Mix 1 teaspoon of sugar with 1/2 cup warm water (105-115°F). Sprinkle 2 1/4 teaspoons of yeast on top and let it sit for 5-10 minutes. If it becomes foamy and bubbly, your yeast is active. If not, it’s time to get a new packet.
Q4: My bread collapsed in the middle. What went wrong?
A: A collapsed loaf can be due to several reasons, often related to too much liquid, too much yeast, or not enough flour. Double-check your measurements, especially for liquids and yeast. High humidity can also contribute, making the dough softer. Next time, try reducing the liquid by 1-2 tablespoons or adding a bit more flour.
Q5: How long will this Cranberry Walnut Bread stay fresh?
A: When stored in an airtight container or bread bag at room temperature, this bread will stay fresh for about 3-4 days. For longer storage, you can slice the cooled bread and freeze it. It toasts beautifully from frozen!
Conclusion: Your Delicious Bread Awaits!
Congratulations, future bread-baking pro! You now have all the tools and knowledge to create a truly delicious Cranberry Walnut Bread Recipe For Bread Machine. This recipe is a fantastic starting point for anyone looking to enjoy the simple pleasure of homemade bread without the fuss.
Don’t be afraid to experiment and make it your own. The beauty of bread machine baking is its forgiveness and ease. So go ahead, give it a try, and savor every slice of your warm, sweet, and nutty creation. Happy baking!