
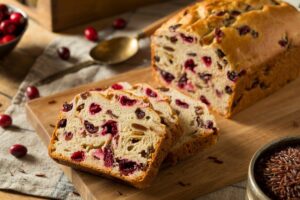
Welcome, aspiring bakers! Are you ready to fill your home with the irresistible aroma of freshly baked bread? This Cranberry Wild Rice Bread Recipe is not just a treat for your taste buds; it’s also one of the most satisfying and easy baking recipes you’ll encounter. Perfect for a cozy breakfast, a delightful sandwich, or simply as a wholesome snack, this bread combines the chewy texture of wild rice with the tart sweetness of cranberries, all nestled in a soft, airy loaf.
We know that starting out can feel a bit daunting, but with our detailed baking tips for beginners, you’ll be kneading, rising, and baking like a pro in no time. Get ready to embark on a delicious journey that will leave you proud of your homemade masterpiece!
Ingredients You’ll Need
Gather your ingredients before you start. This ensures a smooth and stress-free baking process!
| Ingredient | Quantity | Unit |
|---|---|---|
| Warm Water (105-115°F / 40-46°C) | 1 ½ | cups |
| Active Dry Yeast | 2 ¼ | teaspoons (or 1 packet) |
| Granulated Sugar | 1 | tablespoon |
| All-Purpose Flour | 3 ½ – 4 | cups |
| Salt | 1 ½ | teaspoons |
| Olive Oil (or melted unsalted butter) | 2 | tablespoons |
| Cooked Wild Rice (cooled) | ½ | cup |
| Dried Cranberries | ½ | cup |
Step-by-Step Instructions: Bake Your Best Loaf!
Follow these instructions carefully, and don’t be afraid to take your time. Baking is a journey, not a race!
Step 1: Activate the Yeast (The “Proof” is in the Pudding… or Yeast!)
- In a large mixing bowl (or the bowl of a stand mixer), combine the warm water (make sure it’s not too hot, or it will kill the yeast, and not too cold, or it won’t activate), granulated sugar, and active dry yeast.
- Gently stir once and let it sit for 5-10 minutes. You’ll know your yeast is alive and ready when it becomes foamy and bubbly on top. If it doesn’t foam, your water might have been too hot or too cold, or your yeast might be expired. Start again with new yeast and correctly tempered water.
Step 2: Mix the Dough (The Beginning of Something Delicious)
- Add the olive oil (or melted butter), salt, and about 2 cups of the all-purpose flour to the yeast mixture.
- Mix with a wooden spoon or a stand mixer with a dough hook on low speed until just combined.
- Gradually add the remaining flour, ½ cup at a time, until the dough comes together and starts to pull away from the sides of the bowl. The dough should be slightly sticky but manageable. You might not need all 4 cups of flour; stop when the dough feels right. Beginner Tip: It’s better to have a slightly sticky dough than a dry, stiff one, as too much flour can make your bread tough.
- Once the dough has mostly come together, add the cooked wild rice and dried cranberries. Mix until they are evenly distributed throughout the dough.
Step 3: Knead the Dough (Develop That Gluten!)
- If using a stand mixer: Continue to knead with the dough hook on medium-low speed for 6-8 minutes. The dough should become smooth, elastic, and pass the “windowpane test” (more on that below).
- If kneading by hand: Turn the dough out onto a lightly floured surface. Knead for 8-10 minutes. To knead, push the dough away from you with the heels of your hands, fold it back over itself, turn it a quarter turn, and repeat. Continue until the dough is smooth, elastic, and no longer sticky.
- The Windowpane Test (Beginner’s Guide): Pinch off a small piece of dough (about the size of a golf ball). Gently stretch it between your fingers. If you can stretch it thin enough to see light through it without tearing, your gluten is well-developed, and the dough is ready! If it tears quickly, keep kneading for a few more minutes.
Step 4: First Rise (Bulk Fermentation – The Magic Happens Here!)
- Lightly oil a clean large bowl. Place the kneaded dough in the bowl, turning it once to coat the top with oil. This prevents it from drying out.
- Cover the bowl tightly with plastic wrap or a clean kitchen towel.
- Place the bowl in a warm, draft-free place to rise for 1 to 1 ½ hours, or until it has doubled in size. Beginner Tip: A warm oven (turned off, with just the light on), or a sunny spot can work wonders. You can also place the bowl in a slightly larger bowl of warm water.
Step 5: Punch Down and Shape (Giving Your Loaf Its Form)
- Once the dough has doubled, gently “punch it down” to release the air. This isn’t aggressive; just a gentle deflate.
- Turn the dough out onto a lightly floured surface. Gently shape it into a rectangular loaf. For a standard loaf pan, aim for a shape that fits comfortably. You can roll it into a cylinder, then tuck the ends under and pinch the seam closed at the bottom.
Step 6: Second Rise (Proofing – The Final Ascent)
- Lightly grease a 9×5-inch loaf pan. Place the shaped dough seam-side down into the prepared pan.
- Cover the loaf pan loosely with plastic wrap or a clean kitchen towel.
- Let it rise again in a warm, draft-free place for 30-45 minutes, or until it has nearly doubled in size and looks puffy. Beginner Tip: To test if it’s ready, gently poke the dough with a floured finger. If the indentation springs back slowly, it’s ready. If it springs back immediately, it needs more time. If it collapses, it’s over-proofed (don’t worry, it will still taste good, just might be a bit denser).
Step 7: Bake (The Grand Finale!)
- Preheat your oven to 375°F (190°C) about 15 minutes before the second rise is complete.
- Once the oven is preheated and the dough has risen, carefully place the loaf pan into the preheated oven.
- Bake for 30-35 minutes, or until the crust is golden brown and the internal temperature reaches 200-210°F (93-99°C) when measured with an instant-read thermometer. Beginner Tip: If the top starts to brown too quickly, you can loosely tent it with aluminum foil.
Step 8: Cool (Patience is a Virtue!)
- Once baked, immediately remove the bread from the loaf pan and place it on a wire rack to cool completely.
- This step is crucial! Cooling allows the internal structure of the bread to set and prevents it from becoming gummy. Resist the urge to slice into it for at least 1-2 hours.
- Slice, serve, and enjoy your amazing homemade Cranberry Wild Rice Bread!
Tips & Tricks for Beginner Bakers
Mastering bread baking is all about practice and a few helpful pointers. Here are some extra tips to ensure your success:
- Measure Accurately: Especially with flour! Use the “spoon and level” method: spoon flour into your measuring cup and then level it off with a straight edge (like a knife). Don’t scoop directly from the bag, as this can compact the flour and add too much.
- Yeast Freshness: Always check the expiration date on your yeast. Old yeast won’t activate, and your bread won’t rise. Store opened yeast in an airtight container in the fridge or freezer.
- The Warmth Factor: Yeast loves warmth! Ensure your water is the right temperature (like a warm bath, not hot tub!). For rising, a slightly warm, draft-free spot is key. Some ovens have a “bread proof” setting, or you can turn your oven on for a minute, then turn it off and let the dough rise inside.
- Don’t Rush the Rise: The rising times are estimates. The actual time depends on your kitchen’s temperature and humidity. Always go by whether the dough has doubled in size, not just the clock.
- Kneading Patience: Kneading develops the gluten, which gives bread its structure and chewiness. Don’t cut this step short! A properly kneaded dough will be smooth, elastic, and spring back when poked.
- Storage: Store cooled bread in an airtight container or bread bag at room temperature for 3-4 days. For longer storage, slice the bread and freeze it in a freezer-safe bag for up to 3 months.
Essential Baking Tools
Having the right tools makes all the difference! Here are some basics that will set you up for success:
- Mixing Bowl (a large one for dough, preferably with high sides)
- Whisk (for combining dry ingredients)
- Baking Pan (a standard 9×5-inch loaf pan is perfect)
- Measuring Cups (for both dry and liquid ingredients)
- Spatula (or a wooden spoon for mixing)
- Instant-Read Thermometer (highly recommended for checking internal temperature of bread)
- Wire Rack (for cooling the bread evenly)
Nutrition Information (per slice, approximately 1/12th of a loaf)
Please note that these values are estimates and can vary based on specific ingredients and preparation.
| Nutrient | Amount |
|---|---|
| Calories | 220 kcal |
| Total Carbohydrates | 40 g |
| Protein | 7 g |
| Total Fat | 4 g |
| Fiber | 3 g |
| Sugars | 6 g |
Frequently Asked Questions (FAQs) for Beginners
Q1: My dough didn’t rise. What went wrong?
A: The most common culprits are inactive yeast (check the expiration date!), water that was too hot (killed the yeast) or too cold (didn’t activate it), or a drafty environment. Ensure your water is between 105-115°F (40-46°C) and your rising spot is warm and still.
Q2: Can I use fresh cranberries instead of dried?
A: While you can, fresh cranberries have a much higher water content and tartness. They might make your dough a bit wetter and could burst during baking, potentially altering the texture and flavor significantly. For a beginner, dried cranberries are recommended for consistency. If you do use fresh, chop them finely and consider reducing the water slightly or adding a touch more flour.
Q3: Do I have to knead the dough by hand, or can I use a stand mixer?
A: Absolutely! A stand mixer with a dough hook is a fantastic tool for bread making and saves a lot of arm work. Just be sure to use it on a medium-low speed and knead for the recommended time (usually a bit less than by hand) until the dough passes the windowpane test.
Q4: How do I store homemade bread to keep it fresh?
A: Once completely cooled, store your bread in an airtight container, a bread box, or a sealed plastic bag at room temperature. It will stay fresh for about 3-4 days. For longer storage, slice the cooled loaf and freeze the slices in a freezer-safe bag. You can then toast individual slices directly from the freezer.
Q5: My bread is dense. Why?
A: Density usually points to a few common issues: not enough kneading (gluten didn’t develop enough to trap air), under-proofing (the dough didn’t rise enough during either the first or second rise), or too much flour (which makes the dough stiff and heavy). Review the kneading and rising steps carefully for your next bake!
Conclusion: Your Baking Journey Starts Now!
Congratulations, you’ve just unlocked the secret to baking a truly exceptional loaf of Cranberry Wild Rice Bread! This recipe is more than just a list of steps; it’s an invitation to experience the joy and satisfaction of creating something wonderful with your own hands. Don’t be discouraged if your first loaf isn’t “perfect”—every bake is a learning experience, and even imperfect homemade bread tastes better than store-bought. So grab your apron, preheat that oven, and get ready to impress yourself and everyone lucky enough to share a slice. We can’t wait to hear about your baking adventures!