Welcome, budding bakers! Are you ready to transform a common garden ‘weed’ into a surprisingly delightful and wholesome loaf of bread? Our Dandelion Bread Recipe is not just an opportunity to try something wonderfully unique; it’s also one of the most satisfying easy baking recipes you’ll find.
Don’t be intimidated if you’re new to the kitchen we’ve packed this guide with comprehensive baking tips for beginners to ensure your success. Imagine the aroma of freshly baked bread filling your home, with a subtle, earthy sweetness from the vibrant dandelion petals. This recipe is a fantastic way to enjoy the simple pleasures of baking while incorporating a touch of nature’s goodness. Let’s get baking!
Why Bake with Dandelions?
Dandelions, often overlooked, are packed with vitamins and minerals. When harvested correctly and added to bread, their mild, slightly sweet, and earthy flavor adds a unique depth that you won’t find in your average loaf. Plus, it’s incredibly rewarding to create something delicious from something you might otherwise discard!
Ingredients You’ll Need
Gathering your ingredients is the first step to baking success. Make sure everything is measured accurately!
| Ingredient | Quantity | Unit |
|---|---|---|
| All-purpose flour | 3 | cups |
| Active dry yeast | 2.25 | teaspoons |
| Warm water (105-115°F / 40-46°C) | 1 | cup |
| Granulated sugar | 1 | tablespoon |
| Salt | 1 | teaspoon |
| Olive oil | 2 | tablespoons |
| Fresh dandelion petals (green parts removed) | 1/2 | cup |
| (Optional) Honey or maple syrup | 1 | tablespoon |
| (Optional) Melted butter or olive oil (for brushing) | 1 | tablespoon |
Step-by-Step Dandelion Bread Baking Instructions
Follow these detailed steps carefully, and you’ll be enjoying a warm, homemade loaf in no time!
Step 1: Activate Your Yeast
In a large mixing bowl (or the bowl of a stand mixer), combine the warm water (ensure it’s between 105-115°F, too hot will kill the yeast, too cold won’t activate it!), granulated sugar, and active dry yeast. Give it a gentle stir. Let it sit for 5-10 minutes. You’ll know your yeast is active and ready when it becomes foamy and bubbly on the surface. If it doesn’t foam, your yeast might be old or the water temperature was off, and it’s best to start this step over. This is a crucial first step for light, airy bread!
Step 2: Combine Wet and Dry Ingredients
Once your yeast is active, add the olive oil and salt to the yeast mixture. Stir to combine. Gradually add about half of the all-purpose flour to the wet ingredients, mixing with a wooden spoon or a stand mixer with a dough hook on low speed until just combined.
Step 3: Introduce the Dandelion Petals
Now for the star ingredient! Add your fresh dandelion petals to the dough mixture. It’s important to use only the yellow petals, as the green parts can be bitter. Gently fold them into the dough. This ensures an even distribution of flavor and color throughout your bread.
Step 4: Add Remaining Flour and Knead the Dough
Gradually add the remaining flour, about 1/2 cup at a time, mixing until a shaggy dough forms. Once the dough starts to come together, turn it out onto a lightly floured surface (or continue with your stand mixer). **Knead the dough** for 8-10 minutes by hand, or 5-7 minutes with a stand mixer on medium-low speed.
Beginner’s Kneading Tip: If kneading by hand, push the dough away from you with the heels of your hands, fold it back, rotate, and repeat. You’re looking for a dough that becomes smooth, elastic, and no longer sticky. It should pass the “windowpane test” – you can gently stretch a small piece of dough thin enough to see light through it without tearing. If your dough is too sticky, add a tiny bit more flour (1 tablespoon at a time); if it’s too dry, add a tiny bit of water.
Step 5: First Rise (Bulk Fermentation)
Lightly grease a large bowl with a little olive oil. Place the kneaded dough in the bowl, turning it once to coat the entire surface with oil. Cover the bowl tightly with plastic wrap or a clean kitchen towel. Place it in a warm, draft-free place to rise for 1 to 1.5 hours, or until it has **doubled in size**. A slightly warm oven (turned off!) or a sunny spot on your counter works well. This first rise develops the flavor and texture of your bread.
Step 6: Punch Down and Shape the Loaf
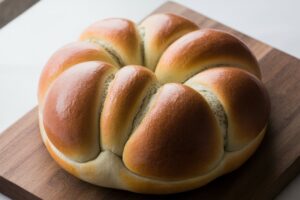
Once the dough has doubled, gently punch it down to release the air. This helps to create a finer crumb. Turn the dough out onto a lightly floured surface. Gently shape it into a loaf. You can do this by flattening the dough into a rectangle, then rolling it up tightly from one of the long sides, pinching the seam closed. Place the shaped loaf into a lightly greased 9×5 inch loaf pan.
Step 7: Second Rise (Proofing)
Cover the loaf pan with plastic wrap or a kitchen towel and return it to a warm, draft-free spot for a second rise. Let it rise for another 30-45 minutes, or until it has nearly doubled in size and looks puffy. This second rise is called “proofing” and ensures a light, airy texture for your final bread.
Step 8: Preheat Oven and Bake
While your bread is on its second rise, preheat your oven to 375°F (190°C). Once preheated and the bread has risen, place the loaf pan in the center of the preheated oven.
Bake for 30-35 minutes, or until the crust is golden brown and the internal temperature reaches 200-210°F (93-99°C) when checked with an instant-read thermometer. If you don’t have a thermometer, tap the bottom of the loaf – it should sound hollow.
Step 9: Cool and Enjoy!
Once baked, remove the bread from the oven and immediately transfer it from the loaf pan to a wire cooling rack. This is crucial for preventing the bottom of the bread from getting soggy. If desired, brush the top with a little melted butter or olive oil for a softer crust. Let the bread cool completely (at least 1 hour) before slicing and serving. Slicing warm bread can make it gummy. Enjoy your homemade Dandelion Bread with butter, jam, or simply on its own!
Essential Baking Tips & Tricks for Success
Even with an easy recipe, a few pointers can make all the difference, especially for beginners!
- Dandelion Harvesting: Only collect dandelions from areas you know are pesticide-free and away from heavy traffic. The best time to harvest is in the morning after the dew has dried. Remember to use only the yellow petals, as the green parts can impart a bitter flavor. A quick rinse and pat dry before adding to the dough are recommended.
- Yeast is Alive! Treat your yeast with care. Water temperature is paramount. If your yeast doesn’t foam after 5-10 minutes, it’s likely dead, and your bread won’t rise. Start fresh!
- Measuring Flour Accurately: For best results, spoon your flour into the measuring cup and then level it off with a straight edge (like the back of a knife). Scooping directly from the bag can compact the flour, leading to too much flour and a dense loaf.
- Don’t Rush the Rise: Dough rising is a magical process that can’t be rushed. Ensure your rising environment is warm and free of drafts. If your kitchen is cold, try putting the dough in an oven that’s been briefly warmed and then turned off.
- Know Your Oven: Ovens can vary widely in temperature. Consider using an **oven thermometer** to ensure your oven is truly at the temperature you set. This can prevent over or under-baking.
- Cooling is Crucial: It’s tempting to slice into a warm loaf, but resist! Cooling on a wire rack allows steam to escape, preventing a gummy texture and ensuring the crumb sets properly.
- Storage: Store your Dandelion Bread in an airtight container or bread bag at room temperature for 3-4 days. For longer storage, slice the cooled bread and freeze it in a freezer-safe bag for up to 3 months.
Essential Baking Tools
Having the right tools makes baking much easier and more enjoyable. Here are a few basics:
- Mixing Bowl
- Whisk
- Baking Pan (9×5 inch loaf pan)
- Measuring Cups and Spoons
- Spatula
- (Optional but Recommended) Dough Scraper
- (Optional) Stand Mixer with Dough Hook
Estimated Nutrition Information (per serving, 1/12 of a loaf)
Please note, these values are estimates and can vary based on specific ingredients and preparation.
| Nutrient | Amount |
|---|---|
| Calories | ~180 kcal |
| Carbohydrates | ~35 g |
| Protein | ~6 g |
| Fat | ~3 g |
| Fiber | ~1.5 g |
| Sugar | ~2 g |
Frequently Asked Questions (FAQs)
Q1: Can I use dried dandelion petals instead of fresh?
While fresh petals offer the best flavor and texture, you could potentially use dried petals. However, they are much more concentrated, so you would need to use significantly less (perhaps 1-2 tablespoons) and rehydrate them slightly before adding. The fresh petals also add a nice visual appeal.
Q2: My dough isn’t rising, what could be the problem?
The most common reasons for dough not rising are: **inactive yeast** (water too hot or too cold, or expired yeast), **cold environment** for rising, or **not enough kneading**. Double-check your yeast’s expiry date and ensure your water temperature is correct for activation. Provide a warm, draft-free spot for rising.
Q3: Do I have to knead the dough by hand? Can I use a stand mixer?
Absolutely! A stand mixer with a dough hook attachment makes kneading much easier and faster. If using a mixer, knead on medium-low speed for 5-7 minutes, until the dough is smooth and elastic. The instructions are written to accommodate both methods.
Q4: Can I add other ingredients to this Dandelion Bread?
Yes, you can! Feel free to experiment. A tablespoon of poppy seeds or sesame seeds could add texture. A pinch of ground nutmeg or cinnamon might complement the dandelion’s earthy notes. You could also try substituting a portion of the all-purpose flour with whole wheat flour for a heartier loaf (though this might require slight adjustments to water content).
Q5: How do I know when the bread is fully baked?
The best way to tell is by internal temperature: it should be between 200-210°F (93-99°C). If you don’t have a thermometer, look for a deep golden-brown crust and a hollow sound when you tap the bottom of the loaf. If the top is browning too quickly, you can loosely tent it with aluminum foil for the last 10-15 minutes of baking.
Conclusion: Your Dandelion Bread Adventure Awaits!
Congratulations, you’ve reached the end of our Dandelion Bread Recipe guide! We hope you feel confident and excited to try this unique and rewarding baking project. There’s truly nothing like the taste of homemade bread, and adding dandelions makes it an even more special experience. Don’t worry if your first loaf isn’t perfect – every bake is a learning opportunity. The most important thing is to have fun, enjoy the process, and savor the delicious results. Happy baking, and we can’t wait to hear about your Dandelion Bread journey! Share your creations and any questions in the comments below!