
Welcome, aspiring bakers! Are you ready to dive into the wonderful world of baking with a recipe that’s as comforting as it is easy? Our Date Cakes Recipe is specifically designed for you. Forget complicated techniques and intimidating ingredient lists; we’re here to show you that creating delicious, moist, and perfectly spiced date cakes is entirely achievable, even if you’ve never baked a cake before. This post is packed with Date Cakes Recipe principles and essential baking tips for beginners to ensure your success. Get ready to fill your home with the warm, inviting aroma of freshly baked date cakes – a truly delightful treat that’s perfect with a cup of coffee or tea, any time of year. Let’s get baking!
Ingredients You’ll Need
Gathering all your ingredients before you start is a golden rule in baking – it makes the process smoother and stress-free. Here’s what you’ll need for these delightful date cakes:
| Quantity | Unit | Ingredient |
|---|---|---|
| 1 ½ | cups | Pitted Dates, finely chopped |
| 1 ½ | cups | Hot Water (or freshly brewed hot coffee for extra flavor!) |
| 1 | teaspoon | Baking Soda |
| ½ | cup | Unsalted Butter, softened (1 stick) |
| 1 | cup | Granulated Sugar |
| 2 | large | Eggs, room temperature |
| 1 ½ | teaspoons | Vanilla Extract |
| 1 ¾ | cups | All-Purpose Flour |
| ½ | teaspoon | Salt |
| Optional Glaze: | ||
| 1 | cup | Powdered Sugar |
| 2-3 | tablespoons | Milk or Water |
Step-by-Step Instructions: Bake Your First Date Cakes!

Follow these detailed steps carefully, and you’ll be enjoying your homemade date cakes in no time. We’ve included extra tips to guide you through each part of the process.
-
1. Prepare Your Dates (and Your Oven!)
First things first, preheat your oven to 350°F (175°C). This is super important because an oven that’s not fully preheated can lead to uneven baking. While the oven heats up, grab an 8×8 inch (20×20 cm) square baking pan or a 9-inch round pan. Lightly grease the inside with butter or cooking spray, then dust it with a little flour. Tap out any excess flour. This creates a non-stick barrier, ensuring your cake comes out easily!
In a medium heatproof bowl, combine your finely chopped pitted dates with the hot water (or hot coffee) and baking soda. Stir gently. The baking soda will react with the dates and hot liquid, helping them soften and break down, which contributes to the cake’s moist texture. Let this mixture sit for about 10-15 minutes while you prepare the rest of the ingredients. The dates will plump up and become very soft.
-
2. Cream Butter and Sugar
In a large mixing bowl, using an electric mixer (or a whisk and some elbow grease!), beat the softened unsalted butter and granulated sugar together. Start on low speed to combine, then increase to medium-high. Beat until the mixture is light, fluffy, and pale in color, usually about 2-3 minutes. This process, called “creaming,” incorporates air into the butter and sugar, which gives your cake a lovely tender crumb. Beginner tip: Make sure your butter is truly softened (press your finger into it, and it should leave an indentation easily) but not melted.
-
3. Add Eggs and Vanilla
Crack your two large eggs into a separate small bowl first. This way, if one has a shell piece or is bad, it won’t ruin your whole batter. Add them to the creamed butter and sugar mixture, one at a time, beating well after each addition until just combined. Scrape down the sides of the bowl with a spatula to ensure everything is incorporated. Finally, mix in the vanilla extract. Why room temperature eggs? They emulsify better with the butter, creating a smoother, more uniform batter and a finer cake texture.
-
4. Alternate Dry and Wet Ingredients
In a separate medium bowl, whisk together the all-purpose flour and salt. This helps to evenly distribute the salt and aerate the flour. Now, it’s time to add these to your wet ingredients.
Add about one-third of the dry ingredient mixture to the butter-egg mixture. Mix on low speed until just combined. Then, add half of the date mixture (including the liquid). Mix on low until just combined. Repeat with another third of the dry ingredients, then the remaining date mixture, and finally the last of the dry ingredients. Mix until just combined after each addition. Crucial beginner tip: Do not overmix! Overmixing develops the gluten in the flour, leading to a tough, dense cake. Stop mixing as soon as you no longer see streaks of dry flour.
-
5. Bake Your Date Cakes
Pour your beautiful cake batter into your prepared baking pan. Use your spatula to spread it evenly. Place the pan in the preheated oven and bake for approximately 30-40 minutes. Baking times can vary slightly depending on your oven, so keep an eye on it.
How to tell if it’s done? Insert a wooden skewer or toothpick into the center of the cake. If it comes out clean or with a few moist crumbs attached (no wet batter!), your cake is ready. If it comes out with wet batter, bake for another 5 minutes and test again. Avoid opening the oven door too early, especially in the first 20 minutes, as this can cause the cake to sink.
-
6. Cool and Glaze (Optional)
Once baked, remove the cake from the oven and let it cool in the pan on a wire rack for about 10-15 minutes. This allows the cake to set and prevents it from breaking when you remove it. After 10-15 minutes, carefully invert the cake onto the wire rack to cool completely. Cooling on a rack ensures air circulates around the entire cake, preventing the bottom from becoming soggy.
For the optional glaze: In a small bowl, whisk together the powdered sugar and 2 tablespoons of milk or water until smooth. If it’s too thick, add more liquid a teaspoon at a time until you reach a pourable consistency. Drizzle the glaze over the completely cooled cake. Let the glaze set for a few minutes before slicing and serving. Enjoy your homemade date cakes!
Tips & Tricks for Beginner Bakers
Date Cakes Recipe, but it doesn’t have to be intimidating! Here are some essential tips to help you succeed with this Date Cakes Recipe and future baking endeavors:
- Measure Accurately: Baking relies on precise measurements. Use dry measuring cups for flour and sugar, and liquid measuring cups for liquids. For flour, spoon it into the measuring cup and level off with a straight edge (like the back of a knife) – don’t scoop directly from the bag, as this can compact the flour and lead to too much.
- Room Temperature Ingredients are Key: This is not just a suggestion! Softened butter and room temperature eggs emulsify much better, creating a smoother, more uniform batter and a finer-textured cake. If you forget, you can quickly soften butter by microwaving it for 10-15 seconds (be careful not to melt it!), and warm eggs by placing them in a bowl of warm water for 5-10 minutes.
- Don’t Overmix: Once you add flour to your wet ingredients, mix only until just combined. Overmixing develops gluten, leading to a tough, dry cake. A few small lumps of flour are better than an overmixed batter.
- Know Your Oven: Ovens can vary wildly in temperature. Consider getting an inexpensive oven thermometer to ensure your oven is truly at the temperature you set. This can prevent over or under-baking.
- Prep Your Pan Properly: Greasing and flouring (or lining with parchment paper) your baking pan is crucial. Nothing is more frustrating than a cake that sticks!
- Cool Completely Before Glazing/Frosting: If you try to glaze or frost a warm cake, the glaze will melt and run off. Patience is a virtue in baking!
- Alternative Ingredients: Feel free to experiment! You can add 1/2 cup of chopped walnuts or pecans to the batter for extra crunch. You can also swap out half the all-purpose flour for whole wheat pastry flour for a slightly healthier, nuttier flavor. For the dates, Medjool dates are wonderful for their soft, caramel-like flavor, but any pitted dates will work.
Essential Baking Tools
Having the right tools makes baking much easier and more enjoyable. Here are a few basics you’ll want in your kitchen:
- Mixing Bowl Set
- Whisk (or Electric Hand Mixer)
- 8×8 Inch Baking Pan
- Measuring Cups & Spoons Set
- Rubber Spatula
- Wire Rack (for cooling)
- Parchment Paper (optional, but very helpful for non-stick)
Estimated Nutrition Info (Per Serving)
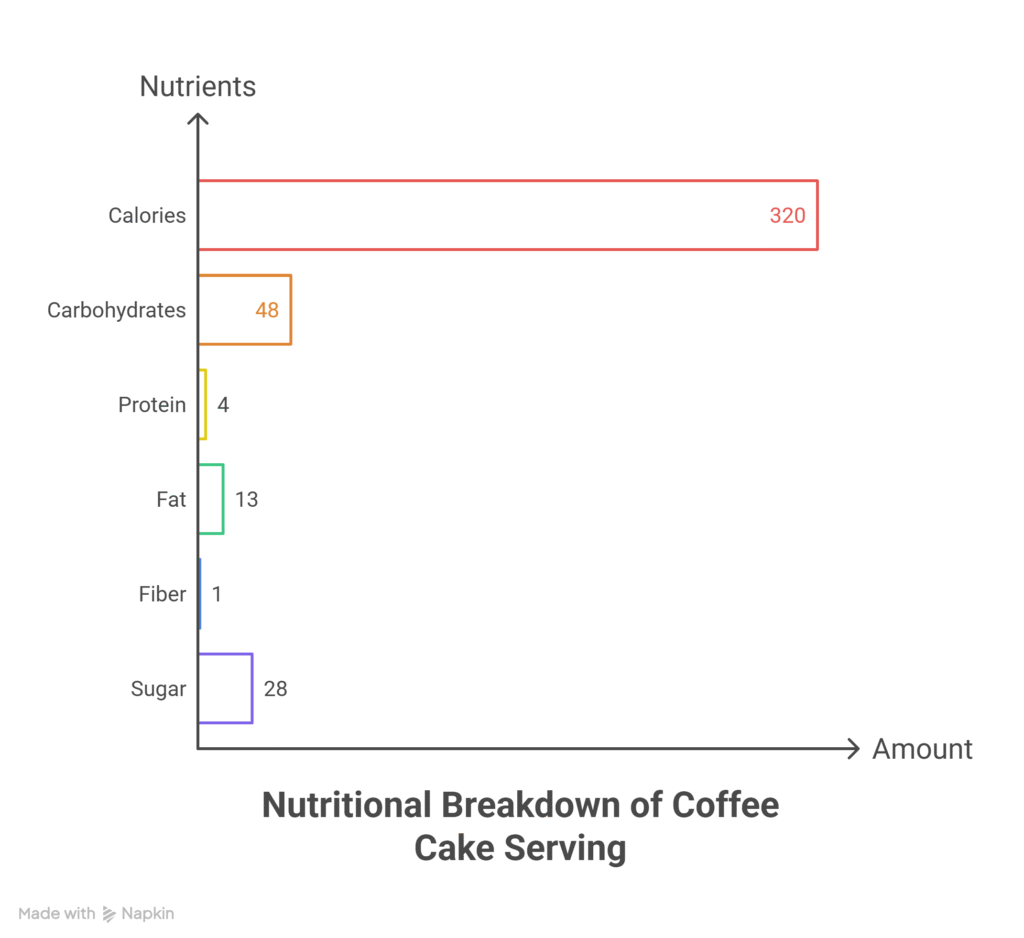
Please note: This is an estimated nutritional breakdown for one serving (assuming 9 servings per 8×8 inch cake) and can vary based on exact ingredients and portion size.
| Nutrient | Amount (per serving) |
|---|---|
| Calories | 350 kcal |
| Carbohydrates | 65 g |
| Protein | 4 g |
| Fat | 10 g |
| Fiber | 3 g |
| Sugar | 45 g |
Frequently Asked Questions (FAQs)
Q: Can I use different types of dates for this recipe?
A: Absolutely! While Medjool dates are often preferred for their soft, caramel-like texture and sweetness, any variety of pitted dates will work well. Just ensure they are finely chopped to help them break down in the hot liquid and distribute evenly throughout the cake.
Q: How do I know when my date cakes are perfectly baked?
A: The best way to check for doneness is to insert a wooden skewer or toothpick into the very center of the cake. If it comes out clean or with only a few moist crumbs attached (not wet batter), your cake is ready! If it’s still wet, bake for another 3-5 minutes and test again. The edges should also look golden brown and slightly pulled away from the sides of the pan.
Q: My cake turned out dry. What went wrong?
A: A dry cake is usually a sign of overbaking or overmixing. Overbaking removes too much moisture, while overmixing develops the gluten in the flour, leading to a tough, dry texture. Make sure to bake only until the toothpick test is passed, and mix the flour in until just combined, no more.
Q: How should I store leftover date cakes?
A: Store your date cakes in an airtight container at room temperature for up to 3-4 days. If you live in a very warm climate or want to keep them longer, they can be stored in the refrigerator for up to a week. For longer storage, slices can be individually wrapped and frozen for up to 2-3 months; thaw at room temperature before serving.
Q: Can I add nuts or other ingredients to the batter?
A: Yes, absolutely! This recipe is very forgiving. You can fold in about ½ cup of chopped walnuts or pecans along with the last addition of flour for added texture and flavor. Dried cranberries or chocolate chips could also be a delicious addition!
Happy Baking!
And there you have it – your very own homemade Date Cakes! We hope this detailed, beginner-friendly guide has demystified the baking process and given you the confidence to create something truly delicious. Remember, every bake is a learning experience, and even seasoned chefs have their off days. Don’t be afraid to experiment, and most importantly, have fun in the kitchen!
We can’t wait to hear how your date cakes turn out. Share your creations, enjoy the sweet rewards of your efforts, and keep baking!