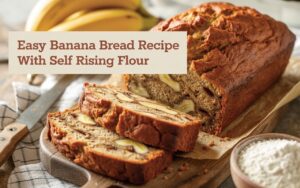
Whether you’re a complete novice or just looking for a straightforward, delicious method, this recipe is designed with you in mind. We’ll walk you through every step, providing valuable baking tips for beginners to ensure your success. Get ready to transform those overripe bananas into a masterpiece!
Ingredients List
Gathering your ingredients is the first step to baking success. Here’s what you’ll need for this simple, delicious banana bread:
| Ingredient | Quantity | Unit |
|---|---|---|
| Ripe Bananas (very spotty!) | 3-4 medium | |
| Granulated Sugar | 1/2 | cup |
| Large Egg | 1 | |
| Unsalted Butter, melted | 1/4 | cup |
| Vanilla Extract | 1 | teaspoon |
| Self-Rising Flour | 1 1/2 | cups |
| Ground Cinnamon (optional) | 1/2 | teaspoon |
| Chocolate Chips or Chopped Nuts (optional) | 1/2 | cup |
Step-by-Step Instructions: Bake Your Way to Banana Bread Perfection
Follow these detailed steps carefully, and you’ll be enjoying a slice of homemade banana bread in no time. We’ve included plenty of tips to guide beginners!
Step 1: Preheat and Prepare Your Pan
- Preheat your oven: Set your oven to 350°F (175°C). It’s crucial to bake in an oven that’s already at temperature for even cooking.
- Prepare your loaf pan: Take a 9×5-inch loaf pan. Grease it thoroughly with butter, cooking spray, or shortening. Then, lightly dust it with flour. This creates a non-stick barrier, ensuring your banana bread comes out easily without sticking. Tap out any excess flour.
Step 2: Mash Those Bananas!
- Get your ripe bananas: The riper, the better! Look for bananas with lots of brown spots or even entirely brown peels. These are sweeter and mash more easily.
- Mash them up: In a large mixing bowl, peel your bananas and place them in. Using a fork or a potato masher, mash the bananas thoroughly until mostly smooth. A few small lumps are perfectly fine and can add nice texture to the finished bread, but avoid large chunks.
Step 3: Mix the Wet Ingredients
- Add sugar and egg: To your mashed bananas, add the 1/2 cup of granulated sugar and the 1 large egg.
- Introduce melted butter and vanilla: Pour in the 1/4 cup of melted butter (make sure it’s cooled slightly so it doesn’t scramble the egg!) and the 1 teaspoon of vanilla extract. Vanilla adds a wonderful aroma and depth of flavor.
- Whisk until combined: Using a whisk or a sturdy fork, mix all these wet ingredients together really well until they are thoroughly combined and smooth. This ensures the sugar dissolves and the egg is fully incorporated.
Step 4: Incorporate the Dry Ingredients (The Self-Rising Secret!)
- Add self-rising flour: Now for the star of the show! Gently add the 1 1/2 cups of self-rising flour to the wet mixture. Remember, self-rising flour already contains baking powder and salt, so you don’t need to add them separately – that’s what makes this recipe so easy!
- (Optional) Add cinnamon: If you’re using 1/2 teaspoon of ground cinnamon, sprinkle it in now for an extra layer of warmth and flavor.
- (Optional) Stir in mix-ins: If you’re adding chocolate chips or chopped nuts (1/2 cup), fold them in now.
- Mix gently, do not overmix: This is a crucial step for beginners! Using a spatula or wooden spoon, gently fold the flour into the wet ingredients until *just combined*. You should stop mixing as soon as you no longer see streaks of dry flour. Overmixing develops the gluten in the flour too much, leading to a tough, dense, and chewy banana bread instead of a tender, moist one. A few small lumps of flour are better than overmixing!
Step 5: Pour into Pan and Bake
- Transfer the batter: Pour your beautifully mixed banana bread batter into the prepared 9×5-inch loaf pan. Use your spatula to spread it evenly.
- Bake until golden: Place the pan in your preheated oven. Bake for approximately 50-65 minutes. Baking times can vary depending on your oven, so keep an eye on it.
- Check for doneness: To check if it’s done, insert a toothpick or a thin knife into the center of the loaf. If it comes out clean or with only a few moist crumbs attached, your banana bread is ready! If it comes out with wet batter, continue baking for another 5-10 minutes and check again.
Step 6: Cool and Enjoy!
- Cool in the pan: Once baked, remove the banana bread from the oven. Let it cool in the pan on a wire rack for about 10-15 minutes. This allows the loaf to set up and makes it easier to remove without breaking.
- Transfer to a wire rack: After 10-15 minutes, carefully invert the pan to release the banana bread onto the wire rack. Let it cool completely before slicing. While it’s tempting to cut into it immediately, cooling allows the internal structure to firm up, preventing a gummy texture.
- Slice and serve: Once cooled, slice your delicious, moist banana bread and enjoy! It’s perfect on its own, with a pat of butter, or a smear of cream cheese.
Tips & Tricks for the Best Banana Bread
Even with an easy recipe, a few extra pointers can elevate your banana bread from good to absolutely amazing!
- Bananas are Key: Don’t skimp on ripeness! The browner and spottier your bananas are, the sweeter and more flavorful your bread will be. Under-ripe bananas won’t provide the same moisture or sweetness. If your bananas aren’t quite ripe enough, you can bake them on a baking sheet at 300°F (150°C) for 15-30 minutes until their peels are black – this sweetens them up quickly!
- Don’t Overmix the Batter: We can’t stress this enough! Overmixing develops gluten, which leads to a tough, dry, and chewy banana bread. Mix *just* until the dry ingredients are incorporated and no streaks of flour remain. A few lumps are fine!
- Room Temperature Ingredients: Ensure your egg and melted butter are at room temperature. This helps them incorporate more smoothly into the batter, creating a more uniform texture.
- Measure Flour Correctly: For accurate results, use the “spoon and level” method for flour. Spoon the self-rising flour into your measuring cup until it overflows, then level it off with the straight edge of a knife. Don’t pack it down or scoop directly from the bag, as this can add too much flour.
- Customize with Add-ins: Feel free to get creative! Stir in 1/2 cup of chocolate chips, chopped walnuts, pecans, or even shredded coconut for extra flavor and texture.
- Storage: Store leftover banana bread tightly wrapped in plastic wrap or in an airtight container at room temperature for up to 3 days, or in the refrigerator for up to a week.
- Freezing for Later: Banana bread freezes beautifully! Wrap individual slices or the whole loaf tightly in plastic wrap, then again in aluminum foil. Freeze for up to 3 months. Thaw at room temperature or gently warm in the microwave.
Essential Baking Tools
Having the right tools makes baking much easier and more enjoyable. Here are a few essentials you’ll need for this recipe:
- Mixing Bowl
- Whisk
- Baking Pan (9×5 inch loaf pan)
- Measuring Cups
- Spatula (rubber or silicone)
- Fork or potato masher
- Wire cooling rack
Nutrition Information (Estimated Per Slice)
Here’s an estimated nutritional breakdown for one slice (assuming 12 slices per loaf) of this delicious banana bread. Please note these are approximate values and can vary based on specific ingredient brands and exact measurements.
| Nutrient | Amount |
|---|---|
| Calories | ~260 kcal |
| Carbohydrates | ~45 g |
| Protein | ~4 g |
| Fat | ~10 g |
| Fiber | ~2 g |
| Sugar | ~25 g |
Frequently Asked Questions (FAQs)
Q1: Why use self-rising flour instead of all-purpose flour?
A: Self-rising flour is a fantastic shortcut! It already contains baking powder and salt, which are essential leavening agents and flavor enhancers. This means you don’t have to measure and add them separately, simplifying the recipe and reducing the chance of error – perfect for beginners!
Q2: My bananas aren’t very ripe. Can I still use them?
A: While very ripe (spotty or brown) bananas yield the best flavor and moisture, you can quick-ripen them. Place unpeeled bananas on a baking sheet and bake at 300°F (150°C) for 15-30 minutes, or until the peels are shiny and black. Let them cool, then proceed with mashing.
Q3: Can I add other mix-ins to this banana bread?
A: Absolutely! This recipe is very versatile. Feel free to stir in 1/2 cup of your favorite additions like chocolate chips, chopped walnuts, pecans, shredded coconut, or even a handful of dried cranberries. Just fold them in gently with the flour.
Q4: How do I know when the banana bread is fully cooked?
A: The best way is the “toothpick test.” Insert a wooden toothpick or a thin knife into the very center of the loaf. If it comes out clean or with only a few moist crumbs attached, it’s done. If it comes out with wet batter, continue baking for another 5-10 minutes and test again.
Q5: How should I store leftover banana bread?
A: To keep your banana bread fresh and moist, store it tightly wrapped in plastic wrap or in an airtight container. It will last for about 3-4 days at room temperature. For longer storage, you can refrigerate it for up to a week or freeze it for up to 3 months.
Conclusion: Your Delicious Banana Bread Journey Begins!
Congratulations! You’ve just created a mouth-watering, perfectly moist banana bread with minimal effort. This Easy Banana Bread Recipe With Self Rising Flour is truly a game-changer for anyone looking for straightforward and delicious easy baking recipes. We hope our detailed steps and baking tips for beginners have given you the confidence to enjoy baking. Don’t be afraid to experiment with your favorite add-ins, and remember, practice makes perfect! So go ahead, pour yourself a cup of coffee, grab a warm slice, and savor the sweet reward of your homemade creation. Happy baking!