Welcome, fellow baking enthusiasts and kitchen adventurers! If you’ve ever dreamt of filling your home with the irresistible aroma of freshly baked bread, but felt intimidated by the process, you’ve come to the right place. This Einkorn Sandwich Bread Recipe is specifically designed for beginners, guiding you through each step with clarity and encouragement. We’re going to demystify bread baking, making it one of your new favorite easy baking recipes.
Einkorn, an ancient grain, offers a unique, slightly nutty flavor and a wonderfully tender crumb that’s often easier for some people to digest compared to modern wheat. It’s truly a delight to work with, especially when you know a few key baking tips for beginners that we’ll share along the way. Get ready to impress yourself (and your taste buds) with a loaf of homemade goodness perfect for sandwiches, toast, or simply slathered with butter. Let’s get baking!
Ingredients List
Gather your ingredients! Using a kitchen scale for flour is always recommended for accuracy, but cup measurements are provided as well.
| Ingredient | Quantity | Unit |
|---|---|---|
| Warm Water (105-115°F / 40-46°C) | 1 | cup |
| Active Dry Yeast | 2 ¼ | teaspoons |
| Honey or Granulated Sugar | 1 | tablespoon |
| Einkorn All-Purpose Flour | 3 ½ – 4 | cups (approx. 420-480g) |
| Fine Sea Salt | 1 | teaspoon |
| Olive Oil or Melted Unsalted Butter | 2 | tablespoons |
Step-by-Step Instructions: Your Guide to Perfect Einkorn Bread
Follow these detailed steps carefully, and you’ll be enjoying warm, homemade bread in no time. Remember, bread baking is a journey, not a race – patience is your best friend!
Step 1: Activate the Yeast (The Magic Begins!)
- In a large mixing bowl, pour in the 1 cup of warm water. The temperature is crucial here – it should feel like a warm bath on your wrist, not too hot (which kills the yeast) and not too cold (which won’t activate it). Aim for 105-115°F (40-46°C).
- Sprinkle the 2 ¼ teaspoons of active dry yeast and the 1 tablespoon of honey or granulated sugar over the warm water. The sugar acts as food for the yeast, helping it to wake up.
- Gently stir once or twice, then let it sit undisturbed for 5-10 minutes. You’ll know your yeast is alive and well when it becomes foamy and bubbly on the surface. If it doesn’t foam, your yeast might be old or the water temperature was off, and it’s best to start again with fresh yeast. This step is crucial for a good rise!
Step 2: Combine the Dry Ingredients
- While your yeast is activating, in a separate medium-sized bowl, whisk together the 3 ½ cups of Einkorn all-purpose flour and the 1 teaspoon of fine sea salt. Whisking ensures the salt is evenly distributed throughout the flour.
- Beginner Tip: Einkorn flour is known for its lower gluten content compared to modern wheat, which means it behaves a bit differently. It absorbs liquid more slowly and can become sticky if over-hydrated. Start with 3 ½ cups and add more only if absolutely necessary during kneading.
Step 3: Mix the Dough
- Once your yeast mixture is foamy, add the 2 tablespoons of olive oil or melted butter to the wet ingredients.
- Gradually add the dry flour mixture to the wet ingredients, about a cup at a time, stirring with a sturdy spoon or a Danish dough whisk. Mix until a shaggy dough forms.
- Once most of the flour is incorporated, turn the dough out onto a lightly floured surface.
Step 4: Knead the Dough (Gentle Does It!)
- Einkorn dough requires a light touch. Unlike modern wheat doughs that benefit from vigorous kneading to develop strong gluten, Einkorn’s gluten structure is more delicate.
- Gently knead the dough for about 5-7 minutes. You’ll notice it’s softer and stickier than regular wheat dough. Resist the urge to add too much extra flour, as this can make your bread dry. A little stickiness is normal for Einkorn.
- The dough should become smoother and more elastic, but it won’t be as “windowpane” strong as traditional bread dough. It should still be soft and pliable.
- Common Mistake & Alternative: If the dough is too sticky to handle, lightly flour your hands or use a bench scraper to help you work it. If you have a stand mixer with a dough hook, you can mix on low speed for 5-6 minutes, but be careful not to overmix.
Step 5: First Rise (Bulk Fermentation)
- Lightly grease the same large mixing bowl (or a clean one) with a little olive oil.
- Place the kneaded dough into the bowl, turning it once to coat the entire surface with oil. This prevents it from drying out.
- Cover the bowl tightly with plastic wrap or a clean kitchen towel.
- Place the bowl in a warm, draft-free spot for its first rise. This usually takes 1 to 1.5 hours, but could be longer or shorter depending on your room temperature. A good spot is often a slightly warm oven (turned off!), or near a sunny window.
- The dough should roughly double in size. You’ll know it’s ready when you can gently press two fingers into the dough, and the indentations remain.
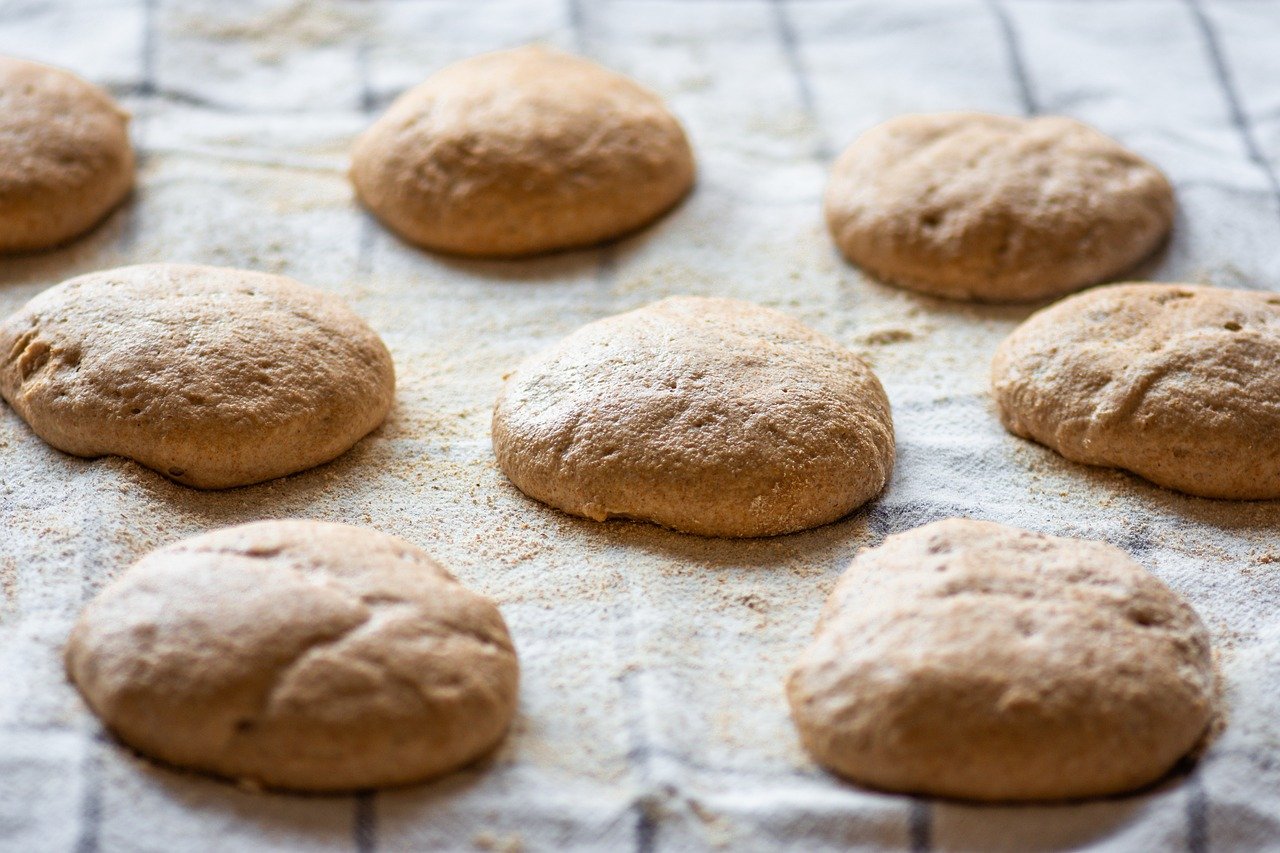
Step 6: Shape the Loaf
- Gently punch down the risen dough to release the air. This step is not about being aggressive; it’s about deflating it gently.
- Turn the dough out onto a lightly floured surface.
- Shape the dough into a rectangular loaf that will fit snugly into your 9×5-inch loaf pan. A common method is to gently flatten the dough into a rectangle, then fold the top third down, and the bottom third up, overlapping them. Then, gently roll it from one end to the other to create a tight cylinder. Pinch the seam closed at the bottom.
- Grease your 9×5-inch loaf pan with butter or oil, or line it with parchment paper for easy removal.
- Carefully place the shaped dough into the prepared loaf pan, seam-side down.
Step 7: Second Rise (Proofing)
- Cover the loaf pan loosely with plastic wrap or a clean kitchen towel.
- Return it to your warm, draft-free spot for its second rise. This will take about 30-45 minutes.
- The dough should again rise significantly, becoming puffy and almost reaching the top of the loaf pan. It may not quite double in size this time, but it should look light and airy.
- Beginner Tip: Don’t let it over-proof! If it rises too much, it can collapse in the oven. It should look noticeably larger but still have some structure.
Step 8: Bake Your Bread!
- About 15 minutes before the end of the second rise, preheat your oven to 375°F (190°C).
- Once the oven is preheated and the dough has completed its second rise, carefully place the loaf pan into the preheated oven.
- Bake for 30-40 minutes. The bread should be beautifully golden brown on top, and sound hollow when tapped on the bottom.
- For ultimate assurance, an instant-read thermometer inserted into the center of the loaf should read 200-210°F (93-99°C).
- Alternative: For a softer crust, you can brush the top of the loaf with a little milk before baking. For a slightly chewier crust, a light spray of water into the oven during the first 10 minutes of baking can help.
Step 9: Cool Completely (The Hardest Part!)
- Once baked, immediately remove the bread from the loaf pan and place it on a wire cooling rack.
- This step is crucial! Let the bread cool completely for at least 1.5-2 hours before slicing. Slicing too early traps steam, resulting in a gummy texture. Cooling allows the internal structure to set and the moisture to redistribute, giving you that perfect, tender crumb.
- Resist the temptation to cut into it right away – it’s worth the wait!
Tips & Tricks for Einkorn Bread Success
- Weigh Your Flour: For consistent results, especially with Einkorn, using a kitchen scale to measure flour (420-480g) is far more accurate than cup measurements. A cup of flour can vary widely depending on how it’s scooped.
- Water Temperature is Key: Always check your water temperature with a thermometer. Too hot kills the yeast; too cold won’t activate it. Aim for 105-115°F (40-46°C).
- Don’t Over-Knead Einkorn: Einkorn has weaker gluten than modern wheat. Over-kneading can break down its delicate structure, leading to a dense loaf. A gentle, shorter knead (5-7 minutes) is perfect.
- Create a Warm Rising Environment: If your kitchen is cool, find a warm spot for your dough to rise. A proofer setting on your oven, an oven with just the light on, or a warm spot near a vent can work wonders.
- Patience with Rising: Don’t rush the rising process. The dough needs time to develop flavor and texture. If your kitchen is cool, it might take longer than the recipe suggests. Look for the visual cues (doubled in size, puffy) rather than strictly adhering to the clock.
- Test for Doneness: Tapping the bottom for a hollow sound is a good indicator, but for absolute certainty, an internal temperature of 200-210°F (93-99°C) confirms your bread is fully baked.
- Cooling is Non-Negotiable: Seriously, let it cool completely! This prevents a gummy interior and ensures a perfect slice every time.
- Storage: Store your cooled bread in an airtight container or bread bag at room temperature for 3-4 days, or freeze sliced bread for longer storage.
Essential Baking Tools
Having the right tools makes the baking process so much smoother. Here are some essentials (with Amazon links for convenience!):
- Mixing Bowl (Large)
- Whisk (For dry ingredients)
- Loaf Baking Pan (9×5 inch is standard)
- Measuring Cups and Measuring Spoons (Or better yet, a Kitchen Scale!)
- Rubber Spatula or Danish Dough Whisk
- Wire Cooling Rack
- Instant-Read Thermometer (Optional, but highly recommended for accuracy)
Nutrition Information (Approximate Per Slice)
(Based on 12 slices per loaf, approximate values and may vary based on exact ingredients and measurements.)
| Nutrient | Amount |
|---|---|
| Calories | ~140 kcal |
| Carbohydrates | ~27 g |
| Protein | ~5 g |
| Fat | ~2.5 g |
| Fiber | ~2 g |
| Sugar | ~1.5 g |
Frequently Asked Questions (FAQs)
Here are some common questions beginners often ask when baking with Einkorn:
Q1: What is Einkorn flour and how is it different from regular flour?
A: Einkorn is an ancient variety of wheat, considered to be the oldest cultivated wheat. It has a simpler genetic structure (diploid) compared to modern wheat (hexaploid), which some people find easier to digest. It also has a slightly sweeter, nuttier flavor and a lower gluten content, resulting in a more delicate, less elastic dough that requires gentler handling.
Q2: My Einkorn dough feels very sticky. Is this normal?
A: Yes, Einkorn dough tends to be stickier and softer than dough made with modern wheat. Its gluten doesn’t develop in the same way, so it won’t achieve the same strong, elastic structure. Resist the urge to add excessive amounts of flour, as this will make your final bread dry. Lightly flouring your hands and work surface, or using a bench scraper, can help manage the stickiness.
Q3: Can I use instant yeast instead of active dry yeast?
A: Absolutely! If using instant yeast, you can typically skip the activation step (Step 1). Simply add the instant yeast directly to your dry ingredients, then combine with the wet ingredients. However, many beginners still prefer to activate instant yeast in warm water to ensure it’s alive and active before mixing. The quantity remains the same (2 ¼ teaspoons).
Q4: How do I know if my yeast is active and alive?
A: When you combine active dry yeast with warm water (105-115°F / 40-46°C) and a pinch of sugar, it should become visibly foamy and bubbly on the surface after 5-10 minutes. If there’s no foam, your yeast is likely dead (expired) or the water temperature was incorrect. In this case, it’s best to discard and start over with fresh yeast.
Q5: My bread didn’t rise much. What went wrong?
A: Several factors can cause poor rise: dead or inactive yeast, water that was too hot or too cold, insufficient kneading time (though too much for Einkorn can also be an issue!), a cold rising environment, or the dough simply wasn’t given enough time to rise. Reviewing these steps and ensuring all conditions are met will help improve your next loaf.
Q6: How should I store my homemade Einkorn bread?
A: Once completely cooled, store your Einkorn bread in an airtight container, a bread bag, or wrapped in plastic wrap at room temperature for up to 3-4 days. For longer storage, slice the cooled loaf and freeze the slices in a freezer-safe bag. You can then toast individual slices directly from the freezer.
Time to Enjoy Your Homemade Einkorn Sandwich Bread!
Congratulations, baker! You’ve successfully created a delicious, wholesome loaf of Einkorn Sandwich Bread. There’s truly nothing quite like the taste and satisfaction of bread baked from scratch, and with this recipe, you’ve mastered an ancient grain that offers incredible flavor and a delightful texture.
Don’t be afraid to experiment, and remember that every loaf is a learning experience. The more you bake, the more intuitive the process becomes. Now, go ahead and slice into that warm, fragrant loaf. Whether it’s for your morning toast, a hearty sandwich, or just a simple slice with butter, you’ll taste the effort and love you put into it. Enjoy your culinary creation, and happy baking!