
Welcome, aspiring bakers! Are you ready to embark on a delightful journey into the world of wholesome homemade bread? Today, we’re tackling the incredible ezekiel bread recipe. Often lauded for its nutritional benefits, Ezekiel bread is made from sprouted grains, which means the grains have begun to germinate, unlocking more nutrients and making them easier to digest. Don’t let the idea of sprouted grains intimidate you; this recipe is designed to be one of the most ezekiel bread recipe you’ll ever try, even if you’re a complete novice. We’ll walk you through every step with detailed ezekiel bread recipe, ensuring your first loaf is a resounding success. Get ready to fill your kitchen with the irresistible aroma of freshly baked, incredibly healthy bread!
Making your own Ezekiel bread from scratch is not only deeply satisfying but also allows you to control every ingredient, ensuring a pure, additive-free loaf. Forget the store-bought versions; the taste and texture of homemade are simply unparalleled. Plus, mastering this recipe will boost your confidence and open the door to many more exciting baking adventures. Let’s get started!
Ingredients List: What You’ll Need
Gathering your ingredients beforehand is key to a smooth baking process. Here’s everything you’ll need for your delicious homemade Ezekiel bread.
| Quantity | Unit | Ingredient |
|---|---|---|
| 1 ½ | cups | Warm Water (105-115°F / 40-46°C) |
| 2 ¼ | teaspoons | Active Dry Yeast or Instant Yeast (one standard packet) |
| 2 | tablespoons | Honey or Maple Syrup (or other liquid sweetener) |
| 1 ½ | teaspoons | Fine Sea Salt |
| 2 | tablespoons | Olive Oil (plus extra for greasing) |
| 3 ½ – 4 | cups | Sprouted Whole Wheat Flour (or a blend of sprouted grain flours like Ezekiel 4:9 flour) |
| ¼ | cup | Vital Wheat Gluten (optional, but highly recommended for better texture with sprouted flours) |
Step-by-Step Instructions: Your Path to Perfect Bread

Follow these detailed steps carefully, and you’ll be enjoying warm, homemade Ezekiel bread in no time!
Step 1: Activate the Yeast
- In a large mixing bowl, pour in 1 ½ cups of warm water. The temperature is crucial here: it should feel warm to the touch, like a baby’s bath, but not hot. Too hot will kill the yeast, too cold won’t activate it. Aim for 105-115°F (40-46°C).
- Sprinkle the 2 ¼ teaspoons of active dry yeast over the water.
- Add 1 tablespoon of the honey or maple syrup to the water. This gives the yeast a little food to get started.
- Gently stir once or twice, then let it sit for 5-10 minutes. You should see a foamy, bubbly layer form on top. This is a sign that your yeast is alive and active! If you don’t see bubbles, your yeast might be old or the water temperature was off. Don’t proceed until your yeast is bubbly; it’s better to start fresh with new yeast.
Step 2: Combine Wet Ingredients
- Once your yeast is active, add the remaining 1 tablespoon of honey/maple syrup, 1 ½ teaspoons of fine sea salt, and 2 tablespoons of olive oil to the yeast mixture.
- Stir well to combine all the wet ingredients.
Step 3: Add Dry Ingredients
- In a separate bowl, whisk together the 3 ½ cups of sprouted whole wheat flour and the ¼ cup of vital wheat gluten (if using). The vital wheat gluten is especially helpful with sprouted flours as they tend to have less gluten development naturally, giving your bread a better rise and texture.
- Gradually add the flour mixture to the wet ingredients, about 1 cup at a time, mixing with a wooden spoon or spatula until just combined after each addition.
- Once most of the flour is incorporated, the dough will be shaggy and sticky. Turn it out onto a lightly floured surface.
- **Beginner Tip:** Don’t dump all the flour in at once. You might not need all of it, or you might need a tiny bit more, depending on humidity and your specific flour. Hold back ½ cup of flour and add it only if the dough is too sticky during kneading.
Step 4: Knead the Dough
- Now comes the fun part: kneading! Kneading develops the gluten in the flour, which gives the bread its structure and chewiness. Push the dough away from you with the heels of your hands, fold it back over, rotate it, and repeat.
- Knead for 8-10 minutes. The dough will start sticky, but as you knead, it will become smoother, more elastic, and less sticky. It should bounce back slowly when you gently poke it with your finger.
- **Common Mistake:** Over-kneading can make the dough tough, but it’s harder to do by hand. Under-kneading is more common for beginners and results in a dense, crumbly loaf. Keep kneading until it feels smooth and elastic.
- **Alternative:** If you have a stand mixer with a dough hook, you can knead on low speed for 6-8 minutes, or until the dough clears the sides of the bowl.
Step 5: First Rise (Bulk Fermentation)
- Lightly grease a clean large bowl with olive oil.
- Place the kneaded dough into the greased bowl, turning it once to coat the top with oil (this prevents it from drying out).
- Cover the bowl tightly with plastic wrap or a clean kitchen towel.
- Place the bowl in a warm, draft-free spot. A slightly warm oven (turned off, or warmed briefly to 100°F and then turned off) or simply on top of your fridge works well.
- Let the dough rise for 1-1.5 hours, or until it has roughly doubled in size. The exact time will depend on the temperature of your kitchen.
- **Beginner Tip:** Don’t rush this step! The first rise (bulk fermentation) is crucial for flavor development and texture.
Step 6: Punch Down and Shape
- Once the dough has doubled, gently punch it down to release the air. This redistributes the yeast and evens out the temperature.
- Turn the dough out onto a lightly floured surface.
- Gently shape the dough into a loaf. For a standard loaf pan (8.5 x 4.5 inches or 9 x 5 inches), flatten the dough into a rectangle, about the length of your pan.
- Fold the top third of the dough down to the center, then fold the bottom third up and over that, creating a log. Pinch the seam closed.
- Roll the log gently to create an even shape, then place it seam-side down into a lightly greased loaf pan.
Step 7: Second Rise (Proofing)
- Cover the loaf pan loosely with plastic wrap or a clean kitchen towel.
- Return the pan to your warm, draft-free spot for the second rise.
- Let it rise for another 30-45 minutes, or until the dough has risen significantly and is about 1 inch above the rim of the pan. It should look puffy and feel light.
- **Beginner Tip:** To test if your dough is adequately proofed, gently press a floured finger into the dough about ½ inch deep. If the indentation springs back slowly, it’s ready. If it springs back immediately, it needs more time. If it collapses, it’s over-proofed (but still bakeable, just might be a bit flatter).
Step 8: Preheat Oven and Bake
- About 15-20 minutes before the end of the second rise, preheat your oven to 375°F (190°C).
- Once preheated and the dough is ready, carefully place the loaf pan into the preheated oven.
- Bake for 30-35 minutes, or until the crust is golden brown and the internal temperature of the bread reaches 200-210°F (93-99°C) when measured with an instant-read thermometer.
- **Beginner Tip:** If the top is browning too quickly, you can loosely tent it with aluminum foil for the last 10-15 minutes of baking.
Step 9: Cool and Enjoy!
- Once baked, immediately remove the bread from the loaf pan and transfer it to a wire cooling rack. This prevents the bottom crust from getting soggy.
- Let the bread cool completely for at least 1-2 hours before slicing. Slicing hot bread can make it gummy and difficult to cut cleanly.
- Enjoy your freshly baked, wholesome homemade Ezekiel bread!
Tips & Tricks for Baking Success
Baking bread is a craft, and a few simple tips can make all the difference, especially for beginners!
- Measure Accurately: Especially with flour, it’s best to weigh it using a kitchen scale for precise results. If using measuring cups, fluff the flour in its container, then spoon it into the measuring cup and level off with a straight edge (the “spoon and level” method). Never pack it down!
- Water Temperature is Key: As mentioned, yeast is sensitive. Use a thermometer to ensure your water is in the sweet spot (105-115°F / 40-46°C). This is one of the most common reasons for yeast not activating.
- Don’t Rush the Rise: Patience is a virtue in bread baking. The rising process (proofing) is crucial for flavor, texture, and a good rise. Let the dough take its time in a warm, draft-free environment.
- Check for Doneness: The best way to tell if bread is fully baked is by its internal temperature. A good loaf of bread should reach between 200-210°F (93-99°C). This prevents a doughy center.
- Cool Completely: Resist the urge to slice into your warm loaf immediately. Cooling allows the internal structure of the bread to set and moisture to redistribute, resulting in a much better texture and easier slicing.
- Storage: Store your cooled Ezekiel bread in an airtight container at room temperature for 3-4 days. For longer storage, slice the loaf and freeze the slices, then toast them directly from frozen.
Essential Baking Tools
Having the right tools makes the baking process much smoother and more enjoyable. Here are a few essentials:
- Mixing Bowl
- Whisk
- Baking Pan (Loaf Pan)
- Measuring Cups & Measuring Spoons
- Spatula
- Kitchen Scale (highly recommended for accuracy)
- Instant-Read Thermometer (for water and bread)
- Wire Cooling Rack
Nutrition Info (per slice, estimated for 12 slices per loaf)
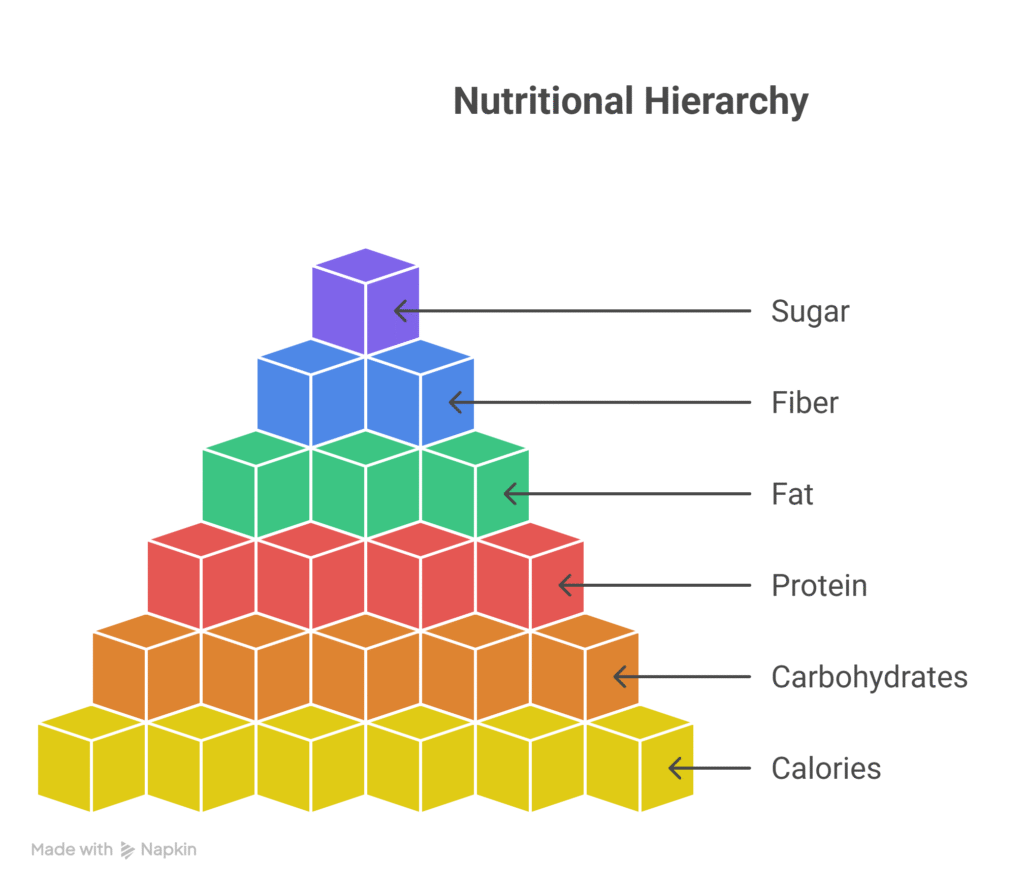
This is an estimate based on the ingredients provided. Actual values may vary slightly depending on specific brands and exact measurements.
| Nutrient | Amount |
|---|---|
| Calories | 140-160 kcal |
| Carbohydrates | 25-30g |
| Protein | 6-8g |
| Fat | 2-3g |
| Fiber | 4-5g |
| Sugar | 2-3g |
Frequently Asked Questions (FAQs)
Q1: Can I make this Ezekiel bread recipe without vital wheat gluten?
A: Yes, you can, but the texture might be denser and the rise less impressive. Sprouted flours tend to have weaker gluten development naturally. Vital wheat gluten helps compensate for this, giving you a lighter, chewier loaf. If you omit it, you might need to knead a bit longer.
Q2: How do I know if my yeast is active?
A: After sprinkling yeast over warm water with a touch of sugar/honey and letting it sit for 5-10 minutes, you should see a foamy, bubbly layer form on the surface. If there are no bubbles, your yeast is likely inactive (either dead or too old) and you should start over with fresh yeast.
Q3: My dough isn’t rising. What went wrong?
A: The most common culprits are inactive yeast (see Q2), water that was too hot or too cold, or a kitchen that’s too cold. Ensure your water temperature is correct and your rising spot is warm and draft-free. Sometimes it just needs more time!
Q4: Can I use regular whole wheat flour instead of sprouted whole wheat flour?
A: While you can use regular whole wheat flour, it won’t be true Ezekiel bread, which specifically uses sprouted grains. The nutritional benefits and flavor profile will differ. If you’re a beginner, regular whole wheat flour might be slightly easier to work with, but we highly recommend trying sprouted for the authentic experience.
Q5: How should I store homemade Ezekiel bread?
A: Once completely cooled, store your Ezekiel bread in an airtight container or a bread bag at room temperature for 3-4 days. For longer storage (up to 3 months), slice the loaf and freeze the slices. You can then toast them directly from frozen.
Q6: Can I use a stand mixer for this recipe?
A: Absolutely! A stand mixer with a dough hook attachment can make the kneading process much easier. Mix on low speed for 6-8 minutes after combining the ingredients, or until the dough is smooth and elastic and clears the sides of the bowl. Be careful not to overmix.
Conclusion: Your Homemade Bread Journey Begins!
Congratulations! You’ve just taken a fantastic step into the rewarding world of homemade baking. This ezekiel bread recipe is more than just a list of instructions; it’s an invitation to create something truly nourishing and delicious with your own hands. Don’t worry if your first loaf isn’t picture-perfect; every bake is a learning experience. The most important thing is that you tried, and you’ve created something wholesome for yourself and your loved ones.
So, slice into that warm, fragrant loaf, spread some avocado or your favorite nut butter, and savor the taste of your accomplishment. We hope this beginner-friendly guide has equipped you with the confidence and knowledge to continue your baking adventures. Happy baking, and enjoy your incredibly healthy, homemade Ezekiel bread! We’d love to hear about your baking journey in the comments below!
3 thoughts on “ezekiel bread recipe – Step-by-Step Guide”