This comprehensive guide is designed specifically with baking tips for beginners in mind, breaking down every step to ensure your first (or fiftieth!) loaf of German Rye Bread is a resounding success. Forget store-bought; get ready to impress yourself and your loved ones with a hearty, flavorful, and perfectly textured loaf that’s ideal for sandwiches, toast, or simply slathered with butter. Let’s get baking!
Ingredients for Your Perfect German Rye Loaf
Gathering your ingredients accurately is the first crucial step to any successful bake. Here’s what you’ll need for a delicious loaf of German Rye Bread:
| Ingredient | Quantity | Unit |
|---|---|---|
| Warm Water (105-115°F / 40-46°C) | 1 ¾ | cups |
| Active Dry Yeast | 2 ¼ | teaspoons (1 packet) |
| Granulated Sugar or Molasses | 1 | tablespoon |
| Rye Flour (Dark or Medium) | 2 | cups |
| All-Purpose Flour or Bread Flour | 2 | cups |
| Salt | 1 ½ | teaspoons |
| Caraway Seeds (optional, but highly recommended) | 1 | tablespoon |
| Vegetable Oil or Butter (for greasing) | 1 | teaspoon |
Step-by-Step Instructions: Baking Your German Rye Bread
Follow these detailed steps carefully, and you’ll be enjoying warm, homemade rye bread in no time!
Step 1: Activate the Yeast (The Wake-Up Call)
- In a large mixing bowl (or the bowl of your stand mixer), combine the **warm water** (make sure it’s between 105-115°F / 40-46°C – it should feel warm to the touch, like bathwater, but not hot!), **granulated sugar or molasses**, and **active dry yeast**.
- **Beginner Tip:** The temperature of the water is critical! If it’s too cold, the yeast won’t activate. If it’s too hot, you’ll kill it. Use a kitchen thermometer if you’re unsure.
- Stir gently and let the mixture sit for **5-10 minutes**. You’re looking for a foamy, bubbly layer to form on the surface. This foam is proof that your yeast is alive and ready to work its magic! If it doesn’t foam, your yeast might be old or the water temperature was off – it’s best to start over.
Step 2: Combine the Dry Ingredients
- While the yeast is activating, in a separate medium bowl, whisk together the **rye flour**, **all-purpose flour (or bread flour)**, **salt**, and **caraway seeds** (if using). Whisking ensures an even distribution of ingredients.
- **Beginner Tip:** When measuring flour, spoon it into your measuring cup and then level it off with a straight edge (like a knife). Don’t scoop directly from the bag, as this can compact the flour and lead to too much being added.
Step 3: Mix the Dough (Bringing it All Together)
- Once your yeast mixture is foamy, add the combined dry ingredients to the wet ingredients in the large mixing bowl.
- Using a sturdy spoon or a dough hook on a stand mixer, mix until all the flour is incorporated and a shaggy dough forms. It will look a bit rough and sticky at this stage.
- Alternative (Stand Mixer): If using a stand mixer, attach the dough hook and mix on low speed for about 2 minutes until everything is just combined.
Step 4: Knead the Dough (Developing the Gluten)
Kneading is essential for developing gluten, which gives bread its structure and chewiness.
- By Hand: Turn the shaggy dough out onto a lightly floured surface. Knead for 8-10 minutes. The technique involves pushing the dough away with the heels of your hands, folding it back over itself, rotating it a quarter turn, and repeating.
- Beginner Tip: Don’t be afraid to get your hands messy! The dough will be sticky at first, but as you knead, it will become smoother and more elastic. Resist the urge to add too much extra flour, as this can make your bread dry. Only add enough to prevent sticking.
- How to Tell When It’s Done: The dough should be smooth, elastic, and spring back slowly when gently poked with a finger. You can also try the “windowpane test”: pull a small piece of dough and stretch it thin enough to see light through it without tearing.
- Stand Mixer: If using a stand mixer, continue to knead on medium-low speed with the dough hook for 6-8 minutes. The dough should clear the sides of the bowl and become smooth and elastic.
Step 5: First Rise (Bulk Fermentation)
- Lightly grease a clean large bowl with a teaspoon of vegetable oil or melted butter.
- Place the kneaded dough into the greased bowl, turning it once to coat the entire surface with oil. This prevents it from drying out.
- Cover the bowl tightly with plastic wrap or a clean kitchen towel.
- Place the bowl in a warm, draft-free spot. A slightly warm oven (turned off, but perhaps preheated to 100°F/38°C and then turned off) or simply on top of your refrigerator are good options.
- Let the dough rise for 1 to 1 ½ hours, or until it has doubled in size.
- Common Mistake: Impatience! Don’t rush this step. The first rise is crucial for flavor development and texture. If your kitchen is cool, it might take longer.
Step 6: Shape the Loaf (Turning Dough into Bread)
- Once doubled, gently punch down the dough to release the air. This is called “degassing.”
- Turn the dough out onto a lightly floured surface.
- Gently shape the dough into a rectangular loaf. You can do this by flattening it slightly, then folding the sides towards the middle, and finally rolling it up tightly from one end to the other, pinching the seam closed at the bottom. This creates tension for a good rise.
- **Beginner Tip:** Don’t overwork the dough at this stage. Be gentle to maintain some of the air pockets.
Step 7: Second Rise (Proofing)
- Lightly grease a 9×5-inch (23×13 cm) loaf pan.
- Carefully place the shaped dough seam-side down into the prepared loaf pan.
- Cover the loaf pan loosely with plastic wrap or a clean kitchen towel.
- Place it back in your warm, draft-free spot for another **45-60 minutes**, or until the dough has nearly doubled in size again and looks puffy.
- **How to Tell When It’s Ready:** Gently poke the dough with a floured finger. If the indentation springs back slowly, it’s ready. If it springs back quickly, it needs more time. If it collapses, it’s over-proofed (though still usually salvageable!).
Step 8: Preheat Oven & Bake!
- About 15-20 minutes before the end of the second rise, preheat your oven to **375°F (190°C)**.
- Once preheated and the dough is ready, you can optionally score the top of the loaf with a sharp knife or bread lame (a razor blade) a few times. This helps control where the bread expands and gives it a professional look.
- Place the loaf pan in the center of the preheated oven.
- Bake for **35-45 minutes**.
- **How to Tell When It’s Done:** The crust should be deeply golden brown and sound hollow when tapped on the bottom. For ultimate accuracy, use an instant-read thermometer – the internal temperature should reach **200-210°F (93-99°C)**.
Step 9: Cool (The Hardest Part!)
- Once baked, immediately remove the bread from the loaf pan and transfer it to a wire cooling rack.
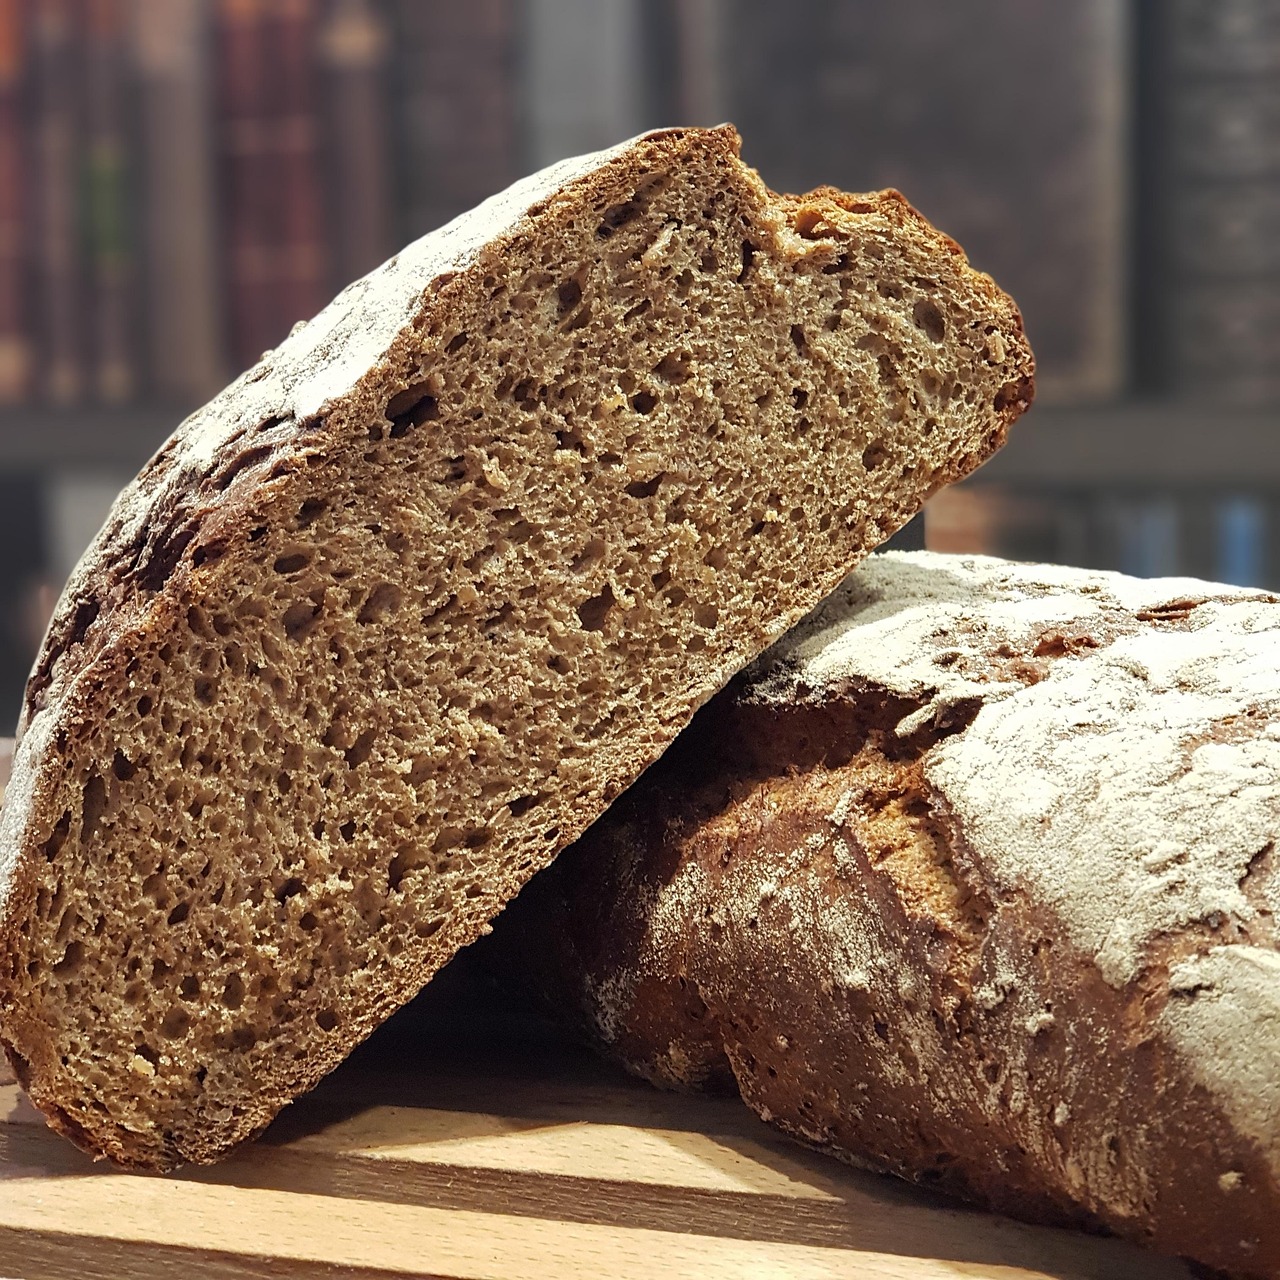
- This is critical for rye bread: Let the bread cool completely for at least 2-3 hours, or even longer, before slicing. Rye bread’s crumb continues to set and firm up as it cools. Slicing too early will result in a gummy, dense texture.
- Resist the temptation to cut into it right away! Your patience will be rewarded with a perfect slice.
Tips & Tricks for Beginner Bread Bakers
Baking bread is a journey, and these actionable tips will help you along the way:
- Accuracy is Key: Invest in a kitchen scale for measuring flour by weight (grams) if you want consistent results. It’s more accurate than volume measurements.
- **Embrace the Stickiness:** Don’t panic if your dough feels sticky. That’s often a sign of good hydration. Only add minimal extra flour during kneading if absolutely necessary to prevent sticking, as too much flour makes dense, dry bread.
- **Yeast Lifespan:** Always check the expiration date on your yeast. Old yeast is inactive yeast, and inactive yeast means no rise. Store it in an airtight container in the fridge or freezer to prolong its life.
- **Listen to Your Dough:** The clock is a guide, but your dough tells you when it’s ready. If your kitchen is cold, rises will take longer. If it’s warm, they’ll be quicker. Look for the visual cues (doubled in size, puffy) rather than rigidly sticking to times.
- **Don’t Over-Proof:** While under-proofing is common, over-proofing can also be an issue. If your dough rises beautifully and then collapses when you touch it or put it in the oven, it’s likely over-proofed.
- **Cooling is Non-Negotiable:** Especially with rye bread, cooling completely allows the starches to fully set, preventing a gummy texture. Patience here will significantly improve your bread’s quality.
- **Experiment with Add-ins:** Once you’re comfortable, try adding different seeds (sunflower, flax), dried fruits, or even a touch of cocoa powder for a darker, richer flavor.
Essential Baking Tools for Your Kitchen
Having the right tools makes the baking process smoother and more enjoyable. Here are some essentials:
- Mixing Bowl
- Whisk
- Baking Pan (9×5 inch loaf pan)
- Measuring Cups
- Measuring Spoons
- Spatula or Dough Scraper
- Instant-Read Kitchen Thermometer (optional, but highly recommended)
- Wire Cooling Rack
Nutrition Information (per slice, approx. 1/12th of loaf)
Please note that these values are estimates and can vary based on specific ingredients and preparation methods.
| Nutrient | Amount |
|---|---|
| Calories | 180-200 kcal |
| Carbohydrates | 35-40 g |
| Protein | 6-8 g |
| Fat | 1-2 g |
| Fiber | 3-5 g |
| Sugar | 2-4 g |
Frequently Asked Questions About German Rye Bread
Q1: Why didn’t my bread rise?
A: The most common culprits are inactive yeast (check the expiration date!), water that was too hot (killed the yeast) or too cold (didn’t activate it), or a drafty environment during the rising periods. Ensure your water temperature is correct and your rising spot is warm and still.
Q2: Can I use only rye flour?
A: While you can make 100% rye bread, it will be much denser and have a different texture (often very compact, not as airy). The combination of rye and all-purpose/bread flour in this recipe creates a lighter, more approachable loaf for beginners, offering a good balance of flavor and texture.
Q3: How do I know if my bread is fully baked?
A: The crust should be a deep golden brown, and when you tap the bottom of the loaf, it should sound hollow. For the most accurate measure, an instant-read thermometer inserted into the center of the loaf should read between 200-210°F (93-99°C).
Q4: Can I add other seeds or nuts to this recipe?
A: Absolutely! Once you’re comfortable with the basic recipe, feel free to experiment. Sunflower seeds, flax seeds, or even chopped walnuts can add wonderful texture and flavor. Stir them in during Step 3 with the dry ingredients.
Q5: How should I store homemade German Rye Bread?
A: Store the cooled bread at room temperature in an airtight container, a bread box, or a sealed plastic bag. It will stay fresh for 3-5 days. For longer storage, slice the cooled bread and freeze it in a freezer-safe bag for up to 3 months. Toast slices directly from frozen.
Q6: What’s the difference between light, medium, and dark rye flour?
A: The difference lies in how much of the bran and germ are removed during milling. Light rye flour has most of it removed, resulting in a milder flavor and lighter color. Dark rye flour retains more bran and germ, giving it a stronger, more robust flavor and a darker hue. Medium rye is a balance between the two. This recipe works well with medium or dark rye for authentic flavor.
Enjoy Your Homemade German Rye Bread!
Congratulations, baker! You’ve just created a magnificent loaf of German Rye Bread from scratch. There’s immense satisfaction in pulling a warm, fragrant loaf from your own oven, and this recipe proves that homemade bread is well within reach, even for those just starting their baking journey.
Don’t be discouraged if your first loaf isn’t picture-perfect; every bake is a learning experience. The most important ingredient is always patience and a willingness to try. Slice it thick, slather it with butter, pile on your favorite deli meats, or simply enjoy its hearty flavor on its own. We hope this guide has given you the confidence and the baking tips for beginners you needed to succeed. Happy baking, and enjoy your delicious creation!