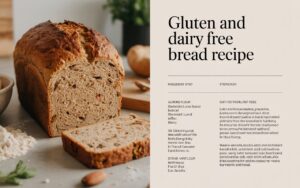
Are you new to baking, or perhaps navigating the world of dietary restrictions and feeling a little intimidated by bread making? Fret no more! This Gluten And Dairy Free Bread Recipe is designed specifically for you. We understand that finding delicious, reliable, and easy-to-follow easy baking recipes can be a challenge, especially when dealing with gluten and dairy sensitivities. But guess what? Baking a fantastic loaf of bread from scratch, even without gluten or dairy, is absolutely achievable!
This recipe breaks down every step, offering clear instructions and plenty of baking tips for beginners to ensure your first (or fiftieth!) loaf is a resounding success. Forget dense, crumbly gluten-free bread – prepare for a soft, flavorful, and wonderfully textured loaf that will have everyone asking for more. Get ready to impress yourself and your loved ones with this simple yet satisfying bread. Let’s get baking!

Ingredients You’ll Need
Gathering your ingredients before you start is one of the best **baking tips for beginners**. It ensures a smooth and stress-free baking experience!
| Ingredient | Quantity | Unit |
|---|---|---|
| Warm Water (105-115°F / 40-46°C) | 1 ½ | cups |
| Granulated Sugar | 2 | tablespoons |
| Instant Yeast | 2 ¼ | teaspoons (1 standard packet) |
| All-Purpose Gluten-Free Flour Blend (with xanthan gum)* | 3 | cups |
| Salt | 1 | teaspoon |
| Olive Oil (or other neutral oil like canola/vegetable) | ¼ | cup |
| Apple Cider Vinegar (optional, for tender crumb) | 1 | tablespoon |
*Note on Gluten-Free Flour: Make sure your chosen all-purpose gluten-free flour blend already contains xanthan gum. If it doesn’t, add ½ teaspoon of xanthan gum to the dry ingredients for this recipe. This gum is crucial for giving gluten-free bread its structure and elasticity, mimicking the role of gluten.
Step-by-Step Instructions: Your Easy Gluten And Dairy Free Bread Recipe Journey
Follow these detailed steps carefully, and you’ll be enjoying homemade bread in no time!
Step 1: Activate the Yeast (The “Proofing” Stage)
- Prepare the Warm Water: Measure out 1 ½ cups of warm water. The temperature is key here – it should feel comfortably warm to the touch, like a baby’s bath. If it’s too hot, it will kill the yeast; too cold, and the yeast won’t activate. A thermometer can be helpful here, aiming for 105-115°F (40-46°C).
- Combine with Sugar: Pour the warm water into a large mixing bowl. Add the 2 tablespoons of granulated sugar. Stir gently until the sugar dissolves. The sugar provides food for the yeast.
- Add the Yeast: Sprinkle the 2 ¼ teaspoons (one packet) of instant yeast over the sugar water. Do not stir it in immediately. Let it sit undisturbed for 5-10 minutes.
- Observe for Activity: After 5-10 minutes, you should see a foamy, bubbly layer form on the surface of the water. This is a sign that your yeast is alive and active! If you don’t see any foam, your water might have been too hot or too cold, or your yeast might be old. In this case, it’s best to discard and start again with fresh yeast and carefully measured water temperature. This is a crucial first step for successful bread.
Step 2: Combine Wet Ingredients
- Add Oil and Vinegar: Once your yeast is foamy, add the ¼ cup of olive oil (or your chosen neutral oil) and the optional 1 tablespoon of apple cider vinegar to the yeast mixture. The vinegar helps to tenderize the gluten-free crumb and can subtly enhance the flavor. Give it a quick stir to combine.
Step 3: Mix Dry Ingredients
- Measure Flour: In a separate medium-sized bowl, measure out 3 cups of your all-purpose gluten-free flour blend. Level off the top of your measuring cup with a straight edge (like a knife) for accuracy. This prevents adding too much flour, which can lead to dry bread.
- Add Salt: Stir in the 1 teaspoon of salt with the flour. Salt is important for flavor and helps regulate the yeast’s activity.
- (Optional) Add Xanthan Gum: If your gluten-free flour blend does NOT contain xanthan gum, add ½ teaspoon of xanthan gum to the dry ingredients now and stir it in well.
Step 4: Combine Wet and Dry Ingredients to Form Dough
- Gradually Add Dry to Wet: Slowly add the dry flour mixture to the wet yeast mixture in the large bowl, a cup at a time, stirring with a sturdy spoon or a stand mixer with a paddle attachment on low speed.
- Mix Thoroughly: Continue mixing until all the flour is incorporated and you have a thick, sticky dough. Unlike traditional wheat dough, gluten-free bread dough is often quite wet and sticky – it won’t form a smooth, elastic ball. Don’t be tempted to add more flour! Over-flouring is a common mistake that leads to dry, dense gluten-free bread. Mix for about 3-5 minutes, ensuring there are no dry pockets of flour. The dough should be smooth but still very soft and sticky.
Step 5: Prepare for the First Rise (Proofing)
- Grease Your Pan: Lightly grease a standard 9×5 inch (23×13 cm) loaf pan with oil or cooking spray. Ensure you get into all the corners.
- Transfer Dough: Using a spatula (it will be sticky!), scrape the dough into the prepared loaf pan.
- Smooth the Top: Gently smooth the top of the dough with the back of a wet spoon or wet fingertips. This helps create an even crust.
- First Rise Location: Cover the loaf pan loosely with plastic wrap or a clean kitchen towel. Place the pan in a warm, draft-free spot for its first rise. A slightly warm oven (turned off, with just the light on) or a sunny spot on your counter works well.
- Let it Rise: Allow the dough to rise for 45-60 minutes, or until it has nearly doubled in size and looks puffy. The exact time will depend on the warmth of your environment. Be patient; this rise is crucial for the bread’s texture.
Step 6: Preheat and Prepare for Baking
- Preheat Oven: About 15-20 minutes before the end of the rising time, preheat your oven to 375°F (190°C). Make sure the oven rack is in the middle position.
Step 7: Bake the Bread
- Bake Initial Phase: Once the oven is preheated and the dough has risen, carefully remove the plastic wrap/towel. Place the loaf pan in the preheated oven.
- Bake Time: Bake for 35-45 minutes.
- Check for Doneness: The bread is done when the crust is golden brown and sounds hollow when tapped on the bottom. For extra certainty, you can use an instant-read thermometer; the internal temperature should reach 200-210°F (93-99°C). If the top is browning too quickly, you can loosely tent it with aluminum foil for the last 10-15 minutes of baking.
Step 8: Cool the Bread
- Cool in Pan: Once baked, remove the loaf pan from the oven and let it cool in the pan for 10-15 minutes on a wire cooling rack. This allows the bread to set and makes it easier to remove.
- Cool Completely: After 10-15 minutes, carefully invert the pan to remove the loaf and place it directly on the wire rack to cool completely. This step is extremely important for gluten-free bread! Cutting into it too soon will result in a gummy texture. Resist the urge to slice it for at least 1-2 hours, or until it’s completely cooled to room temperature. Patience is a virtue here!
Congratulations! You’ve just baked a delicious **Gluten And Dairy Free Bread Recipe** from scratch. Enjoy it toasted, with your favorite spread, or as a side to a meal!
Tips & Tricks for Gluten-Free Bread Baking Success
Baking gluten-free can be a little different, but these **baking tips for beginners** will set you up for success!
- Accurate Measuring is Key: Especially with gluten-free flour, slight variations can impact the final texture. Use measuring cups and spoons accurately, and for flour, spoon it into the cup and level it off.
- Water Temperature Matters: Always check your water temperature for yeast activation. Too hot kills the yeast; too cold won’t activate it. The “baby bath” test (comfortably warm to the touch) is a good indicator if you don’t have a thermometer.
- Don’t Add More Flour: Gluten-free dough is inherently stickier than wheat dough. Resist the urge to add more flour, even if it feels very wet. This extra moisture is what keeps gluten-free bread from becoming dry and crumbly.
- Patience with Rising: Gluten-free dough often rises a bit slower and less dramatically than traditional dough. Give it the full time, and ensure it’s in a warm, draft-free spot.
- Cool Completely: This is arguably the most critical tip for gluten-free bread. Cutting into a warm loaf can lead to a gummy texture. Let it cool completely on a wire rack for at least 1-2 hours.
- Store Properly: Once completely cooled, store your bread in an airtight container at room temperature for 2-3 days, or slice and freeze for longer storage.
- Xanthan Gum is Your Friend: If your GF flour blend doesn’t include it, always add it. It provides the elasticity and structure that gluten would normally offer.
- Embrace the Stickiness: Don’t try to knead gluten-free dough like regular bread dough. It’s more like a thick batter. A spatula or wet hands are your best tools.
Essential Baking Tools
Having the right tools makes the baking process so much easier and more enjoyable. Here are some essentials:
- Mixing Bowl (large, for combining ingredients)
- Whisk (for dry ingredients)
- Baking Pan (standard 9×5 inch loaf pan)
- Measuring Cups and Measuring Spoons (for accuracy)
- Spatula (for scraping and smoothing dough)
- Wire Cooling Rack (essential for proper cooling)
- Kitchen Thermometer (optional, but very helpful for water temperature and internal bread temperature)
Nutrition Information (Estimated per slice, approx. 1/12th of loaf)
Please note: These are estimated values and can vary based on specific brands of ingredients used.
| Nutrient | Amount |
|---|---|
| Calories | 140-160 kcal |
| Carbohydrates | 25-30 g |
| Protein | 2-3 g |
| Fat | 4-6 g |
| Fiber | 1-2 g |
| Sugar | 1-2 g |
Frequently Asked Questions (FAQs)
Q1: My bread didn’t rise. What went wrong?
A: The most common reasons for bread not rising are inactive yeast (water was too hot or too cold, or yeast was old/expired) or a cold, drafty environment during the rise. Always check for foam after adding yeast to warm, sugary water to ensure it’s active. Make sure your rising spot is warm and still.
Q2: Can I use a different type of gluten-free flour?
A: This recipe is developed for an all-purpose gluten-free flour blend that typically contains a mix of rice flours, tapioca starch, potato starch, and often xanthan gum. Using single-ingredient flours (like just almond or coconut flour) will not work as a direct 1:1 substitute without significant recipe adjustments, as they absorb liquids very differently.
Q3: How do I store this Gluten And Dairy Free Bread?
A: Once completely cooled, store the bread in an airtight container or bread bag at room temperature for 2-3 days. For longer storage, slice the loaf and freeze the slices in a freezer-safe bag for up to 2-3 months. You can then toast slices directly from frozen.
Q4: My bread turned out gummy. Why?
A: A gummy texture is a very common issue with gluten-free bread if it’s cut too soon. It needs to cool completely to allow the starches to set. Make sure you let it cool for at least 1-2 hours, or even longer, before slicing. Also, ensure you didn’t add too much liquid or bake at too low a temperature.
Q5: Can I add seeds or herbs to this recipe?
A: Absolutely! For extra flavor and texture, you can fold in ½ cup of seeds (like sunflower, pumpkin, or flax seeds) or 1-2 tablespoons of dried herbs (like rosemary or Italian seasoning) with the dry ingredients. Get creative!
Q6: Do I need a stand mixer for this recipe?
A: While a stand mixer with a paddle attachment makes the mixing process easier, it’s not strictly necessary. You can achieve excellent results by mixing the dough thoroughly with a sturdy wooden spoon or a strong spatula. Just be prepared for a good arm workout!
Your Gluten-Free Baking Adventure Begins Now!
You’ve made it! This Gluten And Dairy Free Bread Recipe is not just about baking bread; it’s about building confidence in your kitchen, especially when navigating dietary needs. Don’t be discouraged if your first loaf isn’t absolutely perfect – every baker has learning curves. The most important thing is to enjoy the process and the delicious reward of homemade bread.
Now, go forth, bake, and savor every wholesome, dairy-free, and gluten-free slice. We can’t wait to hear about your baking success!