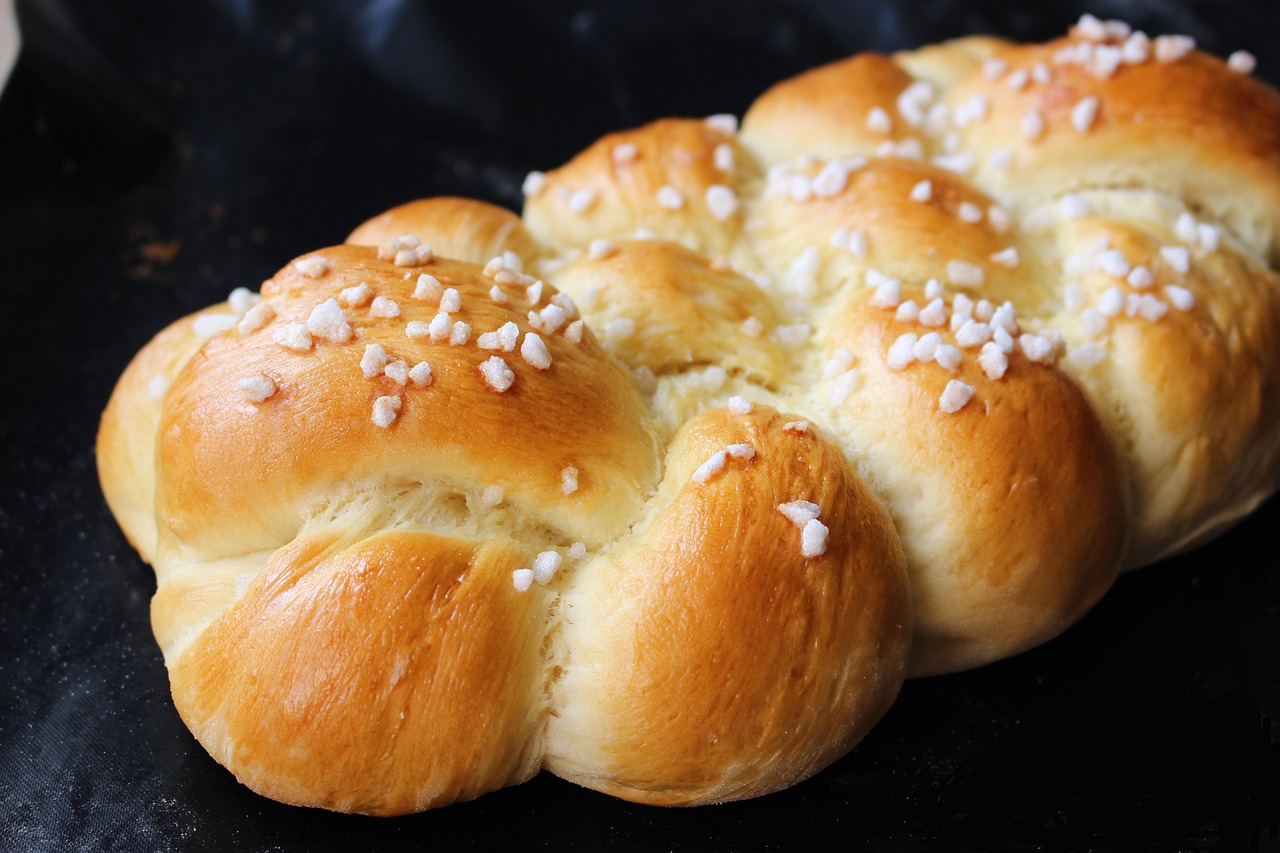
Are you ready to bake something truly special that will impress everyone, including yourself? Often, the thought of baking brioche, let alone a Gluten Free Brioche Bread Recipe, can feel daunting, especially for those new to the kitchen. But what if I told you that achieving that golden, tender, and rich crumb is not only possible but enjoyable, even for beginners? This recipe is designed to be your ultimate guide to creating a show-stopping gluten-free brioche that rivals its traditional counterpart. Forget the myths about complex gluten-free baking; we’re here to prove that with the right approach and a few baking tips for beginners, you can master this decadent bread. So, tie on your apron, gather your ingredients, and let’s embark on an exciting journey to bake one of the most rewarding easy baking recipes you’ll ever try!
This comprehensive guide breaks down every step, offering clear instructions and helpful insights to ensure your success. You’ll learn how to handle gluten-free dough, understand the nuances of proofing, and achieve that perfect, buttery texture. Get ready to fill your home with the incredible aroma of freshly baked brioche – a true testament to your newfound baking prowess!
Ingredients You’ll Need
Using high-quality, room-temperature ingredients is key to the success of this **Gluten Free Brioche Bread Recipe**. Make sure your eggs, milk, and butter are at room temperature for optimal mixing and rising.
| Ingredient | Quantity | Unit |
|---|---|---|
| Gluten-Free All-Purpose Flour Blend (with xanthan gum) | 350 | grams |
| Granulated Sugar | 50 | grams |
| Active Dry Yeast | 7 | grams (approx. 2 1/4 teaspoons or 1 sachet) |
| Salt | 5 | grams (approx. 1 teaspoon) |
| Large Eggs (room temperature) | 3 | |
| Whole Milk (lukewarm, 105-115°F / 40-46°C) | 60 | ml |
| Unsalted Butter (room temperature, cubed) | 120 | grams |
| Xanthan Gum (only if your flour blend does NOT contain it) | 1/2 | teaspoon |
| Egg Yolk (for egg wash) | 1 | |
| Water (for egg wash) | 1 | tablespoon |
Step-by-Step Instructions: Baking Your Gluten-Free Brioche
Follow these detailed steps carefully, and you’ll be amazed at how easily you can create this beautiful bread. Remember, patience is your best friend in baking!
Step 1: Activate Your Yeast
- In a small bowl, combine the **lukewarm milk** (make sure it’s not too hot, or it will kill the yeast!) with 1 teaspoon of the granulated sugar and the active dry yeast.
- Gently whisk them together.
- Let this mixture sit for 5-10 minutes. You should see it become foamy and bubbly on top – this means your **yeast is active and ready to go!** If it doesn’t foam, your yeast might be old, or your milk might have been too hot/cold. Start again with fresh yeast.
Step 2: Combine Dry Ingredients
- In the bowl of a stand mixer fitted with the paddle attachment (or a large mixing bowl if mixing by hand), whisk together the **gluten-free all-purpose flour blend**, the remaining granulated sugar, salt, and xanthan gum (if using).
- Make sure these ingredients are thoroughly combined to ensure even distribution throughout the dough.
Step 3: Mix the Dough
- Add the **three room-temperature large eggs** one at a time to the dry ingredients, mixing on low speed until just combined after each addition.
- Pour in the activated yeast mixture.
- Mix on low speed until a shaggy dough forms.
- Increase the speed to medium-low and continue to mix for about 5 minutes. The dough will be quite sticky, which is normal for gluten-free brioche. It won’t develop gluten like traditional dough, but this mixing helps hydrate the flour and build structure.
Step 4: Incorporate the Butter
- Reduce the mixer speed to low.
- Add the cubed, room-temperature unsalted butter to the dough, one cube at a time. Wait until each cube is mostly incorporated before adding the next. This process can take a little time, so be patient!
- Once all the butter is added, increase the mixer speed to medium-low and continue to mix for another 8-10 minutes. The dough will become smoother, very soft, and still quite sticky, but it should pull away from the sides of the bowl slightly. It will be much softer than traditional brioche dough.
- Beginner Tip: Don’t be tempted to add more flour here! Gluten-free dough is naturally stickier, and adding more flour will result in a dry, dense brioche.
Step 5: First Rise (Bulk Fermentation)
- Lightly grease a large bowl with a neutral oil or cooking spray.
- Scrape the dough into the greased bowl.
- Cover the bowl tightly with plastic wrap or a clean kitchen towel.
- Place the bowl in a warm, draft-free place for 1.5 to 2 hours, or until the dough has roughly doubled in size. A warm oven (turned off, with just the light on) or a sunny spot on your counter works well.
- Common Mistake: Rushing the rise! This step is crucial for flavor and texture. If your kitchen is cool, it might take longer. Don’t worry about the clock; watch the dough’s size.
Step 6: Chill the Dough (Essential for Handling)
- Once the dough has doubled, gently punch it down to deflate it slightly.
- Re-cover the bowl with plastic wrap and place it in the refrigerator for at least 4 hours, or preferably overnight (up to 12-18 hours).
- Why Chill? Chilling the dough makes it much firmer and easier to handle, especially for shaping. This is a non-negotiable step for beautiful brioche, gluten-free or not!
Step 7: Shape Your Brioche
- Lightly grease a 9×5 inch loaf pan.
- On a lightly floured surface (use a little extra GF flour, but sparingly), gently turn out the chilled dough.
- Divide the dough into 3 equal pieces. You can use a kitchen scale for precision.
- For each piece, gently roll it into a ball, then into a log shape about 8-9 inches long.
- Arrange the three logs side-by-side in your prepared loaf pan. You can also braid them if you’re feeling adventurous, but logs are simpler for beginners.
- Alternative Shaping: For individual brioche buns, divide the dough into 8-10 equal pieces, shape each into a ball, and place them in a greased muffin tin or on a baking sheet.
Step 8: Second Rise (Proofing)
- Cover the loaf pan loosely with plastic wrap or a clean kitchen towel.
- Place it back in a warm, draft-free place for another 1 to 1.5 hours, or until the dough has risen significantly and looks puffy. It should nearly fill the pan.
- Beginner Tip: Again, don’t rush this! The second rise (proofing) gives your brioche its final lift and airy texture. Gently poke the dough with a floured finger; if it springs back slowly, it’s ready. If it springs back immediately, it needs more time. If it collapses, it’s over-proofed (but still salvageable for toast!).
Step 9: Prepare for Baking
- Preheat your oven to 375°F (190°C).
- In a small bowl, whisk together the egg yolk and water for the egg wash.
- Once the brioche has finished its second rise, gently brush the top with the egg wash. Be careful not to deflate the dough! The egg wash will give your brioche that beautiful golden, shiny crust.
Step 10: Bake Your Brioche
- Place the loaf pan in the preheated oven.
- Bake for 30-35 minutes, or until the brioche is deep golden brown on top and sounds hollow when tapped on the bottom.
- If the top starts to brown too quickly, you can loosely tent it with aluminum foil for the last 10-15 minutes of baking.
- How to check for doneness: An internal temperature of 200-205°F (93-96°C) is ideal for bread. A digital thermometer is a great baking tip for beginners.
Step 11: Cool and Enjoy!
- Once baked, remove the brioche from the oven and let it cool in the pan for about 10-15 minutes.
- Carefully remove the brioche from the pan and transfer it to a wire rack to cool completely before slicing.
- Why cool completely? Slicing warm brioche can make it gummy and compromise its texture. Patience here will be rewarded!
- Serve warm with butter, jam, or as a base for French toast. Enjoy your amazing homemade Gluten Free Brioche Bread Recipe!
Tips & Tricks for Gluten-Free Brioche Success
Baking gluten-free can be a little different, but these actionable tips will help you achieve perfect results every time with your Gluten Free Brioche Bread Recipe:
- Use a Kitchen Scale: For baking, especially gluten-free, precision is paramount. Measuring by weight (grams) rather than volume (cups) ensures consistent and accurate results. It’s one of the best baking tips for beginners for consistent success.
- Room Temperature Ingredients are Non-Negotiable: Cold butter and eggs won’t emulsify properly with the dough, leading to a lumpy texture and poor rise. Plan ahead and take them out of the fridge at least an hour before you start.
- Don’t Rush the Rise: Proofing is where the magic happens! Allow your dough the full time it needs to double in size. A warm, draft-free environment is key. If your kitchen is cool, a slightly warmed (then turned off) oven with the light on can be a perfect proofing box.
- Understand Gluten-Free Dough Texture: Gluten-free dough is naturally stickier and less elastic than traditional wheat dough. Don’t be alarmed or tempted to add excessive amounts of extra flour during mixing or shaping, as this will dry out your brioche. A light dusting of GF flour on your work surface is usually sufficient for shaping.
- Check Your Yeast: Always ensure your yeast is active (foamy) before adding it to your dry ingredients. Inactive yeast is a common culprit for dense, flat bread.
- Oven Thermometer: Oven temperatures can vary widely. An inexpensive oven thermometer will help you ensure your oven is truly at the temperature you set, preventing under or over-baking.
- Chill the Dough Thoroughly: The chilling step is vital for gluten-free brioche. It firms up the dough, making it much easier to handle and shape without it becoming a sticky mess.
- Patience During Butter Incorporation: Adding butter slowly and allowing it to fully incorporate makes for a rich, smooth dough. Don’t rush this step.
Essential Baking Tools
Having the right tools makes all the difference, especially when tackling a new **Gluten Free Brioche Bread Recipe**. Here are some essentials that will make your baking journey smoother and more enjoyable:
- Mixing Bowl: You’ll need at least one large mixing bowl for your dough, preferably with a lid or plastic wrap for proofing.
- Whisk: Essential for combining dry ingredients and activating yeast.
- Baking Pan: A standard 9×5 inch loaf pan is perfect for this recipe.
- Measuring Cups & Spoons: While a scale is preferred, these are still handy for smaller quantities.
- Spatula: A sturdy rubber spatula is great for scraping down the bowl and handling sticky dough.
- Stand Mixer with Paddle Attachment: Highly recommended for brioche dough due to its stickiness and the need for prolonged mixing.
- Kitchen Scale: For precise measurement of ingredients, ensuring consistent results every time.
- Wire Rack: Crucial for cooling your brioche completely to prevent a soggy bottom and achieve the best texture.
- Pastry Brush: For applying that beautiful egg wash evenly.
Nutrition Information (Estimated per serving)
Please note that these values are estimates and can vary based on specific ingredient brands and serving sizes. This estimate is based on approximately 12 servings per loaf.
Dietary Fiber1-2g
| Nutrient | Amount |
|---|---|
| Calories | 280-320 kcal |
| Total Carbohydrates | 35-45g |
| Sugars | 10-15g |
| Protein | 6-8g |
| Total Fat | 15-20g |
| Saturated Fat | 9-12g |
Frequently Asked Questions (FAQs)
1. Why is my gluten-free brioche dough so sticky?
Gluten-free doughs are inherently stickier than traditional wheat-based doughs because they lack the elastic gluten network. This is completely normal! Resist the urge to add too much extra flour, as it will make your brioche dry. Chilling the dough thoroughly (Step 6) is crucial for making it manageable for shaping.
2. Can I make this Gluten Free Brioche dairy-free?
Yes, you can! Substitute the whole milk with a plain, unsweetened dairy-free milk alternative (like almond or oat milk). For butter, use a high-quality, plant-based butter substitute that comes in stick form (not spread). Ensure your gluten-free flour blend is also dairy-free.
3. How do I know if my yeast is active?
After mixing the yeast with lukewarm milk and a little sugar, it should become foamy and bubbly on the surface within 5-10 minutes. If you don’t see any foam, your yeast is likely inactive (either old or killed by too hot water), and you should discard it and start again with fresh yeast.
4. My brioche didn’t rise well. What went wrong?
Several factors can affect the rise: inactive yeast, cold ingredients, a too-cold proofing environment, or not giving the dough enough time to rise. Ensure your milk is lukewarm, ingredients are at room temperature, and your proofing spot is warm and draft-free. Patience is key for both rises!
5. How long does homemade gluten-free brioche last? How should I store it?
Gluten-free brioche is best enjoyed fresh on the day it’s baked. However, you can store it in an airtight container at room temperature for 2-3 days. For longer storage, slice the cooled brioche and freeze the slices in a freezer-safe bag or container for up to 2-3 months. Reheat gently in a toaster or oven.
6. Can I make this recipe in a bread machine?
While some bread machines have a gluten-free setting, this recipe is specifically designed for a stand mixer and oven baking to achieve the best brioche texture. The high fat content and specific rising steps might not translate perfectly to all bread machines. For your first attempt, sticking to the outlined method is recommended.
Your Gluten-Free Brioche Adventure Awaits!
Congratulations, aspiring baker! You’ve just explored the path to creating a magnificent Gluten Free Brioche Bread Recipe that’s rich, tender, and incredibly satisfying. We hope this detailed, beginner-friendly guide has demystified the process and given you the confidence to tackle this truly rewarding bake. Remember, every master baker started with their first loaf, and the journey is just as delicious as the destination.
Don’t be afraid to experiment and make this recipe your own. Whether you’re enjoying a slice with your morning coffee, turning it into the most luxurious French toast, or simply marveling at your creation, this brioche is a testament to what you can achieve in your kitchen. So go ahead, preheat that oven, and let the aroma of freshly baked gluten-free brioche fill your home. We can’t wait to hear about your success!