
Hello, fellow baking enthusiasts and welcome to your next delightful kitchen adventure! If you’re looking for a dessert that’s bright, cheerful, and absolutely packed with flavor, you’ve come to the right place. Today, we’re diving into the wonderful world of the Golden Oreo Cake Recipe. This isn’t just any cake; it’s a celebration of that iconic golden cookie, transformed into a moist, tender cake layered with dreamy Golden Oreo buttercream. And the best part? It’s one of the most easy baking recipes out there, perfect even if you’re just starting your baking journey.
I remember my first attempts at baking a mix of excitement and a little bit of fear! That’s why I’ve packed this post with all the necessary details and plenty of helpful baking tips for beginners to ensure your Golden Oreo Cake turns out perfectly every single time. Get ready to impress your friends and family (or just yourself!) with this unbelievably delicious and surprisingly simple cake. Let’s get baking!
Ingredients You’ll Need
Gathering your ingredients before you start is a crucial step for any baker, especially beginners. It helps ensure you have everything on hand and makes the baking process much smoother. Here’s what you’ll need for your Golden Oreo Cake and the luscious buttercream:
For the Golden Oreo Cake:
| Ingredient | Quantity | Unit |
|---|---|---|
| All-Purpose Flour | 2 ½ | cups |
| Granulated Sugar | 1 ¾ | cups |
| Baking Powder | 1 | tablespoon |
| Salt | ½ | teaspoon |
| Unsalted Butter (softened) | ½ | cup (1 stick) |
| Large Eggs (room temperature) | 3 | |
| Vanilla Extract | 2 | teaspoons |
| Buttermilk (room temperature) | 1 ¼ | cups |
| Golden Oreo Cookies (crushed) | 15-20 | cookies |
For the Golden Oreo Buttercream:
| Ingredient | Quantity | Unit |
|---|---|---|
| Unsalted Butter (softened) | 1 ½ | cups (3 sticks) |
| Powdered Sugar (confectioners’ sugar) | 5-6 | cups |
| Vanilla Extract | 2 | teaspoons |
| Heavy Cream or Milk | 3-5 | tablespoons |
| Golden Oreo Cookies (finely crushed) | 10-12 | cookies |
| Whole Golden Oreo Cookies (for garnish, optional) | 5-6 | cookies |
Step-by-Step Instructions for Your Golden Oreo Cake
Ready to turn those ingredients into a masterpiece? Follow these detailed steps, and remember, baking is a journey, not a race. Take your time, and enjoy the process!
Part 1: Baking the Golden Oreo Cake Layers
- Prepare Your Oven and Pans:
- Preheat your oven to 350°F (175°C).
- Grease and flour two 8-inch round cake pans. This is a crucial step to prevent your cake from sticking! You can also line the bottoms with parchment paper for extra insurance. A little non-stick cooking spray followed by a light dusting of flour, tapping out the excess, works wonders.
- Combine Dry Ingredients:
- In a large bowl, whisk together the all-purpose flour, granulated sugar, baking powder, and salt. Whisking ensures all the leavening agents (like baking powder) are evenly distributed, leading to a nicely risen cake.
- Beginner Tip: When measuring flour, spoon it lightly into your measuring cup and then level it off with a straight edge (like the back of a knife). Don’t pack it down or scoop directly from the bag, as this can lead to too much flour and a dry cake!
- Cream Butter and Sugar:
- In a separate large bowl, or the bowl of a stand mixer fitted with the paddle attachment, cream together the softened unsalted butter and granulated sugar on medium speed until the mixture is light and fluffy. This usually takes about 3-5 minutes. This process incorporates air, which makes your cake tender.
- Beginner Tip: Make sure your butter is truly softened, but not melted! It should yield easily to a gentle press but still hold its shape. Room temperature ingredients (butter, eggs, buttermilk) emulsify better, creating a smoother batter and a more consistent cake texture.
- Add Eggs and Vanilla:
- Add the large eggs, one at a time, mixing well after each addition. Scrape down the sides of the bowl with a spatula after each egg to ensure everything is incorporated.
- Stir in the vanilla extract.
- Alternate Dry and Wet Ingredients:
- With the mixer on low speed, gradually add the dry ingredient mixture to the wet mixture, alternating with the buttermilk. Start and end with the dry ingredients. For example, add about one-third of the flour mixture, mix until just combined, then half the buttermilk, mix, then another third of flour, the remaining buttermilk, and finally the last third of flour.
- Beginner Tip: Mix only until just combined! Overmixing develops the gluten in the flour, which can lead to a tough, dense cake. A few small lumps are perfectly fine.
- Buttermilk Alternative: If you don’t have buttermilk, you can easily make your own! Add 1 tablespoon of lemon juice or white vinegar to a liquid measuring cup, then fill it up to the 1 ¼ cup line with regular milk. Let it sit for 5-10 minutes until it slightly curdles.
- Fold in Golden Oreos:
- Gently fold in the crushed Golden Oreo cookies using a spatula. You want distinct pieces of cookie in your cake, so don’t crush them into powder. A quick pulse in a food processor or placing them in a Ziploc bag and crushing with a rolling pin works well.
- Bake the Cake Layers:
- Divide the batter evenly between the two prepared cake pans.
- Bake for 28-32 minutes, or until a wooden skewer or toothpick inserted into the center of the cakes comes out clean or with a few moist crumbs attached.
- Beginner Tip: Avoid opening the oven door too early, especially in the first 20 minutes, as this can cause the cakes to sink.
- Cool Completely:
- Let the cakes cool in their pans on a wire rack for about 10-15 minutes.
- Then, carefully invert them onto the wire rack to cool completely. This is crucial! Attempting to frost warm cakes will result in melted frosting and a messy situation. Patience is key here – let them cool for at least 1-2 hours, or even longer.
Part 2: Making the Golden Oreo Buttercream
- Cream Butter:
- In a large bowl or the bowl of a stand mixer with the paddle attachment, beat the softened unsalted butter on medium speed until creamy and smooth, about 2-3 minutes.
- Add Powdered Sugar:
- Gradually add the powdered sugar, about 1 cup at a time, mixing on low speed until combined after each addition. Once most of the sugar is in, increase the speed to medium and beat until light and fluffy, scraping down the sides of the bowl as needed. This usually takes another 3-5 minutes.
- Beginner Tip: Start with the mixer on low speed when adding powdered sugar to avoid a “sugar cloud” explosion in your kitchen!
- Add Vanilla and Liquid:
- Stir in the vanilla extract.
- Then, add the heavy cream or milk, 1 tablespoon at a time, until your buttercream reaches your desired consistency. You want it smooth, spreadable, but not too runny.
- Fold in Crushed Oreos:
- Finally, gently fold in the finely crushed Golden Oreo cookies. For frosting, you’ll want these crushed a bit finer than for the cake batter, but still with some texture.
Part 3: Assembling and Decorating Your Golden Oreo Cake
- Level the Cake Layers (Optional but Recommended for Beginners):
- If your cake layers have a domed top, you can use a serrated knife to carefully level them. This creates a flat surface for stacking and a more professional-looking cake.
- Crumb Coat:
- Place one cooled cake layer on your serving plate or cake stand.
- Spread a thin layer of buttercream over the top and sides of this first layer. This is called a “crumb coat,” and its purpose is to trap any loose crumbs, preventing them from mixing into your final frosting layer.
- Place the second cake layer on top.
- Apply another thin layer of buttercream over the entire cake (top and sides).
- Chill the cake in the refrigerator for 15-20 minutes. This allows the crumb coat to firm up.
- Final Frosting:
- Once the crumb coat is firm, apply a generous layer of the remaining Golden Oreo buttercream to the top and sides of the cake. Use an offset spatula or a butter knife to spread and smooth the frosting to your liking. Don’t worry if it’s not absolutely perfect; rustic looks are charming too!
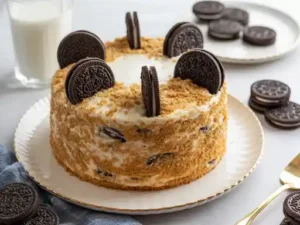
- Decorate:
- Garnish with whole or extra crushed Golden Oreo cookies on top or around the base of the cake for a beautiful finish.
- Serve and Enjoy:
- Slice into generous portions and enjoy your homemade Golden Oreo Cake!
Tips & Tricks for Baking Success
Baking can seem daunting, but with a few simple tricks, you’ll be baking like a pro in no time. Here are some extra nuggets of wisdom to help you master this Golden Oreo Cake Recipe and beyond:
- Room Temperature is Your Best Friend: This isn’t just a suggestion, it’s a rule! Butter, eggs, and buttermilk at room temperature combine more easily and create a smoother, more emulsified batter, leading to a lighter, fluffier cake. Take them out of the fridge at least 30-60 minutes before you start.
- Measure Accurately: Baking is a science. Use proper measuring cups and spoons. For dry ingredients like flour, spoon it into the cup and level it off with a straight edge. For liquids, use clear liquid measuring cups at eye level.
- Don’t Overmix: Once you add the flour to your wet ingredients, mix only until just combined. Overmixing develops gluten, which can make your cake tough and chewy. A few small lumps are okay!
- The Crumb Coat is Essential: This thin layer of frosting, chilled before applying the final layer, locks in all those pesky crumbs. It’s the secret to a smooth, professional-looking frosted cake.
- Cool Completely: I can’t stress this enough! Frosting a warm cake is a recipe for disaster. Wait until your cake layers are completely cool to the touch before even thinking about applying frosting.
- Good Quality Vanilla: A good vanilla extract makes a surprising difference in the flavor of your cake and frosting. Invest in a quality brand.
- Patience with Frosting: If your buttercream seems too stiff, add a tiny bit more heavy cream or milk (half a teaspoon at a time). If it’s too thin, add more powdered sugar. It’s all about adjusting to get the perfect consistency.
- Clean Pans: Always make sure your cake pans are thoroughly greased and floured. This simple step prevents sticking and frustration.
Essential Baking Tools
Having the right tools makes all the difference, especially when you’re just starting. Here are a few essentials that will make your Golden Oreo Cake baking experience much easier:
- Mixing Bowl
- Whisk
- Baking Pan (specifically 8-inch round cake pans)
- Measuring Cups & Spoons
- Spatula (rubber and offset for frosting)
- Electric Mixer (handheld or stand mixer)
- Wire Rack (for cooling)
- Parchment Paper (optional, but highly recommended for lining pans)
Nutrition Information (Estimated Per Serving)
Please note that this nutrition information is an estimate based on the ingredients used and assumes 12 servings per cake. Actual values may vary depending on exact ingredient brands and portion sizes.
| Nutrient | Amount |
|---|---|
| Calories | 480 kcal |
| Total Carbohydrates | 68g |
| Protein | 5g |
| Total Fat | 22g |
| Dietary Fiber | 1g |
| Total Sugars | 45g |
Frequently Asked Questions
1. Can I use regular Oreo cookies instead of Golden Oreos?
Absolutely! While this recipe specifically highlights the Golden Oreo flavor, you can certainly swap them out for classic chocolate Oreos, or even other flavored Oreos like mint or peanut butter. Just be aware that the overall flavor profile of your cake will change, but it will still be delicious!
2. How do I know if my cake is fully baked?
The most reliable method is the “toothpick test.” Insert a wooden skewer or toothpick into the center of the cake layers. If it comes out clean or with only a few moist crumbs attached, your cake is done. If it comes out with wet batter, continue baking for a few more minutes and test again.
3. My cake turned out dry. What went wrong?
A dry cake is often a result of overbaking. Keep a close eye on your oven and use the toothpick test. Other culprits can include using too much flour (always spoon and level!), not enough liquid, or forgetting to add a key moistening ingredient like buttermilk or eggs. Ensure all ingredients are measured precisely.
4. How should I store the Golden Oreo Cake?
Store your Golden Oreo Cake in an airtight container at room temperature for up to 2-3 days. If you live in a warm climate or want to extend its freshness, you can store it in the refrigerator for up to 5 days. Just be sure to bring it to room temperature for about 30 minutes before serving for the best texture and flavor.
5. Can I make this recipe into cupcakes?
Yes, you can! This recipe works wonderfully for cupcakes. Line a muffin tin with paper liners and fill each about two-thirds full with batter. The baking time will be significantly shorter, usually around 18-22 minutes. Keep an eye on them and use the toothpick test for doneness.
Time to Enjoy Your Golden Oreo Masterpiece!
And there you have it – your very own homemade Golden Oreo Cake! We hope this detailed, beginner-friendly guide has given you the confidence and all the tools you need to create a truly delicious dessert. Baking, especially for the first time, is an incredibly rewarding experience. There’s nothing quite like the smell of a fresh cake baking in your oven and the joy of sharing it with loved ones.
Don’t be afraid to experiment, have fun, and most importantly, enjoy every step of the process. Whether it’s for a special occasion or just a sweet treat to brighten your day, this Golden Oreo Cake is sure to be a hit. We can’t wait to hear how yours turned out! Happy baking!