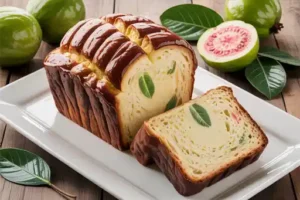
Imagine a moist, tender loaf infused with the exotic, sweet-tart flavor of guava, perhaps even swirled with a ribbon of creamy cheese. Sounds heavenly, right? This recipe is incredibly forgiving, making it perfect for practicing your baking tips for beginners. We’ll walk you through each step with clear instructions, ensuring your Guava Bread turns out perfectly every single time. Get ready to impress yourself and your loved ones with this tropical delight!
Ingredients for Your Guava Bread
Gather your ingredients! Having everything measured and ready before you start is one of the best habits for any baker. It makes the process smoother and more enjoyable.
For the Guava Bread Batter:
| Quantity | Unit | Ingredient |
|---|---|---|
| 2 | cups | All-Purpose Flour |
| 1 | cup | Granulated Sugar |
| 2 | teaspoons | Baking Powder |
| ½ | teaspoon | Salt |
| 2 | large | Eggs |
| ½ | cup | Whole Milk (or 2% milk) |
| ½ | cup | Vegetable Oil (or melted unsalted butter) |
| 1 | teaspoon | Vanilla Extract |
| 6-8 | ounces | Guava Paste (dulce de guayaba), sliced thin or diced |
For the Optional Cream Cheese Swirl (Highly Recommended!):
| Quantity | Unit | Ingredient |
|---|---|---|
| 4 | ounces | Cream Cheese, softened |
| 2 | tablespoons | Granulated Sugar |
| 1 | large | Egg Yolk |
| ¼ | teaspoon | Vanilla Extract |
Step-by-Step Instructions: Baking Your Guava Bread
Follow these detailed steps, and you’ll be enjoying warm, homemade guava bread in no time!
Step 1: Prepare Your Oven and Pan
- Preheat Your Oven: Set your oven to 350°F (175°C). Giving your oven time to fully preheat ensures even baking from the start.
- Prepare Your Loaf Pan: Grease a standard 9×5-inch loaf pan with butter or cooking spray. For extra easy removal, you can also line it with parchment paper, leaving an overhang on the long sides to use as “handles.” This is a fantastic trick for beginners!
Step 2: Combine Dry Ingredients
- In a large mixing bowl, whisk together the all-purpose flour, granulated sugar, baking powder, and salt.
- Beginner Tip: When measuring flour, use the “spoon and level” method. Spoon flour into your measuring cup until it overflows, then use a straight edge (like the back of a knife) to level it off. Don’t pack the flour into the cup, as this can lead to a dry, dense bread.
- Give it a good whisk for about 30 seconds to ensure the baking powder and salt are evenly distributed. This prevents pockets of unmixed ingredients in your final loaf.
Step 3: Combine Wet Ingredients
- In a separate medium bowl, whisk together the eggs, milk, vegetable oil (or melted butter), and vanilla extract until well combined and smooth.
- Beginner Tip: Ensure your eggs and milk are at room temperature. This helps them incorporate more smoothly into the batter, creating a more uniform texture. If you forgot, you can quickly warm eggs in a bowl of warm water for 5-10 minutes.
Step 4: Combine Wet and Dry Mixtures
- Pour the wet ingredients into the dry ingredients.
- Using a spatula or a wooden spoon, mix until just combined. It’s crucial not to overmix! Overmixing develops the gluten in the flour too much, which can result in a tough, chewy, or dry bread. A few lumps in the batter are perfectly fine – they’ll disappear during baking.
Step 5: Prepare Your Guava Paste
- If your guava paste is very firm, you might want to slightly warm it in the microwave for 10-15 seconds to make it easier to slice or dice.
- Cut the guava paste into small, thin slices or ½-inch dice. This ensures the guava flavor is distributed throughout the bread.
- You can gently fold about half of the guava pieces into the batter now, or save them all for layering.
Step 6: Prepare the Optional Cream Cheese Swirl (If Using)
- In a small bowl, combine the softened cream cheese, 2 tablespoons granulated sugar, egg yolk, and ¼ teaspoon vanilla extract.
- Whisk until the mixture is completely smooth and lump-free. Make sure your cream cheese is truly soft, otherwise it will be hard to get a smooth consistency.
Step 7: Assemble Your Loaf
- Pour about half of the guava bread batter into your prepared loaf pan, spreading it evenly.
- Arrange about half of your sliced or diced guava paste over the batter.
- If using the cream cheese swirl, dollop half of the cream cheese mixture over the guava.
- Pour the remaining bread batter over the layers.
- Top with the remaining guava paste and the rest of the cream cheese mixture.
- Using a knife or a skewer, gently swirl the cream cheese into the top layer of batter. Don’t overdo it – a few gentle swirls are all you need for that beautiful marbled effect.
Step 8: Bake Your Guava Bread
- Place the loaf pan in the preheated oven.
- Bake for 50-65 minutes. Baking times can vary depending on your oven, so keep an eye on it.
- How to tell if it’s done: The top should be golden brown, and a wooden skewer or toothpick inserted into the center of the bread (avoiding a large piece of guava paste or cream cheese) should come out clean or with moist crumbs, but no wet batter.
- Common Mistake: Resist the urge to open the oven door too early, especially during the first 30-40 minutes. This can cause the bread to sink in the middle.
- If the top starts to brown too quickly, you can loosely tent the loaf with aluminum foil for the remaining baking time.
Step 9: Cool and Enjoy!
- Once baked, remove the loaf pan from the oven and let it cool in the pan on a wire rack for 10-15 minutes. This allows the bread to set and makes it easier to remove.
- After 10-15 minutes, carefully lift the bread out of the pan (using the parchment paper handles if you used them) and transfer it directly to the wire rack to cool completely.
- Beginner Tip: While it’s tempting to slice into it immediately, letting the bread cool completely allows the internal structure to firm up and the flavors to fully develop. Warm bread is delicious, but fully cooled bread slices much cleaner.
- Once cooled (or slightly warm), slice and serve!
Tips & Tricks for Perfect Guava Bread
Elevate your baking game with these tried-and-true tips:
- Don’t Overmix! This is the golden rule for quick breads. Mix until just combined. Lumps are okay! Overmixing leads to a tough, dry loaf because it develops the gluten too much.
- Room Temperature Ingredients: Eggs, milk, and cream cheese (if using) should ideally be at room temperature. They mix more evenly into the batter, creating a smoother consistency and a better final texture.
- Accurate Measuring: Especially for flour, use the “spoon and level” method. Scooping flour directly from the bag can compact it, leading you to use too much flour, which results in a dry bread.
- Guava Paste Alternatives: If you can’t find guava paste, you can try guava jam or even fresh, ripe guava (finely diced and perhaps tossed with a little flour to prevent sinking). Just be mindful that fresh guava will add more moisture, so you might need to adjust baking time slightly.
- Add-Ins: Feel free to experiment! A handful of shredded coconut, chopped pecans, or even a hint of cinnamon or cardamom would complement the guava beautifully.
- Storage: Store leftover Guava Bread in an airtight container at room temperature for up to 3-4 days. If it has a cream cheese swirl, it’s best to store it in the refrigerator. For longer storage, slice the cooled bread and freeze individual slices in a freezer-safe bag for up to 2-3 months. Thaw at room temperature or warm gently.
- Serving Suggestions: Enjoy a slice plain with your morning coffee, or elevate it with a dollop of cream cheese frosting, a drizzle of honey, or a sprinkle of powdered sugar.
Essential Baking Tools for Your Kitchen
Having the right tools makes baking much easier and more enjoyable. Here are a few essentials for this recipe and many others:
- Mixing Bowl
- Whisk
- Baking Pan (specifically a 9×5-inch loaf pan)
- Measuring Cups & Measuring Spoons
- Spatula (rubber or silicone)
- Wire Rack (for cooling)
- Parchment Paper (optional, but recommended for easy removal)
Nutrition Information (Estimated per serving, assumes 12 servings)
Please note, these are approximate values and can vary based on specific ingredients and brands used.
| Nutrient | Amount |
|---|---|
| Calories | ~320 kcal |
| Carbohydrates | ~48 g |
| Protein | ~5 g |
| Fat | ~14 g |
| Fiber | ~1 g |
| Sugar | ~32 g |
Frequently Asked Questions (FAQs)
Q1: Can I use fresh guava instead of guava paste?
A: Yes, you absolutely can! If using fresh guava, make sure it’s ripe. Peel and finely dice about 1 cup of fresh guava. You might want to toss it with a tablespoon of flour before adding it to the batter to prevent it from sinking to the bottom. Fresh guava will add more moisture, so keep an eye on the baking time; it might need a few extra minutes.
Q2: My bread came out dry. What went wrong?
A: The most common reasons for dry quick bread are overmixing the batter or overbaking. Remember to mix until just combined (lumps are fine!) and use the toothpick test to avoid baking longer than necessary. Also, ensure you’re measuring your flour accurately (spoon and level method).
Q3: How do I store Guava Bread to keep it fresh?
A: Store your Guava Bread in an airtight container at room temperature for up to 3-4 days. If your bread includes the cream cheese swirl, it’s safer to store it in the refrigerator due to the dairy content. For longer storage, wrap slices tightly in plastic wrap and then foil, and freeze for up to 2-3 months. Thaw at room temperature or gently reheat.
Q4: Can I make this recipe into muffins?
A: Absolutely! This recipe works wonderfully as muffins. Divide the batter into a greased or lined 12-cup muffin tin. Bake at 375°F (190°C) for about 20-25 minutes, or until a toothpick inserted into the center comes out clean. Adjust the guava and cream cheese swirl portions for individual muffins.
Q5: What if I don’t have a loaf pan?
A: You can use an 8×8-inch square baking pan for a denser, flatter bread, or even a Bundt pan (you’ll likely need to adjust baking time and keep an eye on doneness). Just ensure the pan is well-greased and floured. The baking time will vary, so rely on the toothpick test for doneness.
Conclusion: Enjoy Your Homemade Guava Bread!
And there you have it! A truly delightful and surprisingly simple Guava Bread Recipe that brings a touch of tropical sunshine right into your home. We hope this detailed guide has given you the confidence and inspiration to bake this wonderful treat. There’s nothing quite like the satisfaction of pulling a warm, fragrant loaf from your own oven.
Whether you enjoy it for breakfast, as a snack, or a sweet dessert, this Guava Bread is sure to become a cherished recipe in your collection. Don’t be afraid to experiment and make it your own! Happy baking, and we can’t wait to hear about your Guava Bread adventures.