Welcome, fellow baking enthusiasts and especially all you wonderful baking beginners Have you ever found yourself torn between the classic comfort of vanilla and the rich indulgence of chocolate? What if I told you that you don’t have to choose? Today, we’re diving into a delightful Half Vanilla Half Chocolate Cake Recipe that brings the best of both worlds to your plate. This isn’t just another cake; it’s a perfectly balanced treat that’s surprisingly straightforward to make, even if you’ve never baked anything more complex than cookies. We’re going to walk through every step, providing all the baking tips for beginners you’ll need to create a show-stopping dessert. Get ready to impress your friends, family, and most importantly, yourself, with this easy-to-follow recipe!
Ingredients for Your Two-Flavor Masterpiece
Gathering your ingredients beforehand, also known as “mise en place,” is a crucial first step for any successful baking adventure. Make sure all your cold ingredients like butter and eggs are at room temperature for the best results!
For the Cake Batter (Yields Two 8-inch Layers):
| Ingredient | Quantity | Unit |
|---|---|---|
| All-Purpose Flour | 2 ½ | cups |
| Granulated Sugar | 1 ¾ | cups |
| Baking Powder | 2 ½ | teaspoons |
| Salt | ½ | teaspoon |
| Unsalted Butter (softened) | 1 | cup (2 sticks) |
| Large Eggs (room temperature) | 4 | |
| Whole Milk (room temperature) | 1 | cup |
| Vanilla Extract | 1 | tablespoon |
| Unsweetened Cocoa Powder | ½ | cup |
| Hot Water or Coffee | ¼ | cup |
For the Vanilla Buttercream Frosting:
| Ingredient | Quantity | Unit |
|---|---|---|
| Unsalted Butter (softened) | 1 ½ | cups (3 sticks) |
| Powdered Sugar (confectioners’ sugar) | 4-5 | cups |
| Heavy Cream or Milk | 3-5 | tablespoons |
| Vanilla Extract | 1 ½ | teaspoons |
| Salt | ¼ | teaspoon |
Step-by-Step Instructions: Baking Your Dream Cake
Follow these detailed steps carefully, and you’ll be enjoying your beautiful **Half Vanilla Half Chocolate Cake** in no time!
Step 1: Prepare for Baking Success
- Preheat Your Oven: Start by preheating your oven to 350°F (175°C). This is crucial for even baking. Don’t put your cake in a cold oven!
- Prepare Your Cake Pans: Grease and flour two 8-inch round cake pans. For an extra non-stick guarantee, you can also line the bottoms with parchment paper. This will make removing your cakes much easier and prevent sticking – a common beginner frustration!
- Room Temperature Ingredients are Key: Ensure your butter, eggs, and milk are all at room temperature. This allows them to emulsify better, creating a smoother, more uniform batter and a light, fluffy cake texture. If you forget, you can quickly warm eggs in a bowl of warm water for 5-10 minutes, and milk in the microwave for 15-20 seconds.
Step 2: Combine the Dry Ingredients
- In a large bowl, whisk together the flour, granulated sugar, baking powder, and salt. Beginner Tip: Whisking these ingredients together ensures they are evenly distributed, so you don’t end up with pockets of baking powder in your cake.
Step 3: Cream the Butter and Eggs
- In a separate, large mixing bowl (or the bowl of your stand mixer), cream together the softened unsalted butter until light and fluffy. This usually takes about 2-3 minutes on medium speed.
- Add the eggs one at a time, beating well after each addition. Scrape down the sides of the bowl as needed to ensure everything is fully incorporated. This step adds air to your batter, which contributes to the cake’s light texture.
Step 4: Alternate Wet and Dry Ingredients
- With the mixer on low speed, gradually add about one-third of the dry ingredients to the butter-egg mixture, mixing just until combined.
- Pour in half of the milk, mixing until just incorporated.
- Repeat this process: add another third of the dry ingredients, then the remaining milk, and finally the last of the dry ingredients. Important Beginner Tip: Do not overmix! Overmixing develops the gluten in the flour too much, leading to a tough, dense cake. Mix only until the ingredients are just combined and no streaks of flour remain. A few small lumps are okay.
Step 5: Create Your Two Flavors
- Divide the cake batter evenly into two separate bowls. Eyeballing it is fine; it doesn’t have to be perfectly precise.
- For the Vanilla Batter: To one bowl, add 1 tablespoon of vanilla extract and stir gently until fully incorporated.
- For the Chocolate Batter: In a small separate bowl, whisk together the ½ cup unsweetened cocoa powder with ¼ cup hot water or coffee until a smooth paste forms. This step is crucial for rich chocolate flavor without drying out your batter! Add this chocolate paste to the second bowl of batter and stir gently until well combined and no streaks of cocoa remain.
Step 6: Fill the Pans
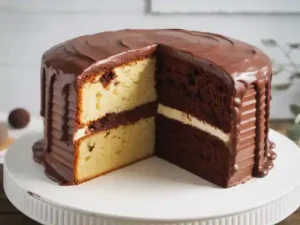
- Now for the fun part that makes this cake unique! Take one of your prepared 8-inch cake pans. Carefully pour the vanilla batter into one half of the pan, using a spoon or spatula to help create a clear dividing line down the middle.
- Then, pour the chocolate batter into the other half of the same pan, again maintaining a clear division. Repeat this process for the second cake pan. Beginner Tip: Don’t try to swirl or marble too much if you want a distinct half-and-half look. Just let the batters sit side-by-side.
- Gently tap the pans on the counter a couple of times to release any large air bubbles.
Step 7: Bake Your Cakes
- Place the cake pans in the preheated oven.
- Bake for 28-32 minutes, or until a wooden skewer or toothpick inserted into the center of each cake comes out clean. Common Mistake & Tip: Avoid opening the oven door too early, especially in the first 20 minutes, as this can cause your cakes to sink.
Step 8: Cool the Cakes
- Once baked, remove the cakes from the oven and let them cool in their pans on a wire rack for about 10-15 minutes.
- After 10-15 minutes, carefully invert the cakes onto the wire rack to cool completely. This is vital! Do not try to frost warm cakes, as the frosting will melt and slide right off. This can take 1-2 hours.
Step 9: Prepare the Vanilla Buttercream Frosting
- In a large bowl or stand mixer, beat the softened unsalted butter on medium speed until light and fluffy, about 3-5 minutes.
- Gradually add the powdered sugar, one cup at a time, beating well after each addition until fully incorporated. The mixture will be thick.
- Pour in the heavy cream (or milk), vanilla extract, and salt. Beat on low speed until combined, then increase to medium-high and beat for another 2-3 minutes until the frosting is light, fluffy, and smooth. If it’s too thick, add more cream a teaspoon at a time. If it’s too thin, add more powdered sugar a tablespoon at a time.
Step 10: Assemble and Frost Your Cake
- Once the cakes are completely cool, place one layer on your serving plate or cake stand.
- Spread a generous layer of buttercream frosting over the top.
- Carefully place the second cake layer on top.
- Frost the top and sides of the entire cake with the remaining buttercream. You can use an offset spatula or a butter knife to create a smooth finish or decorative swirls. Beginner Tip: For a “naked cake” look, use less frosting on the sides, allowing some of the cake to show through. For a smooth finish, use a bench scraper or a long, flat knife.
- Serve immediately or chill until ready to enjoy!
Baking Tips & Tricks for a Perfect Cake Every Time
Baking is a science, but it’s also an art. These practical tips will help you master your kitchen and achieve consistent, delicious results with this **easy baking recipe** and beyond!
- Accuracy in Measuring: For dry ingredients like flour, spoon it into your measuring cup and then level it off with the back of a knife. Don’t scoop directly from the bag, as this compacts the flour and can lead to adding too much, resulting in a dry cake.
- Room Temperature Matters (Again!): We can’t stress this enough. Room temperature butter creams beautifully with sugar, incorporating air for a light texture. Room temperature eggs emulsify better into the batter, preventing curdling.
- Don’t Overmix: After adding flour, mix only until just combined. Overmixing develops gluten, making your cake tough and chewy instead of tender and moist.
- Preheat Properly: Always preheat your oven for at least 15-20 minutes before baking. Ovens fluctuate in temperature, and a properly preheated oven ensures your cake starts baking at the correct temperature, leading to even rising and texture.
- Invest in Parchment Paper: It’s a game-changer for preventing sticking and making cake removal effortless. Cut circles to fit the bottom of your pans.
- Cool Completely: Patience is a virtue, especially when cooling cakes. Frosting a warm cake is a recipe for disaster (and a melted mess!). Ensure your cakes are completely cool to the touch before applying any frosting.
- Scrape Your Bowl: Regularly scrape down the sides and bottom of your mixing bowl during the creaming and mixing stages. This ensures all ingredients are fully incorporated and prevents unmixed pockets of flour or butter.
- Storing Leftovers: Store leftover cake at room temperature for up to 2-3 days, covered loosely to prevent it from drying out. For longer storage, refrigerate for up to a week, or freeze individual slices for up to 2-3 months.
Essential Baking Tools
Having the right tools makes all the difference, especially when you’re starting out. Here are a few essentials that will make baking this cake (and many others!) a breeze:
- Mixing Bowl (several sizes are useful)
- Whisk
- 8-inch Round Baking Pans (you’ll need two)
- Measuring Cups
- Measuring Spoons
- Rubber Spatula (for scraping bowls)
- Electric Mixer (handheld or stand mixer)
- Wire Cooling Rack
- Parchment Paper
Estimated Nutrition Information (per serving, approx. 1/12 of cake)
Please note, these are estimated values and can vary based on exact ingredients and portion sizes.
| Nutrient | Amount |
|---|---|
| Calories | 450-500 kcal |
| Carbohydrates | 60-70 g |
| Protein | 5-7 g |
| Fat | 20-25 g |
| Fiber | 1-2 g |
| Sugar | 45-55 g |
Frequently Asked Questions (FAQs) for Beginners
1. Can I use different pan sizes for this recipe?
Yes, but you might need to adjust baking times. If using 9-inch pans, the layers will be slightly thinner and might bake a few minutes faster. If using smaller pans (like 6-inch), you’ll likely need more pans (3-4 layers) and baking time will increase slightly. Always keep an eye on the cake and use the toothpick test for doneness.
2. My cake came out dry. What went wrong?
A dry cake is often a result of overbaking, overmixing the batter (which develops too much gluten), or not measuring flour correctly (too much flour). Ensure you’re measuring flour by spooning it into the cup and leveling, and always bake only until a toothpick comes out clean, not longer.
3. Why did my cake sink in the middle?
This can happen for a few reasons: opening the oven door too early, inaccurate oven temperature (oven too cool), using too much leavening agent (baking powder), or the cake being underbaked. Make sure your oven is preheated to the correct temperature and resist the urge to peek until at least two-thirds of the baking time has passed.
4. How can I get a really clean line between the vanilla and chocolate batter in the pan?
The best way is to pour the batters slowly and carefully, using the back of a spoon or a small spatula to guide them into position. Try to pour them side-by-side directly into the pan, rather than pouring one on top of the other. Once they’re in, avoid swirling them if you want a distinct separation.
5. Can I make this cake ahead of time?
Absolutely! You can bake the cake layers a day or two in advance. Once completely cooled, wrap them tightly in plastic wrap and store them at room temperature or in the refrigerator. You can also freeze unfrosted layers for up to a month – just make sure they are well-wrapped. Thaw them at room temperature before frosting.
6. What if I don’t have buttermilk?
While this recipe uses whole milk, if you ever encounter a recipe calling for buttermilk and don’t have any, you can make your own! Add 1 tablespoon of white vinegar or lemon juice to a liquid measuring cup, then fill the rest of the way to 1 cup with regular milk. Let it sit for 5-10 minutes until it slightly curdles. This works as a great substitute!
Time to Enjoy Your Dual-Flavor Delight!
And there you have it! A beautiful, delicious, and perfectly balanced Half Vanilla Half Chocolate Cake that’s sure to be a crowd-pleaser. You’ve navigated through the steps, learned some valuable baking tips for beginners, and created something truly special with your own hands. Don’t be afraid to experiment with decorating, or simply enjoy it as is. Baking is a journey of discovery, and every cake you make builds your confidence. We hope this easy baking recipe inspires you to keep creating in the kitchen. Share your creations with us, and happy baking!