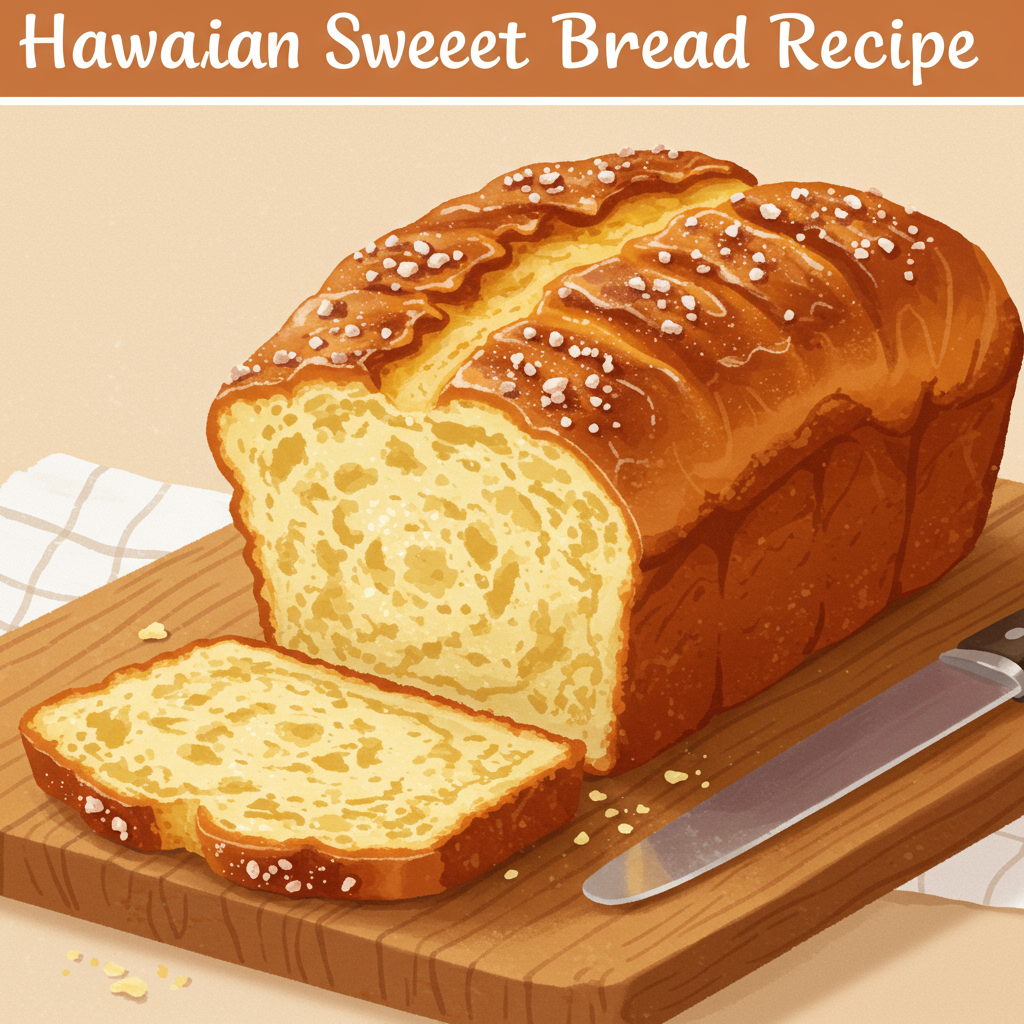
Aloha, baking enthusiasts! Are you dreaming of warm, sweet, and incredibly soft bread that transports you straight to the sunny shores of Hawaii? You’re in luck! This Hawaiian Bread Recipe For Bread Machine is designed to bring that tropical magic right into your kitchen with minimal effort. If you’re new to baking or looking for truly easy baking recipes, your bread machine is about to become your best friend.
Forget the complexities of kneading and rising – this recipe lets your machine do all the hard work, leaving you with a perfectly golden loaf every single time. We’ve packed this guide with essential **baking tips for beginners** to ensure your first (and every subsequent) loaf is a resounding success. Get ready to fill your home with the irresistible aroma of fresh-baked bread!
Why Use a Bread Machine for Hawaiian Bread?
Using a bread machine simplifies the bread-making process dramatically. It handles the mixing, kneading, rising, and even baking all in one convenient appliance. This means less mess, less fuss, and consistent results – perfect for busy individuals or anyone who wants fresh bread without the extensive hands-on time. Plus, the controlled environment of a bread machine often leads to a wonderfully soft and airy texture, ideal for this sweet Hawaiian loaf.
Ingredients List
Precision is key in baking, especially when using a bread machine. Measure your ingredients carefully for the best results!
| Ingredient | Quantity | Unit |
|---|---|---|
| Warm Milk (2% or whole, about 90-100°F / 32-38°C) | 1 | cup |
| Pineapple Juice (unsweetened) | 1/2 | cup |
| Large Egg | 1 | |
| Unsalted Butter, melted and slightly cooled | 1/4 | cup |
| All-Purpose Flour (spooned and leveled) | 3 | cups |
| Granulated Sugar | 1/4 | cup |
| Salt | 1 | teaspoon |
| Instant Yeast (active dry yeast works too, but instant is preferred for bread machines) | 2 | teaspoons |
Step-by-Step Instructions: Baking Your Hawaiian Bread
Follow these detailed steps to ensure a perfect loaf every time. Remember, the order of ingredients in a bread machine is often crucial!
Step 1: Gather and Prepare Your Ingredients
- Read Through: Before you start, read the entire recipe. This helps you understand the process and avoid missing any steps.
- Measure Accurately: Use proper measuring cups and spoons. For flour, spoon it into your measuring cup and then level it off with a straight edge (like the back of a knife) – never scoop directly from the bag, as this compacts the flour and you’ll end up with too much.
- Temperature Matters: Ensure your milk is warm (not hot!) – think bathwater temperature. Too hot will kill the yeast, too cold won’t activate it properly. Your melted butter should be slightly cooled, not piping hot, for the same reason.
Step 2: Load the Bread Machine Pan
The general rule for bread machines is liquids first, then dry ingredients, and finally, the yeast on top. This prevents the yeast from activating too early with the liquids or dissolving into the salt.
- Liquids First: Pour the warm milk, pineapple juice, beaten egg, and cooled melted butter into the bread machine pan.
- Add Dry Ingredients: Carefully add the all-purpose flour on top of the liquids. Try to make a mound.
- Strategic Placement of Sugar and Salt: Place the granulated sugar in one corner of the flour mound and the salt in another corner, away from where you’ll put the yeast. Salt can inhibit yeast activity if they come into direct contact too early.
- Yeast on Top: Create a small well in the center of the flour mound (away from the liquids and salt) and add the instant yeast into it. This allows the yeast to stay dry until the machine begins its mixing cycle.
Step 3: Set Your Bread Machine
- Select Cycle: Place the pan securely back into your bread machine. Close the lid. Select the “Basic,” “White,” or “Sweet” bread cycle. These cycles typically include appropriate kneading, rising, and baking times for a sweet, enriched loaf like Hawaiian bread.
- Choose Loaf Size and Crust Color: Select the 1.5 lb loaf size (or 2 lb if your machine doesn’t have 1.5 lb and you’ve adjusted ingredients accordingly, though this recipe is for 1.5 lb). Choose your desired crust color – “Light” for a softer crust, “Medium” for a traditional golden brown, or “Dark” for a crispier, deeper brown. For Hawaiian bread, “Medium” is usually perfect.
- Start the Machine: Press the start button and let your bread machine work its magic!
Step 4: Monitor the Dough (Optional but Recommended for Beginners)
During the first kneading cycle (usually within the first 5-10 minutes), briefly open the lid to check the dough consistency. This is a crucial step for beginners to understand what good dough looks like and to make minor adjustments if needed.
- Ideal Consistency: The dough should form a smooth, soft, and elastic ball that cleans the sides of the pan as it kneads. It should be slightly sticky but not wet or shaggy.
- Too Dry?: If the dough looks too stiff, is crumbly, or isn’t forming a ball, add a teaspoon of warm milk or water at a time until it reaches the correct consistency. Be patient and add very small amounts.
- Too Wet?: If the dough is too sticky, sloppy, or is sticking to the sides of the pan excessively, add a tablespoon of all-purpose flour at a time until it firms up. Again, add slowly and observe.
Step 5: Baking and Cooling
- The Waiting Game: Resist the urge to open the lid during the rising and baking cycles, as this can cause the bread to collapse.
- Finished Loaf: Once the machine beeps, indicating the cycle is complete, carefully remove the bread pan using oven mitts. The pan and bread will be very hot.
- Immediate Removal: Invert the pan onto a wire cooling rack and gently shake the bread out. If the paddle is stuck in the bread, use a non-stick utensil (like a wooden skewer or silicone spatula) to carefully remove it.
- Cool Completely: Let the bread cool on the wire rack for at least 1-2 hours before slicing. This step is vital! Slicing warm bread can make it gummy and dense inside because the internal cooking process (called “carry-over cooking”) is still happening. Cooling allows the starches to set, resulting in a perfectly soft texture.
Step 6: Enjoy and Store
- Slice your cooled Hawaiian bread with a serrated knife and enjoy its sweet, soft, and tropical flavor! It’s fantastic on its own, toasted, or as a base for sandwiches.
- Store leftover bread in an airtight container or bread bag at room temperature for up to 3-4 days. For longer storage, you can slice and freeze it for up to 2-3 months.
Tips & Tricks for Perfect Hawaiian Bread
Even with a bread machine, a few extra pointers can elevate your baking game, especially for beginners!
- Ingredient Temperature Matters: Always ensure your liquids (milk, pineapple juice) are lukewarm, around 90-100°F (32-38°C). This is the optimal temperature for yeast activation. Too cold, and the yeast won’t activate; too hot, and it will die. A kitchen thermometer is a great investment for this!
- Measure Precisely: Baking is a science. Use proper measuring cups and spoons, and always level off dry ingredients like flour and sugar. For flour, spoon it into the measuring cup rather than scooping directly from the bag to avoid compacting it, which can lead to a dry, dense loaf.
- Check Your Yeast: Ensure your yeast is fresh and active. If your yeast is old, your bread won’t rise. You can test it by dissolving 1 teaspoon of yeast in 1/4 cup of warm water with a pinch of sugar. If it foams within 5-10 minutes, it’s good to go!
- Don’t Skip Cooling: It’s tempting to cut into a warm loaf, but cooling on a wire rack allows the internal steam to escape, preventing a gummy texture and letting the crumb set properly. Patience is a virtue here!
- Adjust for Humidity: On very humid days, you might need slightly less liquid or a tiny bit more flour. On very dry days, the opposite. The “check the dough” step during the first knead is invaluable for this.
- Experiment with Crust: If you prefer a softer crust, try brushing the top of the hot loaf with a little melted butter immediately after it comes out of the machine.
- Storage Secrets: Once completely cooled, store your bread in an airtight bag or container at room temperature. For longer storage, slice the bread and freeze it in a freezer-safe bag. You can then pull out slices as needed and toast them.
- Personalize Your Loaf: Feel free to add 1/2 teaspoon of coconut extract for an even more pronounced tropical flavor, or substitute some of the granulated sugar with brown sugar for a richer, deeper sweetness.
Essential Baking Tools
Having the right tools makes all the difference, especially when you’re starting out!
- Bread Machine (of course!)
- Mixing Bowl (for preparing liquids before adding to the machine)
- Whisk (for beating the egg and mixing liquids)
- Wire Cooling Rack (essential for proper bread cooling)
- Measuring Cups
- Measuring Spoons
- Spatula (silicone or rubber, for scraping bowls and making adjustments to dough)
- Kitchen Thermometer (for checking liquid temperatures)
- Serrated Bread Knife (for clean slices)
Nutrition Information (Per Slice, Approx. 16 slices per loaf)
Please note that these values are estimates and can vary based on specific ingredients and preparation methods.
| Nutrient | Amount |
|---|---|
| Calories | 160-180 kcal |
| Carbohydrates | 30-35 g |
| Protein | 4-5 g |
| Fat | 4-6 g |
| Fiber | 1-2 g |
| Sugar | 7-10 g |
Frequently Asked Questions (FAQs)
Q: Can I make this bread without a bread machine?
A: Yes, you can! You’ll need to manually mix and knead the dough for about 8-10 minutes until it’s smooth and elastic. Then, let it rise in a warm place until doubled (about 1-1.5 hours), punch it down, shape it into a loaf, let it rise again in a loaf pan (about 30-45 minutes), and then bake it in a preheated oven at 375°F (190°C) for 25-35 minutes, or until golden brown and cooked through.
Q: Why didn’t my bread rise, or why is it dense?
A: Several factors can cause this:
- Old Yeast: Ensure your yeast is fresh and active.
- Liquid Temperature: Liquids that are too hot will kill the yeast, while liquids that are too cold won’t activate it. Aim for lukewarm.
- Too Much Flour: Over-measuring flour (scooping directly from the bag) is a common mistake that leads to dense bread. Spoon and level!
- Expired Flour: Old flour can sometimes affect rise.
- Incorrect Cycle: Make sure you selected an appropriate cycle (Basic, White, Sweet) for enriched bread.
Q: Can I substitute ingredients like milk or flour?
A: For best results with this recipe, stick to the recommended ingredients, especially for beginners. However, you can use skim or whole milk. For flour, all-purpose is ideal for this soft bread. Substituting with significant amounts of whole wheat flour will change the texture and may require more liquid. As for the pineapple juice, it’s key to the Hawaiian flavor; while you could use more milk, the bread wouldn’t have the same characteristic taste.
Q: How do I store leftover Hawaiian bread?
A: Once completely cooled, store the bread in an airtight container or a bread bag at room temperature for up to 3-4 days. For longer storage, slice the bread and freeze it in a freezer-safe bag for up to 2-3 months. You can then toast slices directly from frozen.
Q: My bread machine paddle is stuck in the loaf, what do I do?
A: This is common! Once you’ve removed the hot bread from the pan, if the kneading paddle is stuck in the bottom of the loaf, simply use a non-stick tool (like a wooden skewer or a silicone spatula) to carefully pry it out. Be gentle to avoid damaging the bread too much. Some bread machines have collapsible paddles to help minimize this issue.
Conclusion
Congratulations! You’re now equipped with everything you need to bake a delicious, sweet, and incredibly soft Hawaiian Bread Recipe For Bread Machine. This recipe is truly one of the most easy baking recipes out there, especially when you let your bread machine do the heavy lifting. Don’t be intimidated by baking; with these detailed steps and baking tips for beginners, you’re set for success.
Imagine that first slice, warm from the machine, filling your kitchen with its delightful aroma – pure bliss! So go ahead, gather your ingredients, fire up your bread machine, and embark on this delightful culinary journey. We promise, once you try this, you’ll be making it again and again. Happy baking, and enjoy your taste of paradise!