
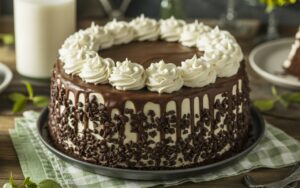
Get ready to impress with a cake that’s rich, decadent, and surprisingly simple to master! If you’ve ever dreamt of baking a show-stopping dessert but felt intimidated, this Irish Car Bomb Cake Recipe is your perfect starting point. It’s packed with the incredible flavors of Guinness stout, Irish whiskey, and creamy Irish liqueur, creating a truly unforgettable experience. Don’t let the unique name fool you; this recipe is designed with easy baking recipes in mind, breaking down every step so even first-time bakers can achieve professional-looking results. We’ll walk you through everything, offering essential baking tips for beginners to ensure your success. So grab your apron, preheat your oven, and let’s bake some magic together!
Ingredients You’ll Need
Before we dive into the fun, gather all your ingredients. Having everything measured out and ready (this is called “mise en place” by pros!) will make your baking process much smoother.
For the Guinness Chocolate Cake:
| Ingredient | Quantity |
|---|---|
| Guinness Stout | 1 cup (240ml) |
| Unsalted Butter | 1 cup (2 sticks, 226g) |
| Unsweetened Cocoa Powder | 3/4 cup (75g) |
| Granulated Sugar | 2 cups (400g) |
| Light Brown Sugar, packed | 1/2 cup (100g) |
| Large Eggs | 2 |
| Pure Vanilla Extract | 1 teaspoon |
| All-Purpose Flour | 2 cups (240g) |
| Baking Soda | 2 teaspoons |
| Salt | 1/2 teaspoon |
| Buttermilk | 1/2 cup (120ml) |
For the Whiskey Ganache Filling:
| Ingredient | Quantity |
|---|---|
| Heavy Cream | 1/2 cup (120ml) |
| Dark Chocolate Chips (or chopped chocolate) | 6 ounces (170g) |
| Irish Whiskey (e.g., Jameson) | 2 tablespoons |
| Unsalted Butter, cold and cubed | 1 tablespoon |
For the Irish Cream Buttercream Frosting:
| Ingredient | Quantity |
|---|---|
| Unsalted Butter, softened | 1 cup (2 sticks, 226g) |
| Powdered Sugar, sifted | 4 cups (480g) |
| Irish Cream Liqueur (e.g., Baileys) | 1/4 cup (60ml) |
| Pure Vanilla Extract | 1 teaspoon |
| Pinch of Salt | 1/8 teaspoon |
Step-by-Step Baking Instructions: Your Path to Cake Perfection!
Follow these detailed steps carefully, and you’ll be amazed at what you can create. We’ve included plenty of tips to guide you!
1. Prepare Your Pans & Oven (The Foundation)
- Preheat Oven: Set your oven to 350°F (175°C). It’s crucial for even baking!
- Prep Cake Pans: Grease and flour two 9-inch round cake pans. An extra tip for beginners: Cut out two circles of parchment paper to fit the bottom of your pans. Place them in the greased bottoms, then grease and flour the parchment too! This ensures your cake won’t stick.
2. For the Guinness Chocolate Cake (The Star of the Show!)
- Simmer Guinness & Butter: In a medium saucepan, combine the Guinness stout and 1 cup (2 sticks) of unsalted butter. Heat over medium heat until the butter is melted and the mixture just begins to simmer.
- Whisk in Cocoa & Sugars: Remove the saucepan from the heat. Whisk in the unsweetened cocoa powder until smooth. Then, add the granulated sugar and light brown sugar, whisking until fully dissolved. Set aside to cool slightly. Beginner Tip: Ensure the mixture isn’t too hot before adding eggs later, or they might scramble!
- Combine Dry Ingredients: In a large bowl, whisk together the all-purpose flour, baking soda, and salt. Make sure they are well combined.
- Add Wet Ingredients to Guinness Mixture: Once the Guinness mixture has cooled a bit (it should be warm, not hot), whisk in the two large eggs, pure vanilla extract, and buttermilk until smooth.
- Combine Wet and Dry: Pour the wet Guinness mixture into the bowl with the dry ingredients. Gently mix with a whisk or rubber spatula until just combined. IMPORTANT Beginner Tip: Do NOT overmix! Overmixing develops gluten, which can lead to a tough, dry cake. A few lumps are okay.
- Pour and Bake: Divide the batter evenly between your two prepared cake pans.
- Bake Time: Bake for 30-35 minutes, or until a wooden skewer or toothpick inserted into the center of the cakes comes out clean or with just a few moist crumbs attached.
- Cooling: Let the cakes cool in their pans on a wire rack for 10-15 minutes. Then, carefully invert them onto the wire rack, remove the pans (and parchment, if used), and let them cool completely. Beginner Tip: This step is crucial! Frosting a warm cake will cause your frosting to melt and slide off. Patience is key!
3. For the Whiskey Ganache Filling (The Boozy Delight!)
- Heat Cream: In a small saucepan, heat the heavy cream over medium heat until it just begins to simmer around the edges. Do not boil.
- Melt Chocolate: Place the dark chocolate chips (or chopped chocolate) in a heatproof bowl. Pour the hot cream over the chocolate. Let it sit undisturbed for 5 minutes to allow the chocolate to melt.
- Whisk to Combine: After 5 minutes, gently whisk the mixture from the center outwards until it’s completely smooth and glossy.
- Add Whiskey & Butter: Stir in the Irish whiskey and the cold, cubed unsalted butter until fully incorporated and smooth. The butter will give it extra shine and richness.
- Cool & Thicken: Let the ganache cool at room temperature for at least 30-60 minutes, stirring occasionally, until it reaches a spreadable, thick consistency. If it’s too thin, it will run off the cake. If it gets too thick, you can gently warm it for a few seconds in the microwave.
4. For the Irish Cream Buttercream Frosting (The Creamy Cloud!)
- Soften Butter: Ensure your unsalted butter is genuinely softened – it should yield easily when pressed, but not be melted or greasy. Room temperature is ideal!
- Cream Butter: In a large bowl, using an electric mixer (handheld or stand mixer with paddle attachment), beat the softened butter on medium speed until creamy and pale, about 2-3 minutes.
- Add Powdered Sugar: Gradually add the sifted powdered sugar, one cup at a time, beating well after each addition. Start on low speed to avoid a sugar cloud, then increase to medium. Beginner Tip: Sifting powdered sugar removes lumps, making your frosting silky smooth!
- Add Liquids & Salt: Once all the sugar is incorporated, add the Irish cream liqueur, pure vanilla extract, and a pinch of salt. Beat on medium-high speed for another 3-5 minutes until the frosting is light, fluffy, and smooth. If it’s too thick, add a tiny bit more Irish cream or milk (1 teaspoon at a time). If it’s too thin, add more sifted powdered sugar (1 tablespoon at a time).
5. Assembling Your Masterpiece!
- Level Cakes (Optional but Recommended): If your cake layers have domed tops, you can carefully use a serrated knife to level them. This creates a more stable and professional-looking cake.
- First Layer: Place one cooled cake layer on your serving plate or cake stand.
- Apply Ganache: Spread the cooled (but still spreadable) whiskey ganache evenly over the top of the first cake layer, leaving a small border around the edge.
- Second Layer: Carefully place the second cake layer on top of the ganache.
- Frost the Cake: Use an offset spatula or knife to spread the Irish cream buttercream frosting evenly over the top and sides of the entire cake. Get creative with swirls or smooth finishes!
- Chill & Serve: For best results and easier slicing, chill the cake in the refrigerator for at least 30 minutes before serving. This helps the ganache and frosting set.
Tips & Tricks for Baking Success
Baking can sometimes feel like a science, but with these simple tips, you’ll be baking like a pro in no time!
- Measure Accurately: Baking is precise! Use proper measuring cups for dry ingredients (levelled off with a straight edge) and liquid measuring cups for wet ingredients (read at eye level). For ultimate precision, consider investing in a kitchen scale.
- Room Temperature Ingredients: This is a game-changer! Eggs, butter, and buttermilk at room temperature emulsify better, creating a smoother, more uniform batter and a lighter, fluffier cake.
- Don’t Overmix: We can’t stress this enough! Mix dry ingredients into wet ingredients only until just combined. Overmixing develops gluten, leading to a dense, tough cake.
- Cool Completely: Patience is a virtue in baking. Always ensure your cake layers are completely cool before frosting. A warm cake will melt your beautiful frosting into a messy puddle.
- Sift Powdered Sugar: For the smoothest, lump-free frosting, always sift your powdered sugar. It makes a noticeable difference in texture!
- Parchment Paper is Your Friend: Lining your cake pans with parchment paper on the bottom ensures easy release and prevents sticking, especially for beginners.
- Make Ahead: Cake layers can be baked a day in advance, wrapped tightly in plastic wrap, and stored at room temperature. The ganache and frosting can also be made ahead and stored in the fridge, then brought to room temp and re-whipped if needed.
Essential Baking Tools
Having the right tools makes all the difference. Here are a few essentials that will make your baking journey much easier:
- Mixing Bowl
- Whisk
- Baking Pan (9-inch round is perfect)
- Measuring Cups & Spoons
- Rubber Spatula
- Electric Mixer (handheld or stand mixer for frosting)
- Wire Cooling Rack
- Offset Spatula (for frosting)
Nutrition Information (Estimated per serving)
Enjoying a slice of this delicious cake is a treat! Here’s an estimated nutritional breakdown per serving (assuming 12 servings per cake).
| Nutrient | Amount |
|---|---|
| Calories | 580-620 kcal |
| Carbohydrates | 70-80 g |
| Protein | 6-8 g |
| Fat | 30-35 g |
| Fiber | 2-3 g |
| Sugar | 50-60 g |
Please note: These are estimated values and can vary based on specific ingredient brands and preparation methods.
Frequently Asked Questions (FAQs)
1. Can I make this cake ahead of time?
Absolutely! The cake layers can be baked 1-2 days in advance, wrapped tightly in plastic wrap once completely cooled, and stored at room temperature. The ganache and frosting can also be made a day ahead and stored in the refrigerator. Just bring the frosting to room temperature and re-whip it for a few minutes before assembling.
2. What if I don’t want to use alcohol in my cake?
You can easily make this recipe non-alcoholic! For the cake, use non-alcoholic stout or a strong brewed coffee. For the ganache, substitute the whiskey with strong brewed coffee or simply omit it. For the frosting, replace the Irish cream with milk or non-alcoholic Irish cream flavored syrup, and add an extra 1/2 teaspoon of vanilla extract.
3. How do I prevent my cake from sticking to the pan?
Grease your pans thoroughly with butter or non-stick spray, then dust with flour. For extra insurance, cut parchment paper circles to fit the bottom of your pans and place them in after greasing, then grease and flour the parchment too! This almost guarantees an easy release.
4. Why is my frosting lumpy?
Lumpy frosting is usually caused by unsifted powdered sugar or butter that wasn’t properly softened. Always sift your powdered sugar to remove clumps, and ensure your butter is at room temperature (soft, but not melted) for the smoothest buttercream.
5. How do I know if my cake is fully baked?
Insert a wooden skewer or toothpick into the center of the cake. If it comes out clean or with a few moist crumbs attached (no wet batter), your cake is done! If it’s still wet, bake for a few more minutes and re-test.
6. How should I store the leftover cake?
Store the cake in an airtight container at room temperature for up to 2-3 days, or in the refrigerator for up to 5 days. If refrigerating, let it come to room temperature for about 30 minutes before serving for the best flavor and texture.
Ready to Bake Your Own Irish Car Bomb Cake?
There you have it! A comprehensive, beginner-friendly guide to creating a truly spectacular Irish Car Bomb Cake Recipe. Don’t be shy about trying something new; every expert baker started as a beginner. With these detailed instructions and helpful tips, you’re well on your way to baking success. Imagine the delighted faces when you present this incredible dessert!
We hope you enjoy baking and, more importantly, eating this delicious cake. Feel free to leave a comment below with your baking experience or any questions you might have. Happy baking!