
Welcome, aspiring bakers and busy home cooks! Are you dreaming of warm, crusty bread filling your kitchen with an irresistible aroma, but feel intimidated by traditional kneading and rising? You’re in the right place! Our guide to Italian Bread Machine Recipes is specifically designed for you. Forget complex techniques and hours in the kitchen; with a bread machine,
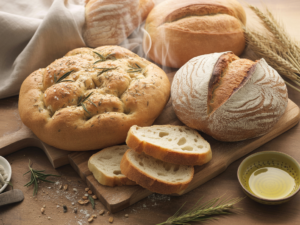
creating a delectable Italian loaf becomes one of the easiest and most rewarding easy baking recipes you’ll ever try. This post is packed with practical baking tips for beginners, ensuring your first (and every subsequent) loaf is a resounding success. Get ready to impress yourself and your family with homemade bread that tastes like it came straight from a Tuscan bakery!
Gather Your Essentials: Simple Ingredients for Superb Bread
The beauty of this Italian bread machine recipe lies in its simplicity. You likely have most of these ingredients in your pantry already!
| Ingredient | Quantity | Notes |
|---|---|---|
| Warm Water | 1 1/4 cups (about 10 fl oz) | Around 105-115°F (40-46°C). Too hot will kill the yeast, too cold won’t activate it. |
| Olive Oil | 2 tablespoons | Extra virgin olive oil for best flavor. Adds richness and a tender crumb. |
| All-Purpose Flour | 3 cups (about 360g) | Spoon and level your flour, don’t scoop directly from the bag to avoid compacting. |
| Granulated Sugar | 1 tablespoon | Feeds the yeast and helps with browning. |
| Salt | 1 1/2 teaspoons | Essential for flavor and controlling yeast activity. Use fine sea salt or table salt. |
| Active Dry Yeast or Instant Yeast | 2 1/4 teaspoons (1 standard packet) | Ensure it’s fresh! Check the expiration date. |
Your Journey to Perfect Italian Bread: Step-by-Step Guide
This is where the magic happens – and the bread machine does most of the work! Follow these detailed steps for a perfect loaf every time.
- Prepare Your Bread Machine Pan: First, ensure your bread machine pan is clean and the kneading paddle is securely in place at the bottom. This paddle is crucial for mixing and kneading your dough.
- Add Wet Ingredients First: Carefully pour the warm water into the bread machine pan. Beginner Tip: Water temperature is key! Use a thermometer if you have one. Aim for 105-115°F (40-46°C). Too hot will kill the yeast, too cold won’t activate it properly, leading to dense bread. Next, add the olive oil.
- Layer Dry Ingredients: Now, it’s time for the dry ingredients. Gently spoon the flour over the wet ingredients, spreading it evenly to cover the water and oil. Beginner Tip: For accurate measuring, always spoon flour into your measuring cup and then level it off with a straight edge (like a knife). Don’t scoop directly from the bag, as this compacts the flour and you’ll end up with too much.
- Create Wells for Sugar and Salt: Using your finger, make a small indentation on one side of the flour for the sugar, and another indentation on the opposite side for the salt. It’s important to keep the salt and yeast separate at this stage, as direct contact can inhibit yeast activity.
- Add the Yeast Last: Make a shallow well in the center of the flour, careful not to let it touch the water immediately. Pour the yeast into this well. Beginner Tip: Always check the expiration date on your yeast! Old yeast is a common culprit for bread that doesn’t rise. If you’re unsure, you can “proof” active dry yeast by dissolving it in a small amount of warm water (from your measured amount) with a pinch of sugar for 5-10 minutes. If it foams, it’s active. Instant yeast doesn’t require proofing.
- Select Your Bread Machine Setting: Place the bread machine pan back into the machine. Close the lid. For this Italian bread, select the “Basic,” “White,” or “French” setting, usually for a 2-pound loaf if your machine has that option. If your machine has crust color options, choose “Medium” for a perfectly golden crust.
- Start the Machine and Observe: Press “Start.” The machine will begin its cycle of kneading, rising, and baking. Beginner Tip: During the first kneading cycle (usually the first 5-10 minutes), peek at the dough. It should form a smooth, elastic ball. If it looks too dry and crumbly, add 1 tablespoon of warm water at a time until it comes together. If it looks too wet and sticky (like pancake batter), add 1 tablespoon of flour at a time until it forms a ball. This adjustment is crucial for the final texture!
- The Waiting Game: Let the bread machine do its work! Avoid opening the lid during the rising and baking cycles, as this can cause the bread to collapse.
- Cooling is Crucial: Once the cycle is complete, the machine will usually beep. Carefully remove the bread pan (it will be very hot!). Immediately turn the pan upside down onto a wire cooling rack and gently shake the bread out. If the kneading paddle is stuck in the loaf, carefully remove it using a butter knife or spatula.
- Slice and Enjoy: Allow the bread to cool completely on the wire rack for at least 1-2 hours before slicing. Beginner Tip: Slicing warm bread can make it gummy and dense. Cooling allows the internal structure to set properly. Once cooled, slice with a serrated knife and enjoy your homemade Italian masterpiece! Serve it with olive oil for dipping, alongside pasta, or as a delicious sandwich bread.
Elevate Your Bread Game: Pro Tips & Tricks
Even with a bread machine, a few extra steps can turn a good loaf into an extraordinary one. Here are some actionable tips to refine your baking skills:
- Ingredient Temperature Matters: Ensure all ingredients, especially water and flour, are at room temperature unless specified. This helps maintain a consistent dough temperature, which is vital for yeast activity.
- Measure Accurately: Baking is a science! Use proper measuring cups and spoons, and always level off dry ingredients. A kitchen scale is an excellent investment for ultimate precision, especially for flour.
- Don’t Skimp on Cooling Time: It’s tempting to cut into a warm loaf, but resist! Cooling on a wire rack allows steam to escape, preventing a gummy texture and ensuring the crumb sets properly.
- Customize Your Crust: Most bread machines have a crust color setting (light, medium, dark). Experiment to find your perfect preference. For an extra crispy crust, you can sometimes remove the bread after the baking cycle and bake it in a preheated conventional oven at 375°F (190°C) for another 5-10 minutes.
- Storing Your Loaf: Store cooled bread in an airtight container or bread bag at room temperature for 3-4 days. For longer storage, slice the bread and freeze it in an airtight freezer bag for up to 2-3 months. Thaw slices as needed.
- Add-Ins for Flavor: Feel free to experiment! During the last kneading cycle (when the machine beeps, if it has an “add-in” feature), you can toss in dried herbs like oregano or basil, a teaspoon of garlic powder, or even some grated Parmesan cheese for an extra flavor boost.
Gear Up for Success: Essential Baking Tools
While your bread machine does most of the heavy lifting, a few basic tools will make your baking journey smoother and more enjoyable.
- Bread Machine (The star of the show!)
- Mixing Bowl (Useful for pre-measuring or if you ever decide to hand-mix)
- Whisk (For quickly combining dry ingredients)
- Baking Pan (While your bread machine is the primary pan, a standard baking pan is great for other baking adventures!)
- Measuring Cups (Essential for accurate ingredient quantities)
- Measuring Spoons (Equally important for smaller quantities like yeast and salt)
- Spatula (Helpful for scraping bowls or removing your bread)
- Kitchen Scale (Optional, but highly recommended for precise measurements)
Nourishment Snapshot: Italian Bread Nutrition
Here’s an estimated nutritional breakdown per slice (based on a 1.5-2 lb loaf, yielding about 12-16 slices). Please note these are approximate values and can vary based on specific ingredients and loaf size.
| Nutrient | Amount (per slice, estimated) |
|---|---|
| Calories | 120-150 kcal |
| Carbohydrates | 25-30g |
| Protein | 4-5g |
| Fat | 2-3g |
| Fiber | 1-2g |
| Sugar | 1-2g |
Your Baking Questions Answered: FAQs
New to bread machines or baking in general? Don’t worry, we’ve got answers to some common beginner questions!
Why didn’t my bread rise properly?
There are a few common culprits! The most frequent reasons are old or inactive yeast (always check the expiration date!), water that was too hot (killing the yeast) or too cold (slowing it down too much), or too much salt (which can inhibit yeast). Ensure your ingredients are fresh and at the correct temperature. Also, make sure you’re using the correct amount of flour and water – a dough that’s too stiff or too wet won’t rise optimally.
Can I use whole wheat flour for this recipe?
Yes, you can, but it will result in a denser loaf with a different texture and flavor profile. Whole wheat flour absorbs more liquid, so you’ll likely need to increase the water by 1-2 tablespoons. It’s often recommended to start by substituting only half of the all-purpose flour with whole wheat flour to ease into the change and achieve a lighter texture. Always observe your dough during the first knead and adjust liquid as needed.
How do I store homemade bread to keep it fresh?
Once completely cooled, store your Italian bread in an airtight container, a bread box, or a sealed plastic bag at room temperature. It will stay fresh for about 3-4 days. For longer storage, slice the cooled bread and freeze the slices in an airtight freezer bag. You can then toast or thaw individual slices as needed. Avoid refrigerating bread, as it tends to dry out faster in the fridge.
What bread machine setting should I use for Italian bread?
Most bread machines have a “Basic,” “White,” or “French” setting that works perfectly for this Italian bread recipe. These cycles typically include proper kneading, rising, and baking times for a classic white bread loaf. If your machine offers a 2-pound loaf size option, select that. Choose a “Medium” crust setting for a beautiful golden-brown finish.
My bread machine paddle gets stuck in the loaf. How can I prevent this?
It’s common for the kneading paddle to get stuck! Many bread machines have a “remove paddle” alert during the last kneading cycle. If your machine has this feature, you can carefully remove the dough, take out the paddle, reshape the dough, and return it to the pan before the final rise and bake. If not, don’t worry. Once the bread is baked and removed from the pan, gently twist and pull the paddle out. You can also coat the paddle with a little cooking spray before adding ingredients to help it release more easily.
Bake, Share, Enjoy: Your Italian Bread Adventure Awaits!
Congratulations, you’ve now mastered the art of baking homemade Italian bread with your bread machine! There’s truly nothing quite like the smell and taste of a fresh, warm loaf straight from your kitchen. This recipe is not just about making bread; it’s about bringing joy, comfort, and delicious aromas into your home with minimal effort. Don’t be afraid to experiment with herbs, cheeses, or different flours as you gain confidence. Share your beautiful creations with friends and family, or simply savor a slice with your favorite meal. Happy baking, and enjoy every delightful crumb of your homemade Italian bread!