
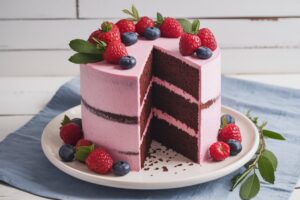
Welcome, aspiring bakers! Are you ready to dive into the wonderful world of baking but feel a little intimidated? Or perhaps you’re looking for delightful Kosher Cake Recipes that are both simple to follow and incredibly delicious? You’ve come to the right place! We believe that everyone can bake, and with the right guidance, you’ll be whipping up amazing treats in no time. This post is dedicated to sharing an easy baking recipe for a moist, rich Chocolate Fudge Cake that happens to be entirely pareve (dairy-free and meat-free), making it perfect for any Kosher meal or for anyone avoiding dairy.
We’ll walk you through every step, providing essential baking tips for beginners to ensure your first (or fiftieth!) cake is a resounding success. Forget complicated techniques; our goal is to make baking an enjoyable, stress-free experience. Get ready to impress your friends and family with a homemade cake that tastes like it came from a professional bakery, all while building your confidence in the kitchen!
What Does “Kosher” Mean for This Cake?
For this specific recipe, “Kosher” primarily means that all ingredients used are certified Kosher (indicated by a reliable hechsher on the packaging) and that the cake itself is “pareve.” Pareve items contain neither meat nor dairy, allowing them to be eaten with either. This means we’ll be using oil instead of butter and water (or coffee) instead of milk, making it incredibly versatile and suitable for those with dairy allergies or intolerances too!
Ingredients for Your Perfect Kosher Chocolate Fudge Cake
Before we begin, gather all your ingredients. This is a crucial step for beginners, often called “mise en place” – everything in its place. It makes the baking process much smoother!
| Ingredient | Quantity | Unit |
|---|---|---|
| All-Purpose Flour | 2 | cups |
| Granulated Sugar | 2 | cups |
| Unsweetened Cocoa Powder (natural) | 3/4 | cup |
| Baking Soda | 2 | teaspoons |
| Baking Powder | 1 | teaspoon |
| Salt | 1 | teaspoon |
| Large Eggs | 2 | |
| Vegetable Oil (or other neutral oil like canola) | 1/2 | cup |
| Vanilla Extract | 2 | teaspoons |
| Hot Water (or hot brewed coffee for richer flavor) | 1 | cup |
| Boiling Water | 1 | cup |
For the Pareve Chocolate Fudge Frosting:
| Ingredient | Quantity | Unit |
|---|---|---|
| Powdered Sugar (Confectioners’ Sugar) | 4 | cups |
| Unsweetened Cocoa Powder | 1/2 | cup |
| Vegetable Shortening or Pareve Margarine, softened | 1/2 | cup |
| Vanilla Extract | 1 | teaspoon |
| Hot Water (or hot brewed coffee) | 1/4 – 1/2 | cup |
Step-by-Step Instructions: Your Beginner’s Guide to Baking This Cake
Ready to bake? Follow these detailed steps carefully. Don’t rush, and remember that baking is a science, so precision helps a lot, especially for beginners!
Step 1: Prepare Your Baking Environment
- Preheat Your Oven: Turn your oven to 350°F (175°C). It’s important to preheat your oven for at least 15-20 minutes before baking to ensure it reaches and maintains the correct temperature. An oven that isn’t fully preheated can lead to uneven baking or a sunken cake.
- Prepare Your Pan(s): Grease and flour your baking pan(s). For this recipe, you can use either a 9×13 inch rectangular pan, or two 8-inch or 9-inch round cake pans.
- Greasing: Use a little vegetable oil or cooking spray to lightly coat the bottom and sides of your pan(s). Make sure to get into all the corners!
- Flouring: Sprinkle about 1-2 tablespoons of all-purpose flour into the greased pan(s). Tilt and tap the pan to spread the flour evenly over all greased surfaces, then tap out any excess flour. This creates a non-stick layer, ensuring your beautiful cake slides out easily after baking. Beginner Tip: Don’t skip this step! A stuck cake is a sad cake.
Step 2: Combine the Dry Ingredients
- In a large mixing bowl, combine the 2 cups all-purpose flour, 2 cups granulated sugar, 3/4 cup unsweetened cocoa powder, 2 teaspoons baking soda, 1 teaspoon baking powder, and 1 teaspoon salt.
- Using a whisk, mix these dry ingredients together thoroughly. Make sure there are no lumps of cocoa powder or baking soda. You want everything evenly distributed so the leavening agents (baking soda and powder) can work properly and give your cake a nice, even rise. Beginner Tip: Whisking dry ingredients together ensures they are well combined without needing to sift, which is one less step for you!
Step 3: Add the Wet Ingredients (Except Boiling Water)
- To the dry ingredients in your large bowl, add the 2 large eggs, 1/2 cup vegetable oil, and 2 teaspoons vanilla extract.
- Pour in 1 cup of hot water (or hot brewed coffee for a deeper, more complex chocolate flavor – highly recommended for chocolate lovers!). Beginner Tip: Using hot water helps to bloom the cocoa powder, intensifying its flavor and creating a smoother batter.
- Using an electric mixer on low speed, or a whisk and good old-fashioned arm power, mix everything until just combined. You’ll notice the batter is quite thick at this stage.
Step 4: The Secret Ingredient – Boiling Water!
- Carefully add the 1 cup of boiling water to the batter. The batter will become very thin and liquidy – don’t worry, this is exactly what you want! The boiling water helps create a super moist, tender crumb.
- Mix again on low speed (or with a whisk) until the boiling water is fully incorporated and the batter is smooth. Be careful not to splash the hot water. Common Beginner Mistake: Overmixing! Once the ingredients are just combined and smooth, stop mixing. Overmixing develops the gluten in the flour too much, leading to a tough, rubbery cake instead of a light and airy one.
Step 5: Bake Your Cake
- Pour the thin batter evenly into your prepared baking pan(s).
- Carefully transfer the pan(s) to your preheated oven.
- Bake for:
- 9×13 inch pan: 30-35 minutes
- 8-inch or 9-inch round pans: 25-30 minutes
- How to Check for Doneness: Insert a wooden skewer or toothpick into the center of the cake. If it comes out clean or with a few moist crumbs attached (but no wet batter), your cake is done! If it comes out with wet batter, bake for another 2-5 minutes and check again. Common Beginner Mistake: Opening the oven door too early or too often. This can cause the cake to cool rapidly and sink in the middle. Resist the urge until near the end of the baking time!
Step 6: Cool Your Cake
- Once baked, remove the cake from the oven and let it cool in the pan on a wire rack for about 10-15 minutes. This allows the cake to set and firm up, making it easier to handle.
- After 10-15 minutes, carefully invert the cake onto the wire rack to cool completely. If you baked in round pans, you might need to run a knife around the edges first. Beginner Tip: Cooling completely on a wire rack is crucial! If you try to frost a warm cake, the frosting will melt and slide right off. Patience is key here. This can take 1-2 hours.
Step 7: Prepare the Pareve Chocolate Fudge Frosting
- In a medium mixing bowl, combine the 4 cups powdered sugar and 1/2 cup unsweetened cocoa powder. Whisk well to remove any lumps.
- Add the 1/2 cup softened vegetable shortening or pareve margarine and 1 teaspoon vanilla extract.
- Using an electric mixer on low speed, gradually add the hot water (1/4 to 1/2 cup), starting with 1/4 cup. Mix until smooth and creamy. If the frosting is too thick, add more hot water, one tablespoon at a time, until you reach your desired spreading consistency. If it becomes too thin, add a little more powdered sugar.
Step 8: Frost and Enjoy!
- Once your cake is completely cool, use an offset spatula or a knife to spread the delicious pareve chocolate fudge frosting evenly over the top and sides of the cake.
- Slice, serve, and bask in the glory of your homemade, delicious Kosher Chocolate Fudge Cake!
Baking Tips & Tricks for Beginners
Baking can seem daunting, but these simple tips will help you achieve consistent success and build your confidence:
- Read the Entire Recipe First: Before you even touch an ingredient, read through the recipe from start to finish. This helps you understand the process and prevents surprises.
- Measure Accurately: Baking is precise. Use proper measuring cups for dry ingredients (levelled off with a straight edge) and liquid measuring cups for wet ingredients (at eye level). For best results, consider investing in a kitchen scale for flour and sugar.
- Room Temperature Ingredients: For recipes calling for eggs, having them at room temperature helps them incorporate more easily and create a smoother, more emulsified batter. If you forget, place eggs in a bowl of warm water for 5-10 minutes.
- Don’t Overmix: This is a golden rule in baking, especially for cakes. Mix wet and dry ingredients only until they are just combined. Overmixing develops gluten, leading to a tough, dry cake.
- Know Your Oven: Oven temperatures can vary significantly. An inexpensive oven thermometer can be a game-changer, helping you ensure your oven is truly at the temperature you set.
- Grease and Flour Properly: As mentioned, this is vital for easy cake release. Don’t skimp on this step!
- Patience with Cooling: Resist the urge to frost a warm cake. A fully cooled cake is easier to handle and ensures your frosting won’t melt.
- Kosher Certification: When making Kosher recipes, always double-check that all your ingredients bear a reliable Kosher certification (a hechsher) on their packaging.
Essential Baking Tools for Your Kitchen
Having the right tools makes baking much easier and more enjoyable. Here are some basics you’ll want to have on hand:
- Mixing Bowl Set: Various sizes are essential for different stages of mixing.
- Whisk: Perfect for combining dry ingredients and light batters.
- 9×13 Inch Baking Pan: A versatile pan for many cakes and brownies.
- Measuring Cups and Spoons Set: Crucial for accurate ingredient measurements.
- Rubber Spatula: Great for scraping down bowls and folding ingredients gently.
- Wire Rack: For cooling your cake evenly and preventing sogginess.
- Electric Hand Mixer: While a whisk works, an electric mixer makes light work of batters and frostings.
Nutrition Information (Estimated Per Serving)
Please note: These are estimated values and can vary based on specific ingredients and portion sizes. This calculation is based on approximately 16 servings for the entire cake including frosting.
| Nutrient | Amount (approx.) |
|---|---|
| Calories | 420 kcal |
| Total Carbohydrates | 68 g |
| Protein | 4 g |
| Total Fat | 18 g |
| Fiber | 2 g |
| Total Sugar | 48 g |
Frequently Asked Questions (FAQs) for Beginner Bakers
Q1: What does “Kosher” mean for this cake specifically?
For this recipe, “Kosher” means all ingredients used have a reliable Kosher certification (a hechsher). Additionally, this particular cake is “pareve,” meaning it contains neither dairy nor meat ingredients, making it suitable to be eaten with any meal according to Kosher dietary laws. This is why we use oil instead of butter and water/coffee instead of milk.
Q2: Can I substitute ingredients in this recipe?
While baking is a science, some substitutions are possible for beginners. You can use strong brewed coffee instead of hot water for a richer chocolate flavor. For the oil, any neutral-flavored vegetable oil like canola, sunflower, or grapeseed oil will work. For the frosting, pareve margarine can be used instead of vegetable shortening. However, for flour, sugar, and leavening agents (baking soda/powder), stick to the recipe for best results.
Q3: How do I know if my cake is overmixed?
An overmixed cake batter will often appear very smooth and elastic, almost like bread dough. After baking, an overmixed cake tends to be tough, dense, and chewy, rather than light and tender. To avoid this, mix only until the ingredients are just combined and no streaks of flour remain.
Q4: Why did my cake sink in the middle after baking?
A sunken cake can happen for a few reasons:
- Oven Door Opened Too Early: Opening the oven door before the cake is set can cause it to collapse.
- Underbaked: The cake wasn’t fully cooked through, and the center didn’t have enough structure to hold up.
- Too Much Leavening: Using too much baking soda or baking powder can cause the cake to rise too quickly and then collapse.
- Expired Leavening Agents: Old baking soda or powder might not work effectively.
- Oven Temperature Fluctuations: An inconsistent oven temperature can also be a culprit.
Make sure your oven is properly preheated and don’t open the door until near the end of the baking time.
Q5: How long will this cake stay fresh?
This Kosher Chocolate Fudge Cake will stay fresh at room temperature, covered, for 2-3 days. In the refrigerator, it can last up to 5 days. For longer storage, you can freeze individual slices or the whole unfrosted cake (well-wrapped) for up to 2-3 months. Thaw in the refrigerator before frosting or serving.
Conclusion: Your Baking Journey Begins Here!
Congratulations, you’ve now mastered a delicious and easy Kosher Cake Recipe! This Chocolate Fudge Cake is not only incredibly moist and flavorful but also serves as a fantastic foundation for your baking adventures. Remember, every master baker started somewhere, and every “mistake” is just a learning opportunity.
Don’t be afraid to get your hands a little messy, follow the steps, and most importantly, have fun! The aroma of a freshly baked cake filling your home is one of life’s simple pleasures. We hope these baking tips for beginners have equipped you with the confidence to try this recipe and many more. Enjoy your homemade treat, and happy baking!
If you tried this recipe, we’d love to hear about it in the comments below! Share your successes, ask questions, or tell us what you’d like to bake next.
“`