
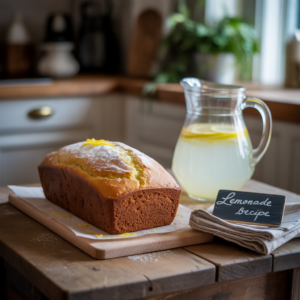
Welcome, baking enthusiasts and kitchen novices alike! Are you ready to dive into the wonderful world of baking with a recipe that’s as delightful to make as it is to eat? Our Lemonade Bread Recipe is here to brighten your day with its sunny flavor and incredibly simple steps. This quick bread is the perfect choice for anyone looking for easy baking recipes, offering a burst of zesty lemon in every moist, tender slice.

Forget complicated techniques and intimidating ingredient lists – this recipe is designed with baking tips for beginners in mind, ensuring a stress-free and delicious experience. Whether you’re whipping up a treat for breakfast, an afternoon snack, or a thoughtful gift, this Lemonade Bread will quickly become a favorite. Let’s gather our ingredients and get ready to bake something truly special!
Ingredients You’ll Need

Gathering all your ingredients before you start is a key baking tip for beginners – it makes the process much smoother! Here’s what you’ll need for your delicious Lemonade Bread and its sweet glaze.
For the Lemonade Bread:
| Ingredient | Quantity |
|---|---|
| All-Purpose Flour | 1 ½ cups |
| Granulated Sugar | ½ cup |
| Baking Powder | 1 ½ teaspoons |
| Salt | ½ teaspoon |
| Large Eggs | 2 (room temperature) |
| Whole Milk | ½ cup (room temperature) |
| Unsalted Butter, melted | ¼ cup |
| Fresh Lemon Zest | 2 tablespoons (from 2-3 lemons) |
| Fresh Lemon Juice | ¼ cup (from 2-3 lemons) |
For the Lemon Glaze:
| Ingredient | Quantity |
|---|---|
| Powdered Sugar (Confectioners’ Sugar) | 1 cup |
| Fresh Lemon Juice | 2-3 tablespoons |
Step-by-Step Instructions: Your Path to Perfect Lemonade Bread
Follow these detailed instructions to bake your first (or next!) perfect loaf of Lemonade Bread. We’ve included extra tips to make sure every step is clear and easy, especially for beginners!
Step 1: Prepare Your Oven and Pan
Before you even think about mixing, let’s get the oven ready! **Preheat your oven to 350°F (175°C)**. This ensures your oven is at the correct temperature when the batter goes in, which is crucial for even baking. Next, prepare a 9×5 inch loaf pan. You can either grease and flour it (grease lightly with butter or cooking spray, then dust with a tablespoon of flour, tapping out the excess) or line it with parchment paper, leaving an overhang on the sides. The parchment paper method makes it super easy to lift the bread out once it’s baked and cooled.
Step 2: Combine the Dry Ingredients
In a large mixing bowl, combine the **all-purpose flour, granulated sugar, baking powder, and salt**. Use a whisk to gently mix them together until they are well combined. This ensures that the leavening agents (baking powder) are evenly distributed, leading to a consistent rise in your bread. **Beginner Tip:** When measuring flour, spoon it into your measuring cup and then level it off with a straight edge (like the back of a knife). Don’t scoop directly from the bag, as this can compact the flour and lead to too much flour, resulting in a dry bread.
Step 3: Mix the Wet Ingredients
In a separate, medium-sized bowl, whisk together the **room temperature eggs, room temperature milk, melted unsalted butter, fresh lemon zest, and fresh lemon juice**. Using room temperature ingredients helps them emulsify better and creates a smoother, more uniform batter, which ultimately leads to a more tender and moist bread. The lemon zest is where a lot of that bright, fresh lemon flavor comes from, so don’t skip it!
Common Mistake & Alternative: If your eggs and milk aren’t at room temperature, you can speed it up. For eggs, place them in a bowl of warm (not hot!) water for 5-10 minutes. For milk, microwave it for 15-20 seconds.
Step 4: Combine Wet and Dry Ingredients
Pour the wet ingredient mixture into the bowl with the dry ingredients. Using a spatula or wooden spoon, gently mix them together until *just combined*. It’s okay if there are a few small lumps of flour – in fact, it’s better! **Do not overmix the batter.** Overmixing develops the gluten in the flour too much, which can make your Lemonade Bread tough and dense instead of light and tender. Mix only until no dry streaks of flour remain.
Step 5: Fill the Pan and Bake
Pour the batter evenly into your prepared loaf pan. Give the pan a gentle tap or two on the counter to help settle the batter and remove any large air bubbles. Place the loaf pan into your preheated oven. **Bake for 45-55 minutes**, or until a wooden skewer or toothpick inserted into the center of the bread comes out clean or with only a few moist crumbs attached. The top should be golden brown. Around the 30-minute mark, if the top is browning too quickly, you can loosely tent the loaf with aluminum foil to prevent over-browning.
Step 6: Cool the Bread
Once baked, remove the loaf pan from the oven. Let the bread cool in the pan for about **10-15 minutes**. This crucial step allows the bread to set and prevents it from falling apart when you remove it. After 10-15 minutes, carefully lift the bread out of the pan (using the parchment paper overhang if you used it) and transfer it to a wire rack to cool completely. Cooling on a wire rack allows air to circulate around all sides, preventing the bottom from becoming soggy. **Do not glaze warm bread**, as the glaze will simply melt off.
Step 7: Prepare the Lemon Glaze
While the bread is cooling, you can prepare your delicious lemon glaze. In a small bowl, combine the **powdered sugar** and **2 tablespoons of fresh lemon juice**. Whisk until completely smooth. If the glaze is too thick, add a tiny bit more lemon juice (¼ teaspoon at a time) until it reaches a pourable, but still thick, consistency. If it’s too thin, add a little more powdered sugar. You want it to be thick enough to cling to the bread but thin enough to drizzle.
Step 8: Glaze and Serve!
Once your Lemonade Bread is completely cool, drizzle the prepared lemon glaze generously over the top. You can use a spoon to create an even coating or a fork for a more rustic drizzle. Let the glaze set for about 10-15 minutes before slicing and serving. The glaze will harden slightly, creating a lovely sweet and tangy finish. Slice your beautiful Lemonade Bread and enjoy!
Tips & Tricks for Lemonade Bread Success
To ensure your Lemonade Bread turns out perfectly every time, here are some invaluable **baking tips for beginners** and seasoned bakers alike:
- Room Temperature Ingredients are Key: This isn’t just a suggestion! Room temperature eggs and milk emulsify better with the melted butter, creating a smoother batter and a more tender, uniform crumb in your bread.
- Don’t Overmix: This is arguably the most common mistake in quick bread baking. Mix your wet and dry ingredients only until *just combined*. A few lumps are perfectly fine. Overmixing develops gluten, leading to a tough, chewy bread instead of a soft, tender one.
- Measure Flour Correctly: Always spoon flour into your measuring cup and level it off with a straight edge. Scooping directly from the bag compacts the flour, adding too much to your recipe, which results in a dry loaf.
- Use Fresh Lemon Juice and Zest: The flavor difference between fresh and bottled lemon juice is significant! Fresh zest also contains aromatic oils that give your bread that vibrant, authentic lemon taste.
- Test for Doneness: Use the toothpick test. If it comes out clean or with moist crumbs, your bread is ready. If it’s still wet, give it a few more minutes. Avoid opening the oven door too frequently during baking, especially in the first 30 minutes, as this can cause the bread to sink.
- Cool Completely Before Glazing: Patience is a virtue here! Glazing a warm loaf will cause the glaze to melt and soak into the bread, losing its beautiful finish and distinct texture.
- Storage: Store your Lemonade Bread at room temperature in an airtight container for up to 3-4 days. For longer storage, you can wrap it tightly and freeze it for up to 3 months. Thaw at room temperature before serving.
- Adjust Glaze Consistency: Don’t be afraid to adjust the glaze. Too thick? Add a tiny bit more lemon juice. Too thin? Add a little more powdered sugar. It should be pourable but still opaque.
Essential Baking Tools
Having the right tools makes baking a breeze! Here are some essentials you’ll want for this recipe, with convenient links to find them:
- Mixing Bowl
- Whisk
- Baking Pan (9×5 inch loaf pan)
- Measuring Cups
- Spatula
- Measuring Spoons
- Lemon Zester/Grater
- Wire Rack
Nutrition Information (Estimated per slice, 1/12th of loaf)
Please note: These are estimated values and can vary based on specific ingredients and portion sizes.
| Nutrient | Amount |
|---|---|
| Calories | 280 kcal |
| Carbohydrates | 52 g |
| Protein | 4 g |
| Fat | 8 g |
| Fiber | 1 g |
| Sugar | 30 g |
Frequently Asked Questions (FAQs)
Q1: Why is my Lemonade Bread dry?
A1: Dry bread is typically caused by one of two things: **overmixing the batter** (which develops too much gluten, making the bread tough and dry) or **overbaking** (which dries out the moisture). Ensure you mix just until combined and use the toothpick test to avoid baking for too long.
Q2: Can I use bottled lemon juice instead of fresh?
A2: While fresh lemon juice and zest provide the best, most vibrant flavor, you can use bottled lemon juice in a pinch. However, be aware that the flavor won’t be as bright or complex. Always opt for fresh if possible, especially for the zest!
Q3: How do I know when the Lemonade Bread is fully baked?
A3: The best way to check is by inserting a wooden skewer or toothpick into the center of the loaf. If it comes out clean or with only a few moist crumbs attached, your bread is done. The top should also be golden brown, and the edges will start to pull away slightly from the pan.
Q4: Can I add other ingredients to this recipe?
A4: Absolutely! This Lemonade Bread recipe is wonderfully versatile. You can add ½ cup of poppy seeds for a Lemon Poppy Seed Bread, or a handful of fresh blueberries (toss them in a tablespoon of flour first to prevent sinking) for a Lemon Blueberry Bread. Get creative!
Q5: How long does Lemonade Bread last, and how should I store it?
A5: Your Lemonade Bread will stay fresh at room temperature for 3-4 days when stored in an airtight container. For longer storage, you can wrap it tightly in plastic wrap and then foil, and freeze it for up to 3 months. Thaw it at room temperature before serving.
Q6: My glaze is too thick/thin. How can I fix it?
A6: Easily! If your glaze is too thick, add a tiny bit more lemon juice (start with ¼ teaspoon) and whisk until it reaches your desired consistency. If it’s too thin, add a little more powdered sugar (a tablespoon at a time) until it’s perfect. You want it thick enough to coat a spoon but still pourable.
Time to Enjoy Your Zesty Creation!
And there you have it! A wonderfully simple, incredibly delicious, and utterly delightful Lemonade Bread Recipe that’s perfect for any occasion. We hope this beginner-friendly guide has given you the confidence to step into your kitchen and create something truly special. The vibrant lemon flavor and tender crumb of this bread are sure to put a smile on your face and those you share it with.

Baking is a journey, and every loaf is a learning experience. Don’t be afraid to experiment, and most importantly, have fun! We’d love to hear how your Lemonade Bread turned out. Feel free to leave a comment below with your thoughts or any questions you might have. Happy baking!
“`